Creative Woodworks & crafts 2000-03, страница 103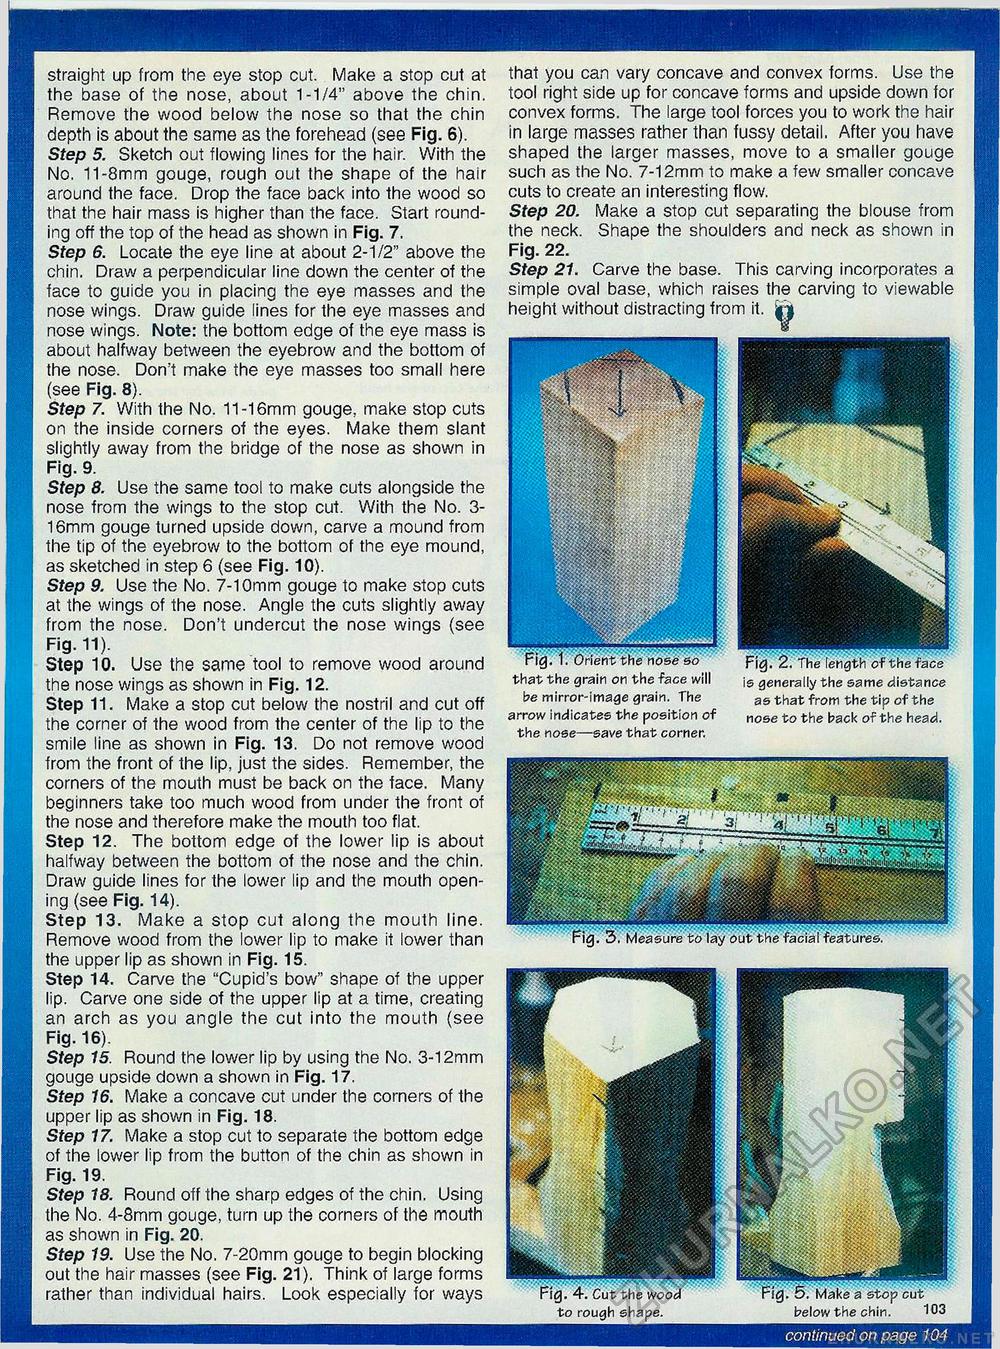
straight up from the eye stop cut. Make a stop cut at the base of the nose, about 1-1/4" above the chin. Remove the wood below the nose so that the chin depth is about the same as the forehead (see Fig. 6). Step 5. Sketch out flowing lines for the hair. With the No. 11-8mm gouge, rough out the shape of the hair around the face. Drop the face back into the wood so that the hair mass is higher than the face. Start rounding off the top of the head as shown in Fig. 7. Step 6. Locate the eye line at about 2-1/2" above the chin. Draw a perpendicular line down the center of the face to guide you in placing the eye masses and the nose wings. Draw guide lines for the eye masses and nose wings. Note: the bottom edge of the eye mass is about halfway between the eyebrow and the bottom of the nose. Don't make the eye masses too small here (see Fig. 8). Step 7. With the No. 11-16mm gouge, make stop cuts on the inside corners of the eyes. Make them slant slightly away from the bridge of the nose as shown in Fig. 9. Step 8. Use the same tool to make cuts alongside the nose from the wings to the stop cut. With the No. 3-16mm gouge turned upside down, carve a mound from the tip of the eyebrow to the bottom of the eye mound, as sketched in step 6 (see Fig. 10). Step 9. Use the No. 7-1 Omm gouge to make stop cuts at the wings of the nose. Angle the cuts slightly away from the nose. Don't undercut the nose wings (see Fig. 11). Step 10. Use the same tool to remove wood around the nose wings as shown in Fig. 12. Step 11. Make a stop cut below the nostril and cut off the corner of the wood from the center of the lip to the smile line as shown in Fig. 13. Do not remove wood from the front of the lip, just the sides. Remember, the corners of the mouth must be back on the face. Many beginners take too much wood from under the front of the nose and therefore make the mouth too flat. Step 12. The bottom edge of the lower lip is about halfway between the bottom of the nose and the chin. Draw guide lines for the lower lip and the mouth opening (see Fig. 14). Step 13. Make a stop cut along the mouth line. Remove wood from the lower lip to make it lower than the upper lip as shown in Fig. 15. Step 14. Carve the "Cupid's bow" shape of the upper lip. Carve one side of the upper lip at a time, creating an arch as you angle the cut into the mouth (see Fig. 16). Step 15. Round the lower lip by using the No. 3-12mm gouge upside down a shown in Fig. 17. Step 16. Make a concave cut under the corners of the upper lip as shown in Fig. 18. Step 17. Make a stop cut to separate the bottom edge of the lower lip from the button of the chin as shown in Fig. 19. Step 18. Round off the sharp edges of the chin. Using the No. 4-8mm gouge, turn up the corners of the mouth as shown in Fig. 20. Step 19. Use the No. 7-20mm gouge to begin blocking out the hair masses (see Fig. 21). Think of large forms rather than individual hairs. Look especially for ways that you can vary concave and convex forms. Use the tool right side up for concave forms and upside down for convex forms. The large tool forces you to work the hair in large masses rather than fussy detail, After you have shaped the larger masses, move to a smaller gouge such as the No. 7-12mm to make a few smaller concave cuts to create an interesting flow. Step 20. Make a stop cut separating the blouse from the neck. Shape the shoulders and neck as shown in Fig. 22. Step 21. Carve the base. This carving incorporates a simple oval base, which raises the carving to viewable height without distracting from it. jr| that the grain on the face will be mirror-image grain. The arrow indicates the position of the nose—save that corner. is generally the same distance as that from the tip of the nose to the back of the head. continued on page 104 |


