Creative Woodworks & crafts 2000-03, страница 113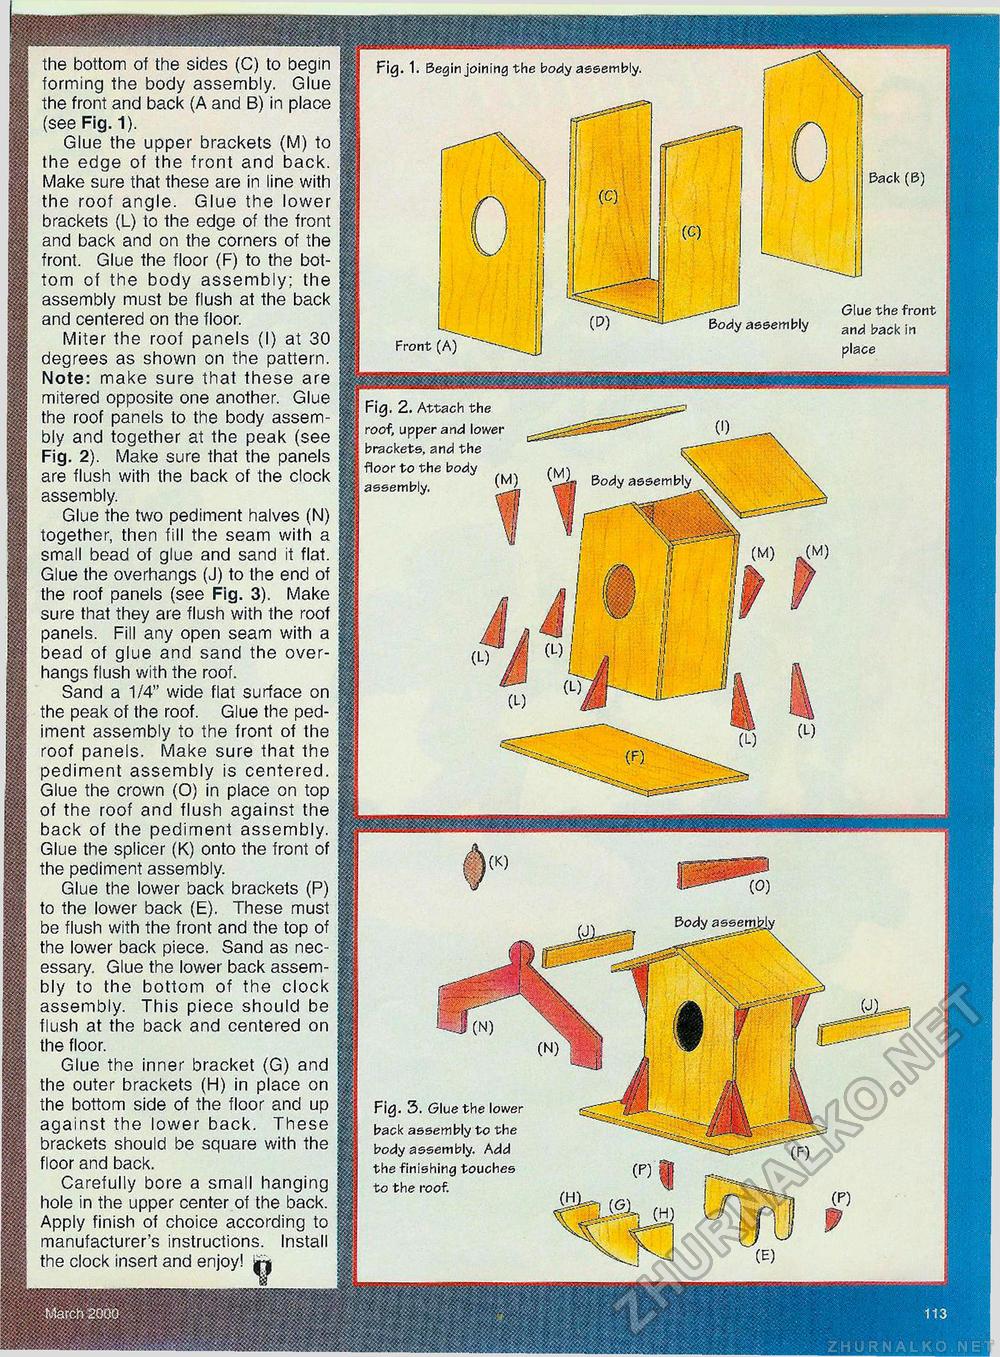
wmMmM the bottom of the sides (C) to begin forming the body assembly. Glue the front and back (A and B) in place (see Fig. 1). Glue the upper brackets (M) to the edge of the front and back. Make sure that these are in line with the roof angle. Glue the lower brackets (L) to the edge of the front and back and on the corners of the front. Glue the floor (F) to the bottom of the body assembly; the assembly must be flush at the back and centered on the floor. Miter the roof panels (I) at 30 degrees as shown on the pattern. Note: make sure that these are mitered opposite one another. Glue the roof panels to the body assembly and together at the peak (see Fig. 2). Make sure that the panels are flush with the back of the clock assembly. Glue the two pediment halves (N) together, then fill the seam with a small bead of glue and sand it flat. Glue the overhangs (J) to the end of the roof panels (see Fig. 3). Make sure that they are flush with the roof panels. Fill any open seam with a bead of glue and sand the overhangs flush with the roof. Sand a 1/4" wide flat surface on the peak of the roof. Glue the pediment assembly to the front of the roof panels. Make sure that the pediment assembly is centered. Glue the crown (O) in place on top of the roof and flush against the back of the pediment assembly. Glue the splicer (K) onto the front of the pediment assembly. Glue the lower back brackets (P) to the lower back (E). These must be flush with the front and the top of the lower back piece. Sand as necessary. Glue the lower back assembly to the bottom of the clock assembly. This piece should be flush at the back and centered on the floor. Glue the inner bracket (G) and the outer brackets (H) in place on the bottom side of the floor and up against the lower back. These brackets should be square with the floor and back. Carefully bore a small hanging hole in the upper center of the back. Apply finish of choice according to manufacturer's instructions. Install the clock insert and enjoy! ^ fr^M+^ZZ: S'iii V/ Fig. 1. Begin joining the body assembly. Back(B) Front (A) Body assembly Glue the front and back in place Fig. 2. Attach the roof, upper and lower brackets, and the floor to the body assembly. Body assembly Fig. 3. Glue the lower back assembly to the body assembly. Add the finishing touches to the roof. |


