Creative Woodworks & crafts 2000-03, страница 25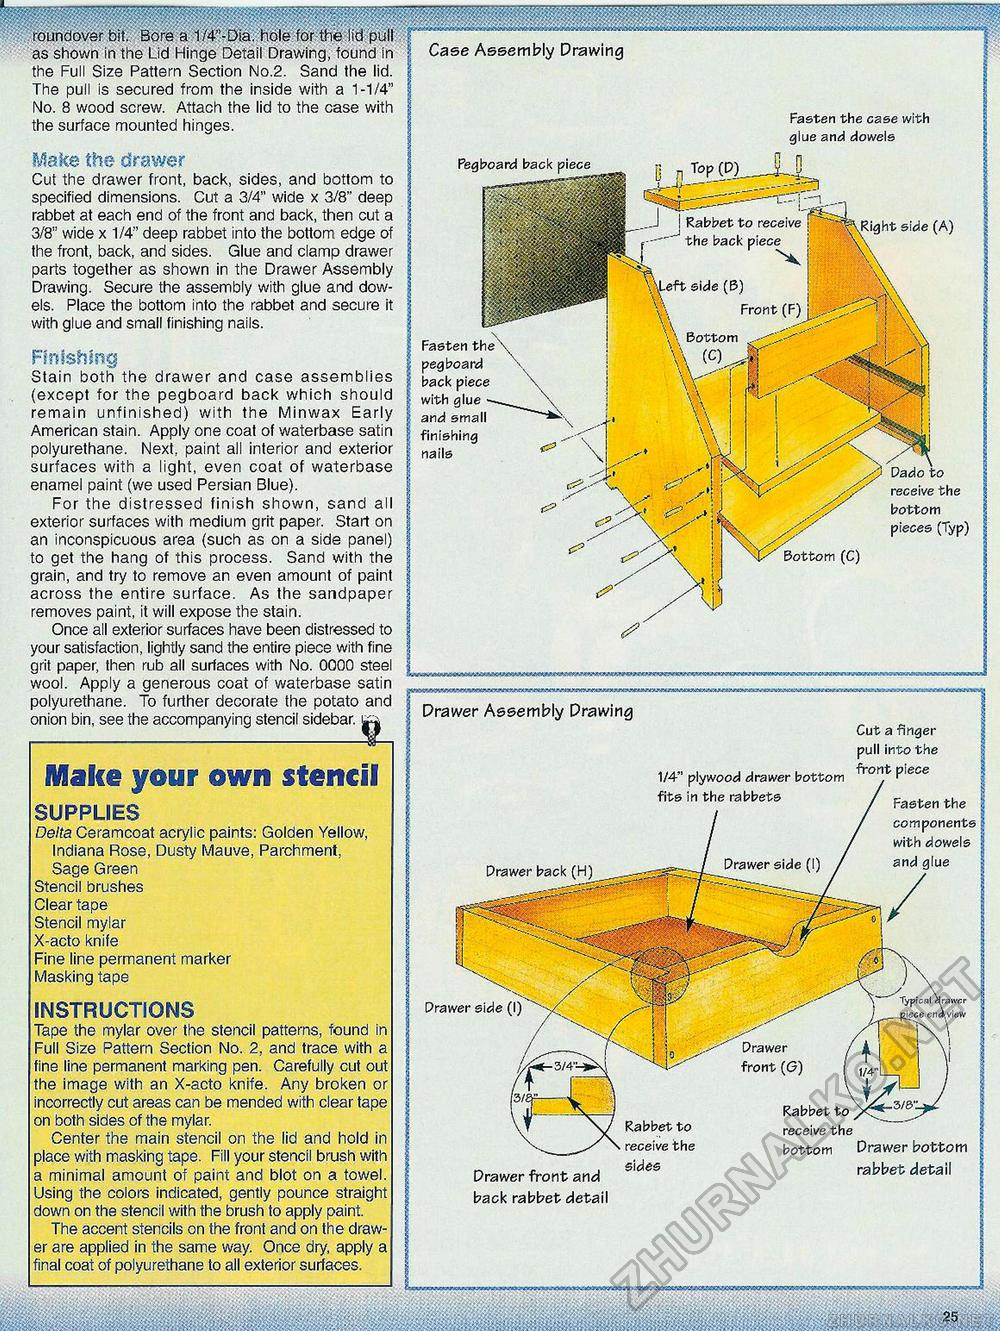
mm Case Assembly Drawing Rabbet to receive the back piece Front \ Bottom W (CU Drawer side (I) Iraivcr Prawer side (I) Drawer front (<5) Rabbet to receive the bottom Drawer bottom rabbet detail Rabbet to receive the sides Drawer front and back rabbet detail as shown in the Lid Hinge Detail Drawing, found in the Full Size Pattern Section No.2. Sand the lid. The pull is secured from the inside with a 1-1/4" No. 8 wood screw. Attach the lid to the case with the surface mounted hinges. Make the drawer Cut the drawer front, back, sides, and bottom to specified dimensions. Cut a 3/4" wide x 3/8" deep rabbet at each end of the front and back, then cut a 3/8" wide x 1/4" deep rabbet into the bottom edge of the front, back, and sides. Glue and clamp drawer parts together as shown in the Drawer Assembly Drawing. Secure the assembly with glue and dowels. Place the bottom into the rabbet and secure it with glue and small finishing nails. Fmishmg Stain both the drawer and case assemblies (except for the pegboard back which should remain unfinished) with the Minwax Early American stain. Apply one coat of waterbase satin polyurethane. Next, paint all interior and exterior surfaces with a light, even coat of waterbase enamel paint (we used Persian Blue). For the distressed finish shown, sand all exterior surfaces with medium grit paper. Start on an inconspicuous area (such as on a side panel) to get the hang of this process. Sand with the grain, and try to remove an even amount of paint across the entire surface. As the sandpaper removes paint, it will expose the stain. Once all exterior surfaces have been distressed to your satisfaction, lightly sand the entire piece with fine grit paper, then rub all surfaces with No. 0000 steel wool. Apply a generous coat of waterbase satin polyurethane. To further decorate the potato and onion bin, see the accompanying stencil sidebar, ti Malce your own stencil SUPPLIES Delta Ceramcoat acrylic paints: Golden Yellow, Indiana Rose, Dusty Mauve, Parchment, Sage Green Stencil brushes Clear tape Stencil mylar X-acto knife Fine line permanent marker Masking tape Fasten the case with glue and dowels Pegboard back piece Right side (A) Fasten the pegboard back piece with glue and small finishing nails Dado to receive the bottom pieces (Typ) w Bottom (C) Drawer Assembly Drawing Cut a finger pull into the 1/4" plywood drawer bottom Plece fits in the rabbets / r- Fasten the components with dowels and glue Prawer back (H) __ INSTRUCTIONS Tape the mylar over the stencil patterns, found in Full Size Pattern Section No. 2, and trace with a fine line permanent marking pen. Carefully cut out the image with an X-acto knife. Any broken or incorrectly cut areas can be mended with clear tape on both sides of the mylar. Center the main stencil on the lid and hold in place with masking tape. Fill your stencil brush with a minimal amount of paint and blot on a towel. Using the colors indicated, gentiy pounce straight down on the stencil with the brush to apply paint. The accent stencils on the front and on the drawer are applied in the same way. Once dry, apply a final coat of polyurethane to all exterior surfaces. |


