Creative Woodworks & crafts 2000-03, страница 47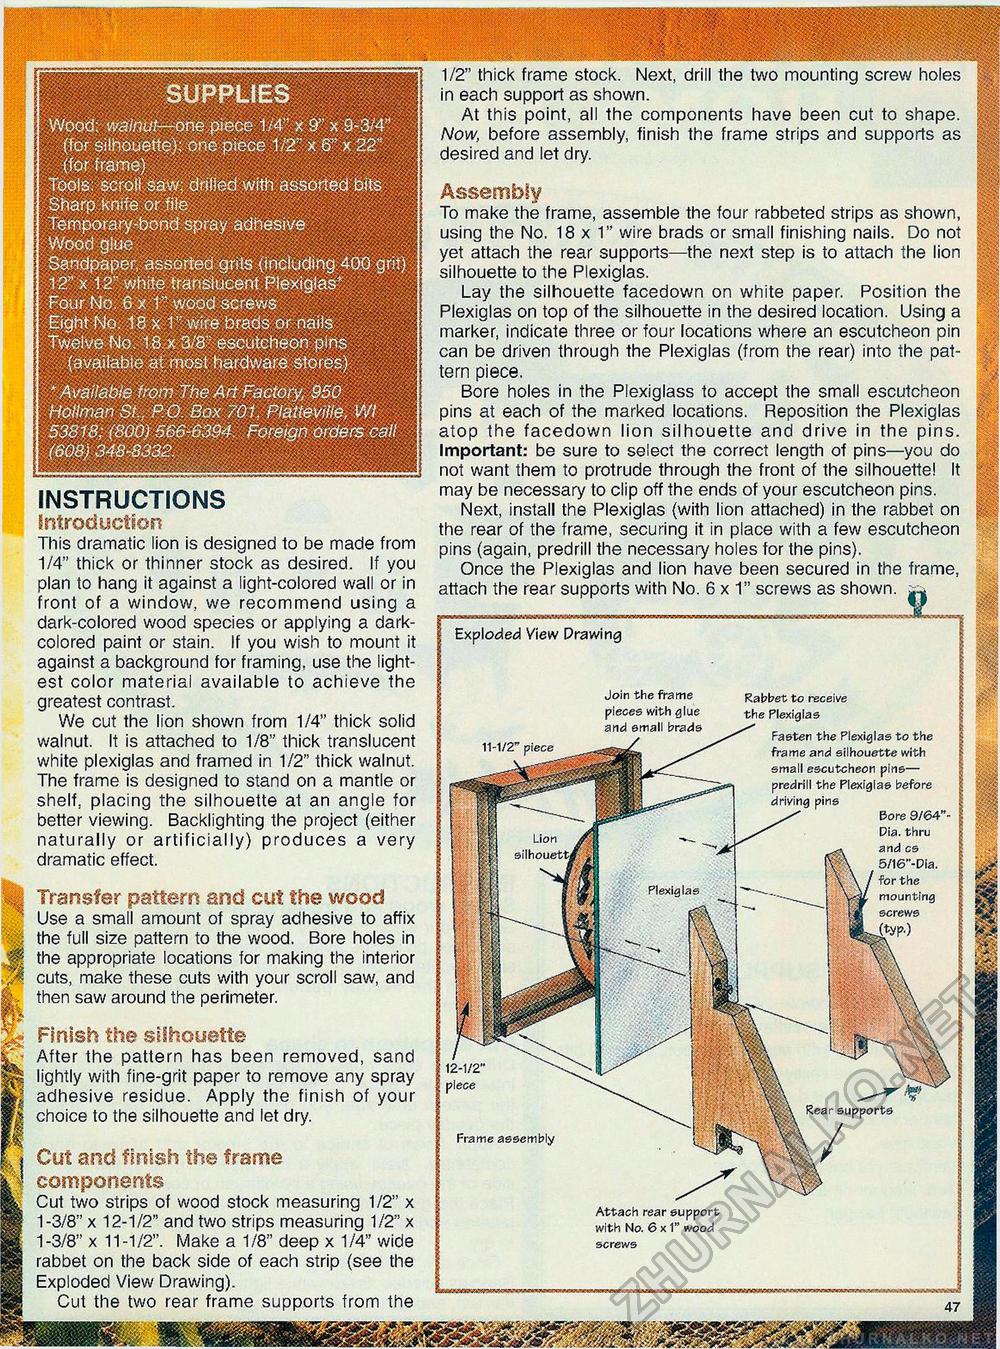
arid email brads Faster the Plexiglas to the frame and silhouette with small escutcheon pins— predrill the Plexigla6 before driving pins Bore 9/64' Dia. thru and cs \ \ 5/16"-Dia. \ \ / for the ^ ^ \ y^L mounting lijjs screws ; Wr-J^P') Lion silhouetti Plexig las Rear supports BHHH9HBHBI ■■■■■■■■■■■■■■■■■■■I SUPPLIES Wood: walnut—one piece 1/4" x 9" x 9-3/4"; ; (for silhouette); one piece 1/2" x 6" x 22" Tools: scroll saw; drifted with assorted bits Sharp knife or file Temporary-bond spray adnesive Wood giue Sandpaper assorted grits (including 400 grit) 12" x 12" white translucent Plexiglas* Four No 6x1" wood screws Eight No. 18 x 11 wire brads or nails Twelve No. 18 x 3/8" escutcheon pins (available at most hardware stores) * Available from The Art Factory, 950 Holiman St., P.O. Box 701. Plattevilie, Wt , 53818; (800) 566-6394. Foreign orders call \ (608)348-8332 INSTRUCTIONS introduction This dramatic lion is designed to be made from 1/4" thick or thinner stock as desired. If you plan to hang it against a light-colored wall or in front of a window, we recommend using a dark-colored wood species or applying a dark-colored paint or stain. If you wish to mount it against a background for framing, use the lightest color material available to achieve the greatest contrast. We cut the lion shown from 1/4" thick solid walnut. It is attached to 1/8" thick translucent white plexiglas and framed in 1/2" thick walnut. The frame is designed to stand on a mantle or shelf, placing the silhouette at an angle for better viewing. Backlighting the project (either naturally or artificially) produces a very dramatic effect. 1/2" thick frame stock. Next, drill the two mounting screw holes in each support as shown. At this point, all the components have been cut to shape. Now, before assembly, finish the frame strips and supports as desired and let dry. Assembly To make the frame, assemble the four rabbeted strips as shown, using the No. 18x1" wire brads or small finishing nails. Do not yet attach the rear supports—the next step is to attach the lion silhouette to the Plexiglas. Lay the silhouette facedown on white paper. Position the Plexiglas on top of the silhouette in the desired location. Using a marker, indicate three or four locations where an escutcheon pin can be driven through the Plexiglas (from the rear) into the pattern piece. Bore holes in the Plexiglass to accept the small escutcheon pins at each of the marked locations. Reposition the Plexiglas atop the facedown lion silhouette and drive in the pins. Important: be sure to select the correct length of pins—you do not want them to protrude through the front of the silhouette! It may be necessary to clip off the ends of your escutcheon pins. Next, install the Plexiglas (with lion attached) in the rabbet on the rear of the frame, securing it in place with a few escutcheon pins (again, predrill the necessary holes for the pins). Once the Plexiglas and lion have been secured in the frame, attach the rear supports with No. 6x1" screws as shown. Exploded View Prawing Attach rear support with No. 6 x 1" wood screws Finish the silhouette After the pattern has been removed, sand lightly with fine-grit paper to remove any spray adhesive residue. Apply the finish of your choice to the silhouette and let dry. Cut and finish the frame components Cut two strips of wood stock measuring 1/2" x 1-3/8" x 12-1/2" and two strips measuring 1/2" x 1-3/8" x 11-1/2". Make a 1/8" deep x 1/4" wide rabbet on the back side of each strip (see the Exploded View Drawing). Cut the two rear frame supports from the Transfer pattern end cut the wood Use a small amount of spray adhesive to affix the full size pattern to the wood. Bore holes in the appropriate locations for making the interior cuts, make these cuts with your scroll saw, and then saw around the perimeter. 12-1/2" piece Frame assembly 11-1/2" piece |


