Creative Woodworks & crafts 2000-03, страница 95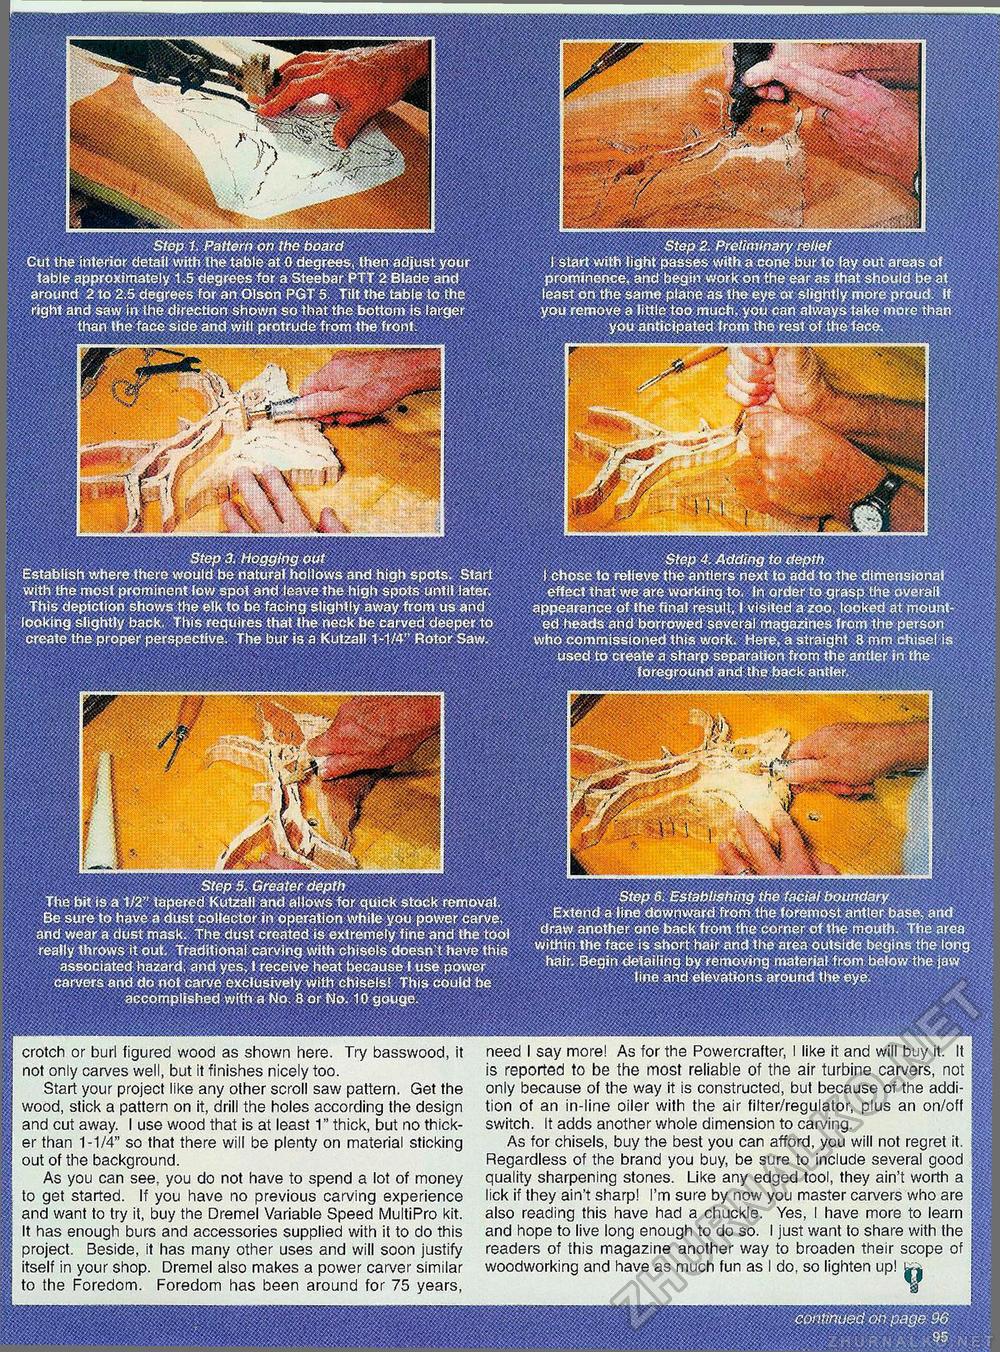
Step 1. Pattern on the board Cut the interior detail with the table at 0 degrees, then adjust your table approximately 1.5 degrees for a Steebar PTT 2 Blade and around 2 to 2.5 degrees for an Olson PGT 5. Tilt the table to the right and saw in the direction shown so that the bottom is larger than the face side and will protrude from the front. Step 2. Preliminary relief I start with light passes with a cone bur to lay out areas of prominence, and begin work on the ear as that should be at least on the same plane as the eye or slightly more proud, if you remove a little too much, you can always take more than you anticipated from the rest of the face. Step 3. Hogging out Establish where there Would be natural hollows and high spots. Start with the most prominent low spot and leave the high spots until later, this depiction shows the elk to be facing slightly away from us and looking slightly back. This requires that the neck be carved deeper to create the proper perspective. The bur is a Kutzall 1-1/4" Rotor Saw. Step 4. Adding to depth 1 chose to relieve the antlers next to add to the dimensional effect that we are working to. In order to grasp the overall appearance of the final result, I visited a zoo. looked at mounted heads and borrowed several magazines from the person who commissioned this work. Here, a straight 8 mm chisel is used to create a sharp separation from the antler in the foreground and the back antler. Step 5. Greater depth The bit is a 1/2" tapered Kutzall and allows for quick stock removal. Be sure to have a dust collector in operation while you power carve, and wear a dust mask. The dust created is extremely fine and the tool really throws it out. Traditional carving with chisels doesn't have this associated hazard, and yes, I receive heat because fuse power : carvers and do not carve exclusively with chisels! This could be accomplished with a No. 8 or No. 10 gouge. Step 6. Establishing the facial boundary Extend a line downward from the foremost antler base, and draw another one back from the corner of the mouth. The area within the face is short hair and the area outside begins the long hair. Begin detailing by removing material from below the jaw tine and elevations around the eye. continued on page 96 95 need I say more! As for the Powercrafter, I like it and will buy it. It is reported to be the most reliable of the air turbine carvers, not only because of the way it is constructed, but because of the addition of an in-line oiler with the air filter/regulator, plus an on/off switch. It adds another whole dimension to carving. As for chisels, buy the best you can afford, you will not regret it. Regardless of the brand you buy, be sure to include several good quality sharpening stones. Like any edged tool, they ain't worth a lick if they ain't sharp! I'm sure by now you master carvers who are also reading this have had a chuckle. Yes, I have more to learn and hope to live long enough to do so. I just want to share with the readers of this magazine another way to broaden their scope of woodworking and have as much fun as I do, so lighten up! wi crotch or burl figured wood as shown here. Try basswood, it not only carves well, but it finishes nicely too. Start your project like any other scroll saw pattern. Get the wood, stick a pattern on it, drill the holes according the design and cut away. I use wood that is at least 1" thick, but no thicker than 1-1/4" so that there will be plenty on material sticking out of the background. As you can see, you do not have to spend a lot of money to get started. If you have no previous carving experience and want to try it, buy the Dremel Variable Speed MultiPro kit. It has enough burs and accessories supplied with it to do this project. Beside, it has many other uses and will soon justify itself in your shop. Dremel also makes a power carver similar to the Foredom. Foredom has been around for 75 years, |


