Creative Woodworks & crafts 2000-06, страница 44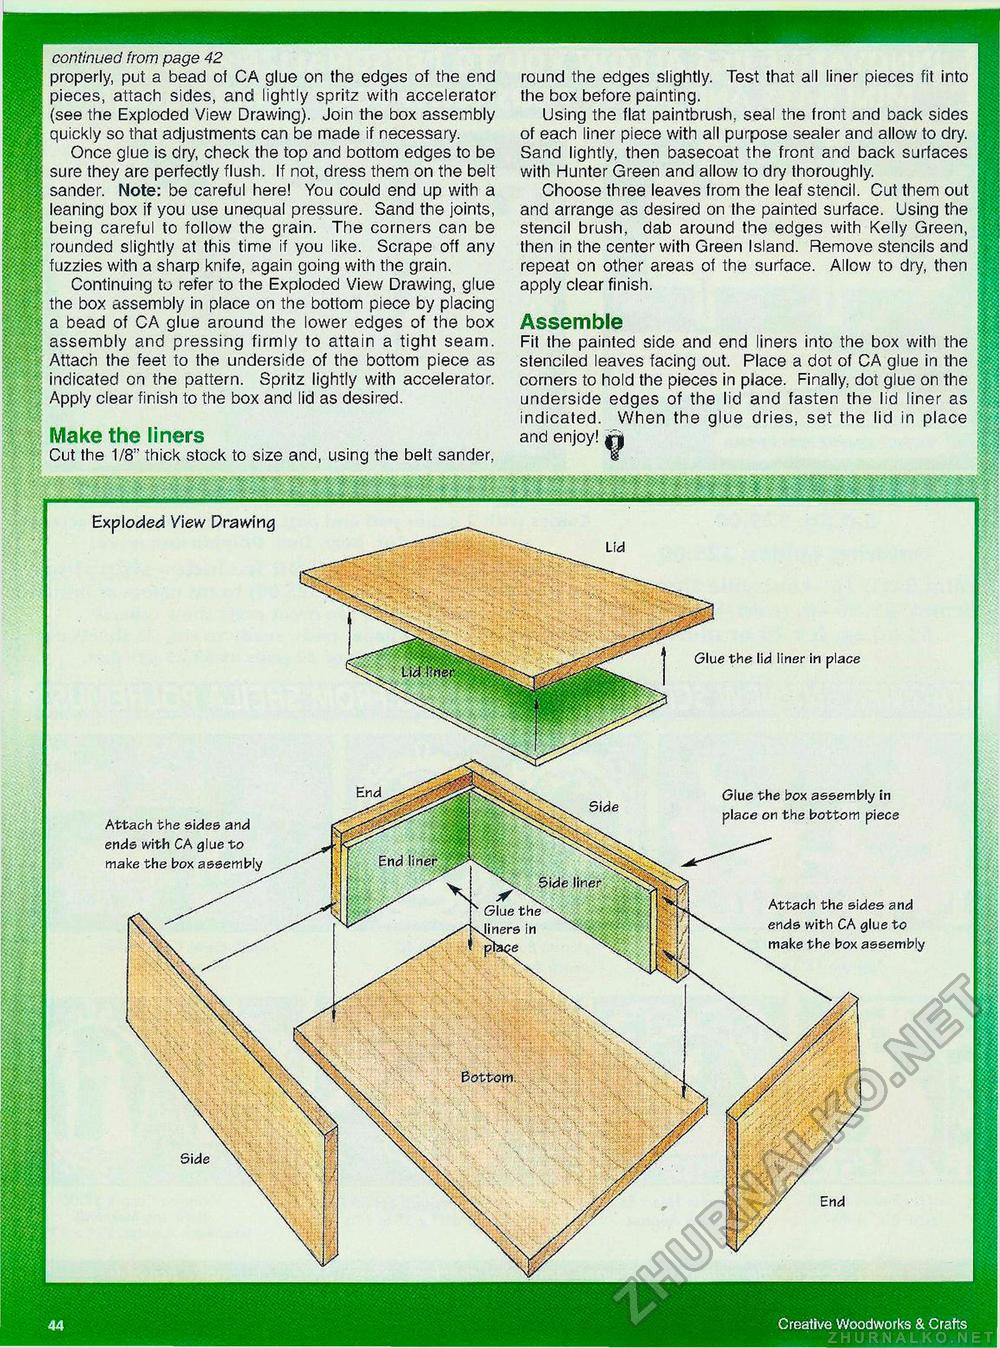
continued from page 42 properly, put a bead of CA glue on the edges of the end pieces, attach sides, and lightly spritz with accelerator (see the Exploded View Drawing). Join the box assembly quickly so that adjustments can be made if necessary. Once glue is dry, check the top and bottom edges to be sure they are perfectly flush. If not, dress them on the belt sander. Note: be careful here! You could end up with a leaning box if you use unequal pressure. Sand the joints, being careful to follow the grain. The corners can be rounded slightly at this time if you like. Scrape off any fuzzies with a sharp knife, again going with the grain. Continuing to refer to the Exploded View Drawing, glue the box assembly in place on the bottom piece by placing a bead of CA glue around the lower edges of the box assembly and pressing firmly to attain a tight seam. Attach the feet to the underside of the bottom piece as indicated on the pattern. Spritz lightly with accelerator. Apply clear finish to the box and lid as desired. Make the liners Cut the 1/8:! thick stock to size and, using the belt sander, mmmmpfllllf round the edges slightly. Test that all liner pieces fit into the box before painting. Using the flat paintbrush, seal the front and back sides of each liner piece with all purpose sealer and allow to dry. Sand lightly, then basecoat the front and back surfaces with Hunter Green and allow to dry thoroughly. Choose three leaves from the leaf stencil. Cut them out and arrange as desired on the painted surface. Using the stencil brush, dab around the edges with Kelly Green, then in the center with Green Island. Remove stencils and repeat on other areas of the surface. Allow to dry, then apply clear finish. Assemble Fit the painted side and end liners into the box with the stenciled leaves facing out. Place a dot of CA glue in the corners to hold the pieces in place. Finally, dot glue on the underside edges of the lid and fasten the lid liner as indicated. When the glue dries, set the lid in place and enjoy! Glue the lid liner in place Exploded View Drawing Attach the sides and ends with CA glue to make the box assembly Glue the box assembly in place on the bottom piece Attach the sides and ends with CA glue to make the box assembly 44 |


