Creative Woodworks & crafts 2000-11, страница 48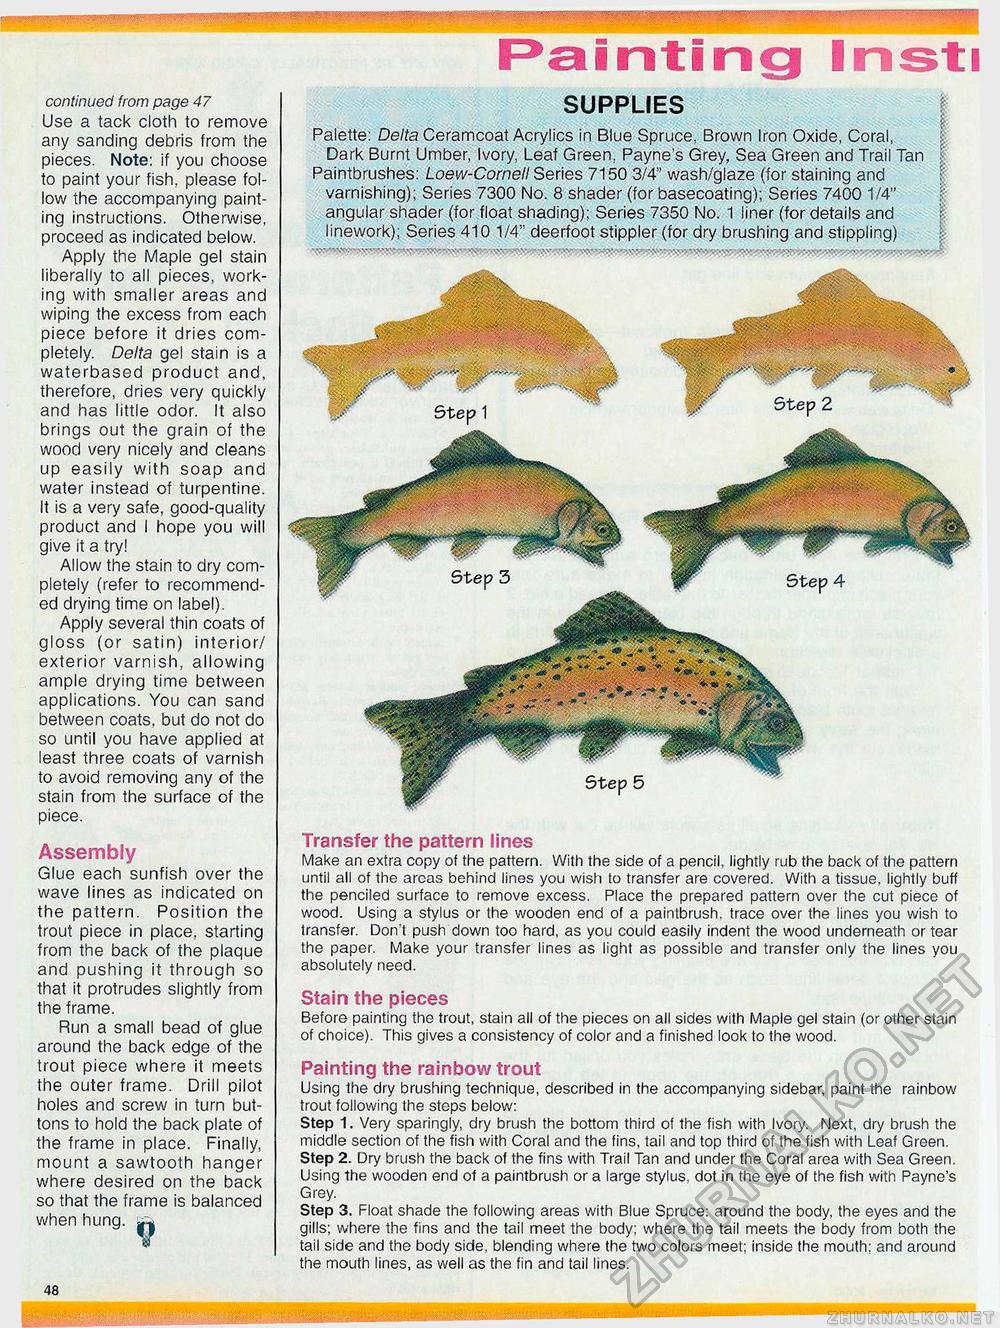
continued from page 47 Use a tack cloth to remove any sanding debris from the pieces. Note: if you choose to paint your fish, please follow the accompanying painting instructions. Otherwise, proceed as indicated below. Apply the Maple gel stain liberally to all pieces, working with smaller areas and wiping the excess from each piece before it dries completely. Delta gel stain is a waterbased product and, therefore, dries very quickly and has little odor. It also brings out the grain of the wood very nicely and cleans up easily with soap and water instead of turpentine. It is a very safe, good-quality product and I hope you will give it a try! Allow the stain to dry completely (refer to recommended drying time on label). Apply several thin coats of gloss (or satin) interior/ exterior varnish, allowing ample drying time between applications. You can sand between coats, but do not do so until you have applied at least three coats of varnish to avoid removing any of the stain from the surface of the piece. Assembly Glue each sunfish over the wave lines as indicated on the pattern. Position the trout piece in place, starting from the back of the plaque and pushing it through so that it protrudes slightly from the frame. Run a small bead of glue around the back edge of the trout piece where it meets the outer frame. Drill pilot holes and screw in turn buttons to hold the back plate of the frame in place. Finally, mount a sawtooth hanger where desired on the back so that the frame is balanced when hung. ^ Painting Inst SUPPLIES Palette: Delta Ceramcoat Acrylics in Blue Spruce, Brown Iron Oxide, Coral, Dark Burnt Umber, Ivory, Leaf Green, Payne's Grey, Sea Green and Trail Tan I Paintbrushes: Loew-Corneii Series 7150 3/4" wash/glaze (for staining and varnishing); Series 7300 No. 8 shader (for basecoating); Series 7400 1/4" angular shader (for float shading); Series 7350 No. 1 liner (for details and linework); Series 410 1/4" deerfoot stippler (for dry brushing and stippling) Transfer the pattern lines Make an extra copy of the pattern. With the side of a pencil, lightly rub the back of the pattern until all of the areas behind lines you wish to transfer are covered. With a tissue, lightly buff the penciled surface to remove excess. Place the prepared pattern over the cut piece of wood. Using a stylus or the wooden end of a paintbrush, trace over the lines you wish to transfer. Don't push down too hard, as you could easily indent the wood underneath or tear the paper. Make your transfer lines as light as possible and transfer only the lines you absolutely need. Stain the pieces Before painting the trout, stain all of the pieces on all sides with Maple gel stain (or other stain of choice). This gives a consistency of color and a finished look to the wood. Painting the rainbow trout Using the dry brushing technique, described in the accompanying sidebar, paint the rainbow trout following the steps below: Step 1. Very sparingly, dry brush the bottom third of the fish with Ivory. Next, dry brush the middle section of the fish with Coral and the fins, tail and top third of the fish with Leaf Green. Step 2. Dry brush the back of the fins with Trail Tan and under the Coral area with Sea Green. Using the wooden end of a paintbrush or a large stylus, dot in the eye of the fish with Payno's Grey. Step 3. Float shade the following areas with Blue Spruce: around the body, the eyes and the gills; where the fins and the tail meet the body; where the tail meets the body from both the tail side and the body side, blending where the two colors meet; inside the mouth; and around the mouth lines, as well as the fin and tail lines. 48 |


