Creative Woodworks & crafts 2002-03, страница 61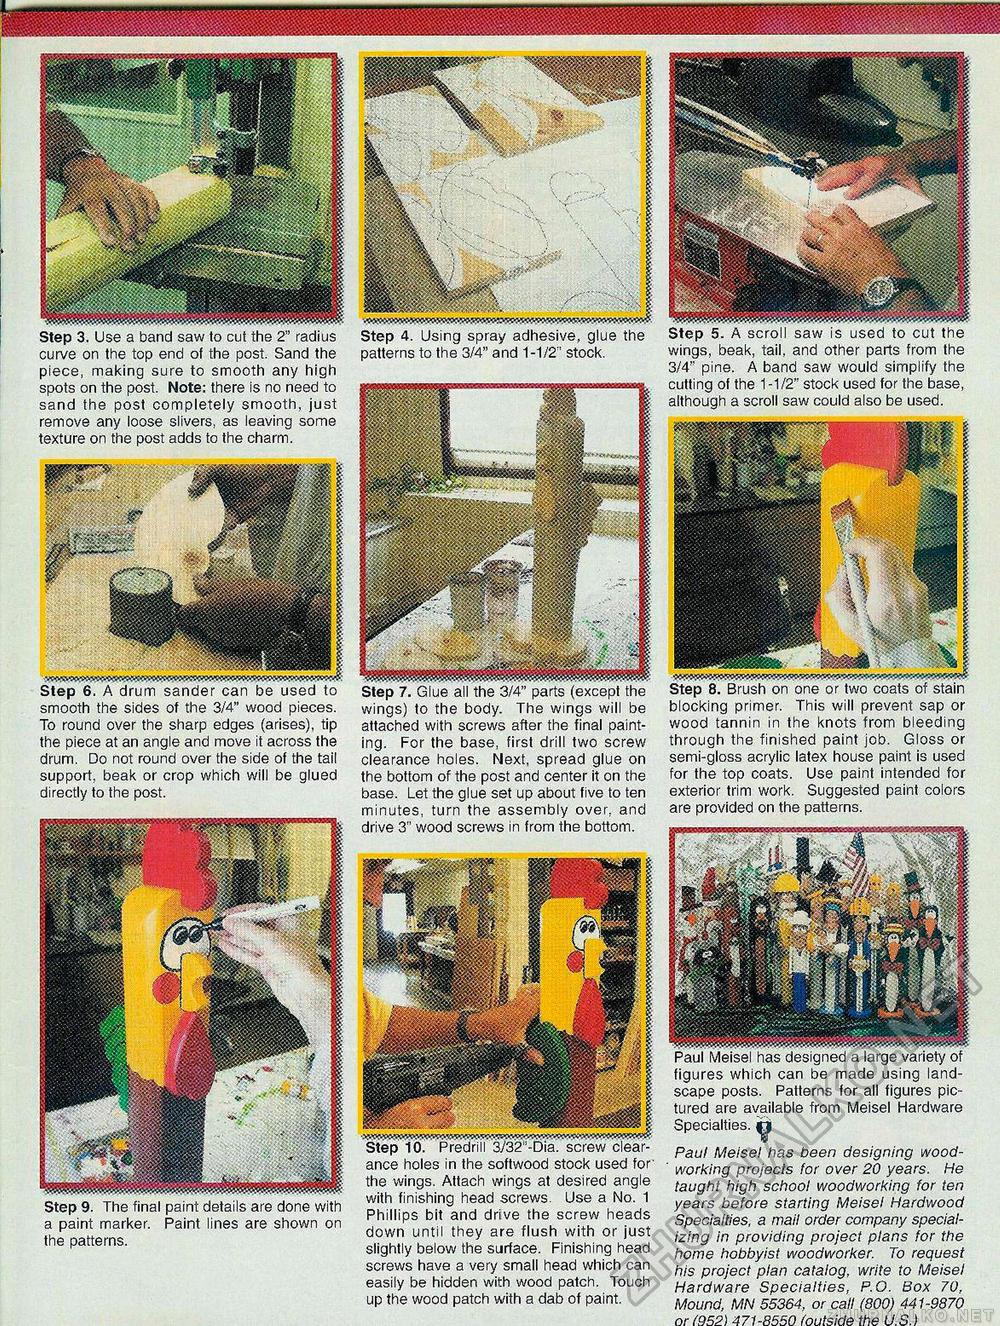
Step 9. The final paint details are done with a paint marker. Paint lines are shown on the patterns. Step 4. Using spray adhesive, glue the patterns to the 3/4" and 1-1/2" stock. wings) to the body. The wings will be attached with screws after the final painting. For the base, first drill two screw clearance holes. Next, spread glue on the bottom of the post and center it on the base. Let the glue set up about five to ten minutes, turn the assembly over, and drive 3" wood screws in from the bottom. ance holes in the softwood stock used for' the wings. Attach wings at desired angle with finishing head screws. Use a No. 1 Phillips bit and drive the screw heads down until they are flush with or just slightly below the surface. Finishing head screws have a very small head which can easily be hidden with wood patch. Touch up the wood patch with a dab of paint. Step 3. Use a band saw to cut the 2" radius curve on the top end of the post. Sand the piece, making sure to smooth any high spots on the post. Note; there is no need to sand the post completely smooth, just remove any loose slivers, as leaving some texture on the post adds to the charm. Step 6. A drum sander can be used to smooth the sides of the 3/4" wood pieces. To round over the sharp edges (arises), tip the piece at an angle and move it across the drum. Do not round over the side of the tail support, beak or crop which will be glued directly to the post. beak, tail, and other parts from the , ne. A band saw would simplify the cutting of the 1 -1/2" stock used for the base, although a scroll saw could also be used. Step 8. Brush on one or two coats of stain blocking primer. This will prevent sap or wood tannin in the knots from bleeding through the finished paint job. Gloss or semi-gloss acrylic latex house paint is used for the top coats. Use paint intended for exterior trim work. Suggested paint colors are provided on the patterns. Paul Meisel has designed a large variety of figures which can be made using landscape posts. Patterns for all figures pictured are available from Meisel Hardware Specialties. Paul Meisel has been designing woodworking projects for over 20 years. He taught high school woodworking for ten years before starting Meisel Hardwood Specialties, a mail order company specializing in providing project plans for the home hobbyist woodworker. To request his project plan catalog, write to Meisel Hardware Specialties, P.O. Box 70, Mound, MN 55364, or call (800) 441-9870 or (952) 471-8550 (outside the U.S.) |


