Creative Woodworks & crafts 2003-01, страница 55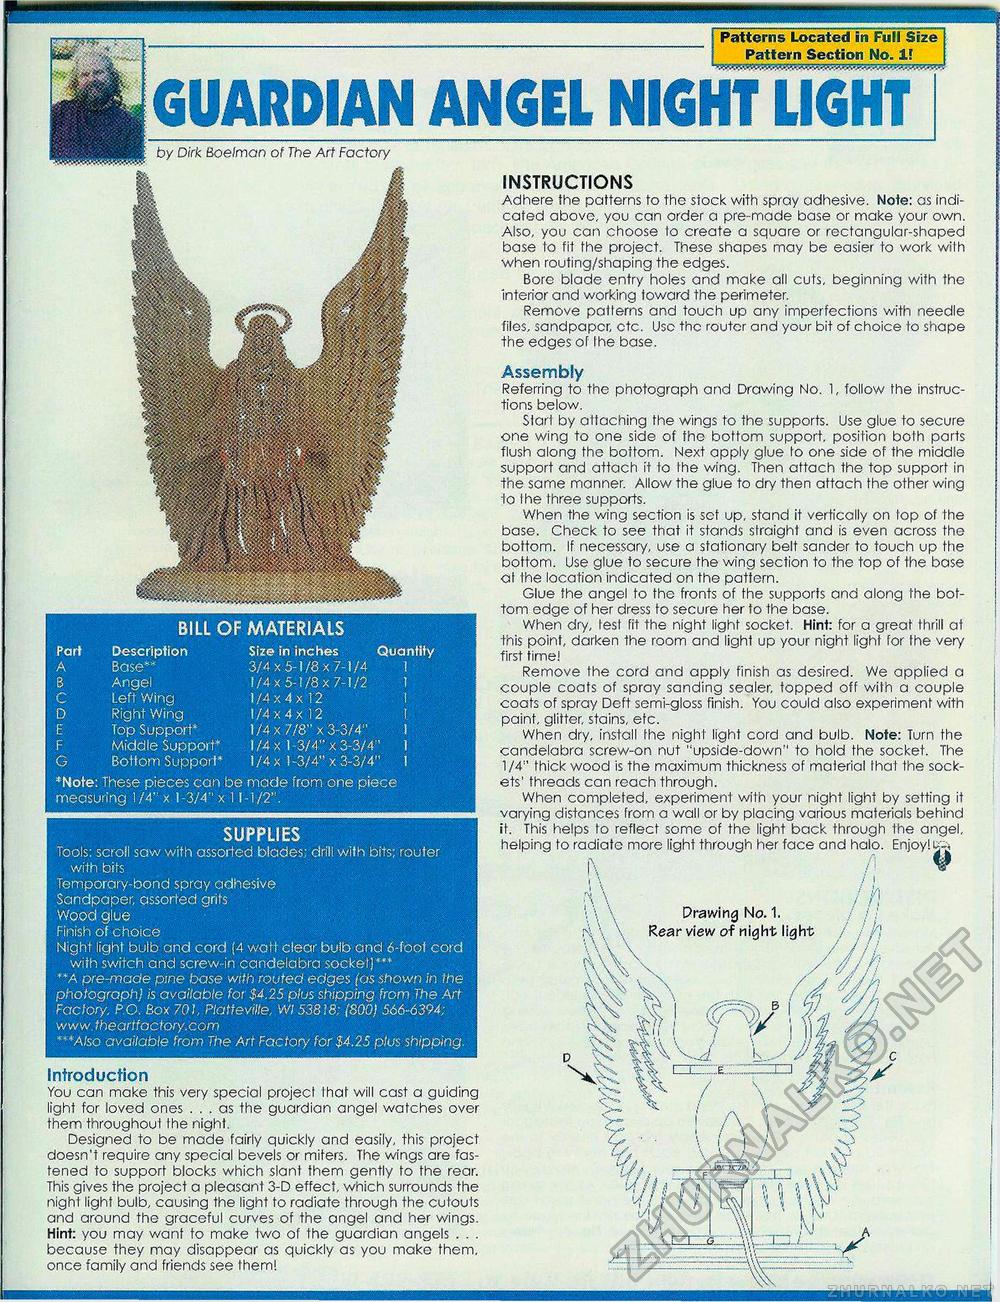
BILL OF MATERIALS Part Description Size in inches Quantity A Base** 3/4x5-1/8x7-1/4 I B Angel 1/4x5-1/8x7-1/2 1 C Left Wing 1/4x4x12 1 D Right Wing 1/4x4x12 1 E Top Support* 1/4 x 7/8" x 3-3/4" 1 F Middle Support* 1/4x1 3/4" x 3-3/4" 1 G Bottom Support* 1/4 x 1-3/4" x 3-3/4" 1 *Note: These pieces can be made from one piece measuring 1/4" x 1-3/4" x 11-1/2". SUPPLIES Tools: scroll saw with assorted blades; drill with bits; router with bits Temporary-bond spray adhesive Sandpaper, assorted grits Wood glue Finish of choice Night light bulb and cord (4 wait clear bulb and 6-foot cord with switch and screw-in candelabra socket] **A pre-made pine base with routed edges (as shown in the photograph) is available for $4.25 plus shipping from The Art Factory, P.O. Box 701 Platteville, Wl S38I8:1800) 566-6394; www.theartfactory.com «*A/so available from The Art Factory for $4.25 plus shipping. [Patterns Located in Full Size Pattern Section No. 1! GUARDIAN ANGEL NIGHT LIGHT by Dirk Boelman of The Art Factory Introduction You can make this very special projecl that will cast a guiding light for loved ones ... as the guardian angel watches over them throughout Ihe night. Designed to be made fairly quickly and easily, this project doesn't require any special bevels or miters. The wings are fastened to support blocks which slant them gently to the rear. This gives the project a pleasant 3-D effect, which surrounds the night light bulb, causing the light to radiate through the cutouts and around the graceful curves of the angel and her wings. Hint: you may want to make two of the guardian angels . . . because they may disappear as quickly as you make them, once family and friends see them! INSTRUCTIONS Adhere the patterns to the stock with spray adhesive. Note: as indicated above, you can order a pre-made base or make your own. Also, you can choose to create a square or rectangular-shaped base to fit the project. These shapes may be easier to work with when routing/shaping the edges. Bore blade entry holes and make all cuts, beginning with the interior and working toward the perimeter. Remove patterns and touch up any imperfections with needle files, sandpaper, ctc. Use the router and your bit of choice to shape the edges of Ihe base. Assembly Referring to the photograph and Drawing No. 1, follow the instructions below. Star! by attaching the wings to the supports. Use glue to secure one wing to one side of the bottom support, position both parts flush along the bottom. Next apply glue to one side of the middle support and attach it to the wing. Then attach the top support in the same manner. Allow the glue to dry then attach the other wing lo Ihe three supports. When the wing section is sot up, stand it vertically on lop of the base. Check to see that it stands straight and is even across the bottom. If necessary, use a stationary belt sander to touch up the bottom. Use glue to secure the wing section to the top of the base at the location indicated on the pattern. Glue the angel to the fronts of the supports and along the bottom edge of her dress to secure her to the base. When dry, lest fit the night light socket. Hint: for a great thrill at this point, darken the room and light up your night light for the very first time! Remove the cord and apply finish as desired. We applied a couple coats of spray sanding sealer, topped off with a couple coats of spray Deft semi-gloss finish. You could also experiment with paint, glitter, stains, etc. When dry, install the night light cord and bulb. Note: Turn the candelabra screw-on nut "upside-down" to hold the socket. The 1/4" thick wood is the maximum thickness of material thai the sockets' threads can reach through. When completed, experiment with your night light by setting it varying distances from a wall or by placing various materials behind it. This helps to reflect some of the light back through the angel, helping to radiate more light through her face and halo. Enjoy! |


