Creative Woodworks & crafts 2003-03, страница 27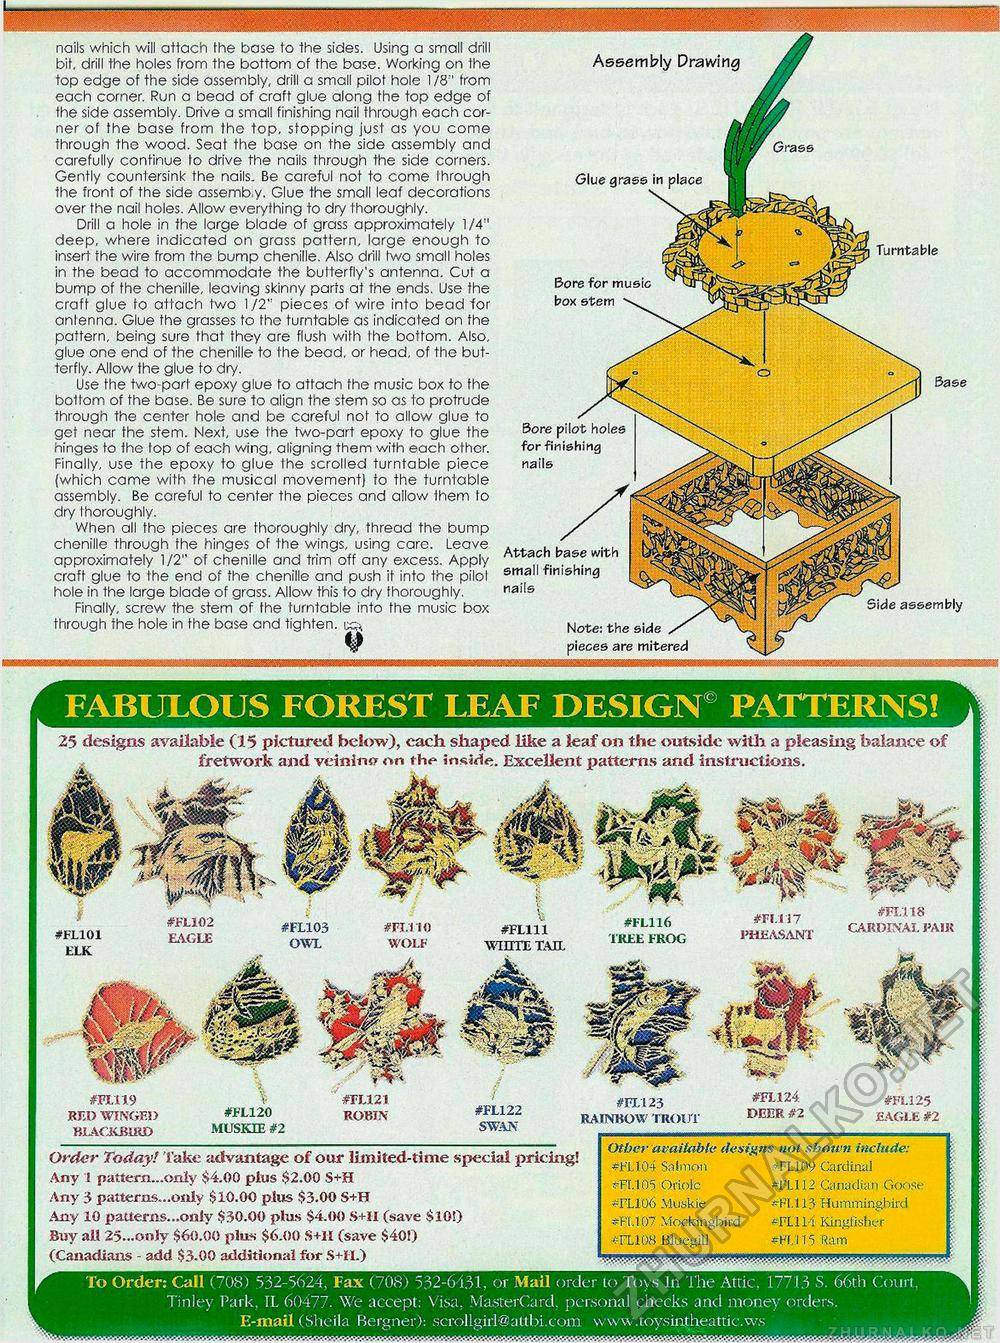
FABULOUS FOREST LEAF DESIGN® PATTERNS! nails which will attach the base to the sides. Using a small drill bit, drill the holes from the bottom of the base. Working on the top edge of the side assembly, drill a small pilot hole 1/8" from each corner. Run a bead of craft glue along the top edge of the side assembly. Drive a small finishing nail through each corner of the base from the top, stopping just as you come through tho wood. Seat the base on the side assembly and carefully continue to drive the nails through the side corners. Gently countersink the nails. Be careful not to come through the front of the side assemb.y. Glue the small leaf decorations over the nail holes. Allow everything to dry thoroughly. Drill a hole in the large blade of grass approximately 1/4" deep, where indicated on grass pattern, large enough to insert the wire from the bump chenille. Also drill two small holes in the bead to accommodate the butterfly's antenna. Cut a bump of the chenille, leaving skinny parts at the ends. Use the craft glue to attach two 1 J 2" pieces of wire into bead for anlenna. Glue the grasses to the turntable as indicated on fhe pattern, being sure that they are flush with Ihe bottom. Also, glue one end of the chenille to the bead, or head, of the butterfly. Allow the glue to dry. Use the two-part epoxy glue to attach the music box to fhe bottom of the base. Be sure to align the stem so as to protrude through the center hole and be careful not to allow glue to get near the stem. Next, use fhe two-part epoxy to glue the hinges to the top of each wing, aligning them with each other. Finally, use the epoxy to glue the scrolled turntable piece {which came with fhe musical movement) to the turntable assembly. Be careful to center the pieccs and allow Ihem to dry thoroughly. When all the pieces are thoroughly dry, thread the bump chenille through the hinges of the wings, using carc. Leave approximately 1/2" of chenille and trim off any excess. Apply craft glue to the end of fhe chenille and push it into the pilol hole in the large blade of grass. Allow this to dry thoroughly. Finally, screw the stem of fhe turntable into the music box through the hole in the base and tighten, uc^ Assembly Drawing Turntable Bore for music box stem Sore pilot holes for finishing nails Attach base with small finishing nails Note: the side pieces are mitered 25 designs available (15 pictured below), each shaped like a leaf on the outside with a pleasing balance of fretwork and veinino on the inside. Excellent patterns and instructions. CARDINAL PAIR #FI/117 PHEASANT #FL116 TREE FROG #FJL102 EAGLE #FL103 OWL #FL111 "WHITE TAIL #FL101 ELK #FU24 DEER #2 #FL12I ROBIN" #F£119 RED WINGED BLACKBIRD #FL125 EAGLE #2 #FI;I 23 RAINROW TROUT #FL120 MUSKIE #2 Order Today! l ake advantage of our limited-time special pricing! Any I pattern—only $4.00 plus $2.00 S+H Any 3 patterns...only $10.00 plus $3.00 S+H Any 10 patterns...only $30.00 plus $4.00 S+H (save $10!) Buy all 25...only $60.00 plus $6.00 S+1I (save $401) (Canadians - add $3.00 additional for S+H.) Other available designs not shown include: *Jr'L104 Salmon H'1.105 Oriole #FL106 Muskie *P(.t07 Mockingbird -?FLli)8 Bluegill .*FU09 Cardinal ~FU12 Canadian Goose *FT.l 13 Hummingbird *F111'1 Kingfisher •-fl.115 Ram To Order: Call (70S) 532-5624, Fax (708) 532-6431, or Mail order to Toys In The Attic, 17713 S. 66th Court, Tinley Park, IL 60477. We accept: Visa. MasterCard, personal checks and money orders. E-mail (Sheila Bergner): scrollgirl@attbi.com www.toystoheattic.ws |


