Creative Woodworks & crafts 2003-03, страница 46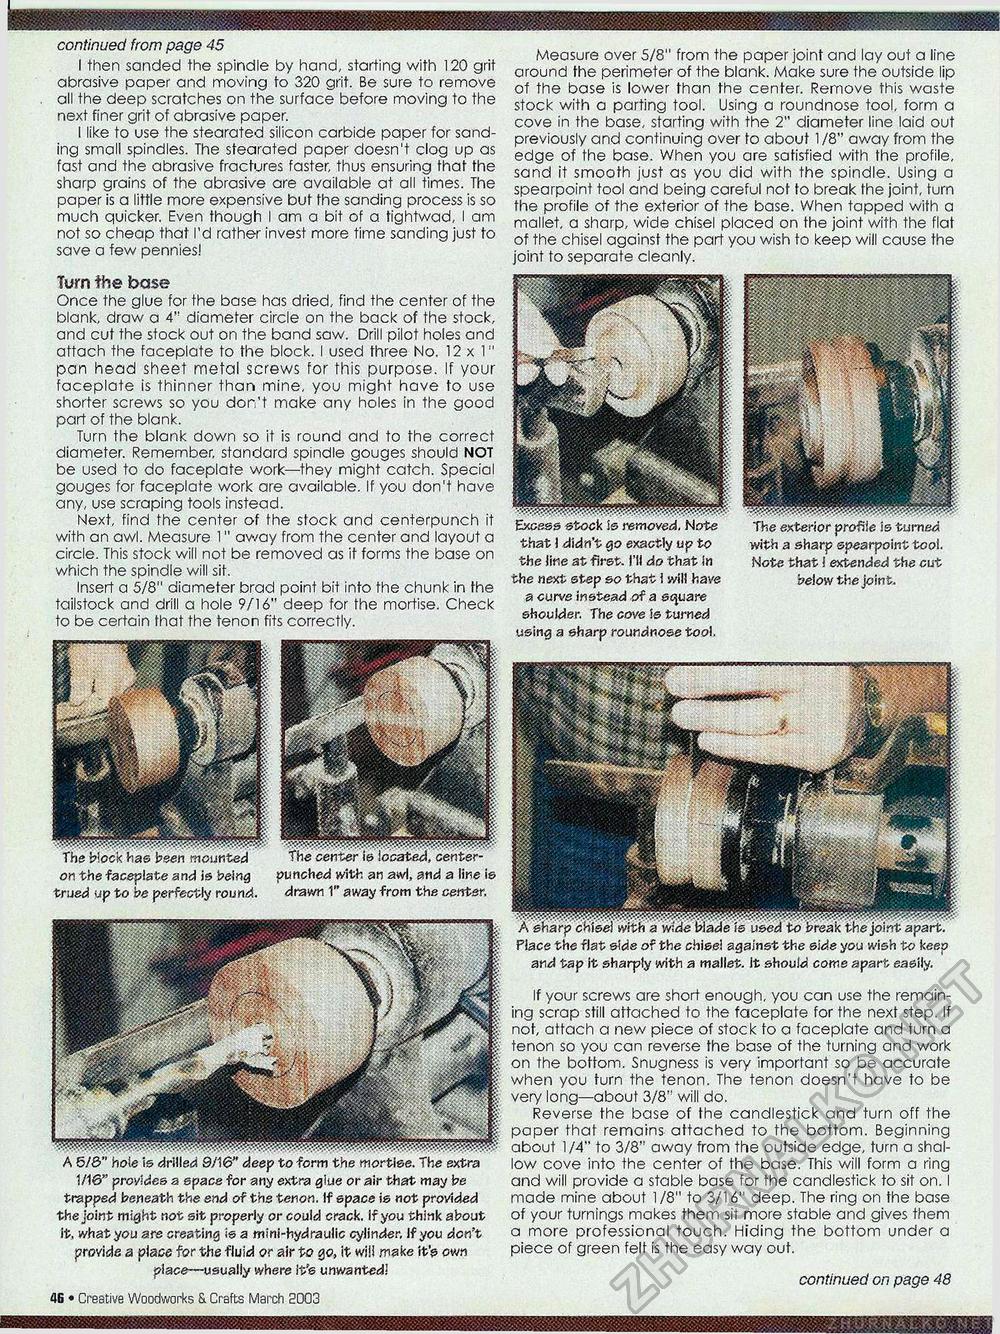
continued from page 45 I then sanded the spindle by hand, starting with 120 grit abrasive paper and moving to 320 grit. Be sure to remove all the deep scratches on the surface before moving to the next finer grit of abrasive paper. I like to use the stearated silicon carbide paper for sanding small spindles. The stearated paper doesn't clog up as fast and the abrasive fractures faster, thus ensuring that fhe sharp grains of the abrasive are available at all times. The paper is a little more expensive but the sanding process is so much quicker. Even though I am a bit of a tightwad, I am not so cheap that I'd rather invest more time sanding just to save a few pennies! Measure over 5/8" from the paper joint and lay out a line around the perimeter of the blank. Make sure the outside lip of the base is lower than the center. Remove this waste stock with a parting tool. Using a roundnose tool, form a cove in the base, starting with the 2" diameter line laid out previously and continuing over to about 1/8" away from the edge of the base. When you are satisfied with the profile, sand it smooth just as you did with the spindle. Using a spearpoint tool and being careful not to break the joint, turn the profile of the exterior of the base. When tapped with a mallet, a sharp, wide chisel placed on the joint with the flat of the chisel against the part you wish to keep will cause the joint to separate cleanly. on the faceplate and is being punched with an awl, and a line is trued up to be perfectly round. drawn 1" away from the center. Turn the base Once the glue for the base has dried, find the center of the blank, draw a 4" diameter circle on the back of the stock, and cut the stock out on the band saw. Drill pilot holes and attach the faceplate to the block. I used three No. 12 x 1" pan head sheet metal screws for this purpose. If your faceplate is thinner than mine, you might have to use shorter screws so you dor.'t make any holes in the good part of the blank. Turn the blank down so it is round and to the correct diameter. Remember, standard spindle gouges should NOT be used to do faceplate work—they might catch. Special gouges for faceplate work are available. If you don't have any, use scraping tools instead. Next, find the center of the stock and centerpunch it with an awl. Measure 1" away from the center and layout a circle. This stock will not be removed as it forms the base on which the spindle will sit. Insert a 5/8" diameter brad point bit into the chunk in the tailstock and drill a hole 9/16" deep for the mortise. Check to be certain that the tenon fits correctly. provides a space for any extra glue or air that may be trapped beneath the end of the tenon, If space is not provided the joint might not sit properly or could crack. If you think about it, what you are creating ie a mini-hydraulic cylinder. If you don't provide a place for the fluid or air to go, it will make it's own place—usually where It's unwanted! «8 • Creative Woodworks & Crafts March 2003 ■'SjS that 1 didn't go exactly up to the line at first. I'll do that in the next step so that I will have a curve instead of a square shoulder. The cove is turned using a sharp roundnose tool. The exterior profile is turned with a sharp spearpoint tool. Note that 1 extended the cut below the joint. A sharp chisel with a wide blade is used to break the joint apart. Place the flat side of the chisel against the side you wish to keep and tap it sharply with a mallet, it should come apart easily. If your screws are short enough, you can use the remaining scrap still attached to the faceplate for the next step. If not, attach a new piece of stock to a faceplate and turn a tenon so you can reverse the base of the turning and work on the bottom. Snugness is very important so be accurate when you turn the tenon. The tenon doesn't have to be very long—about 3/8" will do. Reverse the base of the candlestick and turn off the paper that remains attached to the bottom. Beginning about 1/4" to 3/8" away from the outside edge, turn a shallow cove into the center of the base. This will form a ring and will provide a stable base for the candlestick to sit on. I made mine about 1/8" to 3/16" deep. The ring on the base of your turnings makes them sit more stable and gives them a more professional touch. Hiding the bottom under a piece of green felt is the easy way out. continued on page 48 |


