Creative Woodworks & crafts 2003-09, страница 18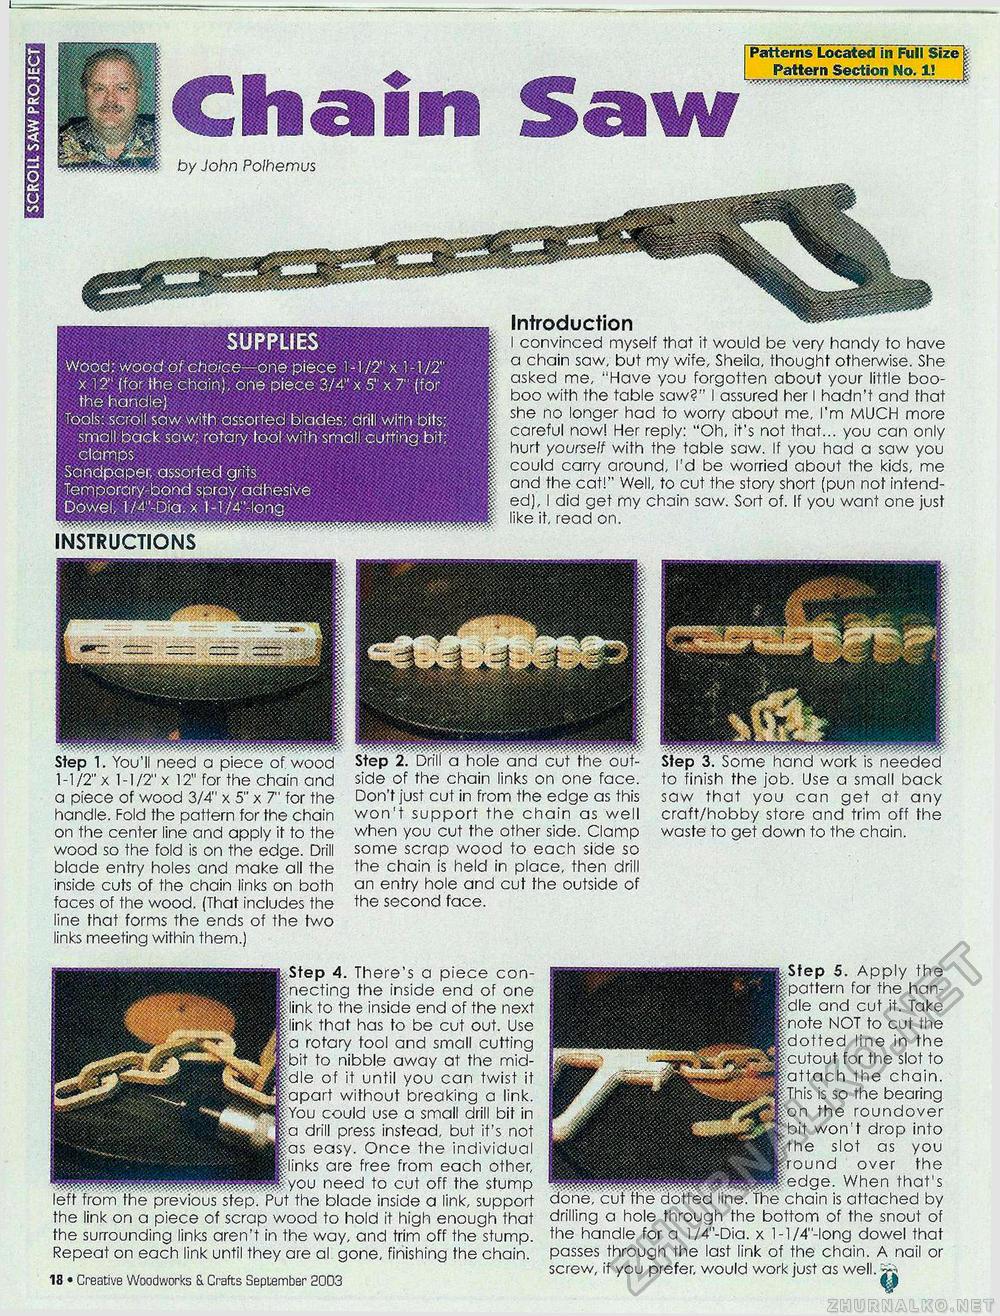
SUPPLIES Wood: wood of choice—one piece 1 -1 /2" x 1 -1 /2" x 12" (forthe chain), one piece 3/4" x 5" x 7" (for the handle} Tools: scroll saw with assorted blades: drill witlvbjts: small back saw; rotary fool with small cutting bit: clamps Sandpaper, assorted grits Temporary-bond spray adhesive Dowel, l/4"-Dia. x 1-l/4"-long Patterns Located in Full Size Pattern Section No. 1! Chainby John Polhemus Introduction I convinced myself that it would be very handy to have a chain saw, but my wife, Sheila, thought otherwise. She asked me, "Have you forgotten about your little boo-boo with the table saw?" I assured her I hadn't and that she no longer had to worry about me, I'm MUCH more careful now! Her reply: "Oh, it's not that... you can only hurt yourself with the table saw. If you had a saw you could carry around, I'd be worried about the kids, me and the cat!" Well, to cut the story short (pun not intended), I did get my chain saw. Sort of. If you want one just like it, read on. INSTRUCTIONS Step 3. Some hand work is needed to finish the job. Use a small back saw that you can get at any craft/hobby store and trim off the waste to get down to the chain. Step 1. You'll need a piece of wood Step 2. Drill a hoie ana cut the out-1-1/2" x 1-1/2" x 12" for the chain and side of the chain links on one face, a piece of wood 3/4" x 5" x 7" for the Don't just cut in from the edge as this handle. Fold the pattern for the chain won't support the chain as well on the center line and apply it to the when you cut the other side. Clamp wood so the fold is on the edge. Drill some scrap wood to each side so blade entry holes and make all the the chain is held in place, then drill inside cuts of the chain links on both an entry hole and cut the outside of faces of the wood. (That includes the the second face, line that forms the ends of the two links meeting within them.) BStep 4. There's a piece connecting the inside end of one • link to the inside end of the next :a rotary tool and small cutting ■bit to nibble away at the mid-.dle of it until you can twist it iapart without breaking a link. You could use a small drill bit in :a drill press instead, but it's not ias easy. Once the individual iiinks are free from each other, ................. you need to cut off the stump left from the previous step. Put the blade inside a link, support the link on a piece of scrap wood to hold it high enough that the surrounding links aren't in the way, and trim off the stump. Repeat on each link until they are al gone, finishing the chain. 18 • Creative Woodworks & Crafts September 2003 H Step 5. Apply the {pattern for the han-:dle and cut it. Take ; note NOT to cut the jdotted line in the : cutout for the slot to ^attach the chain. ■This is so the bearing ion the roundover bit won't drop into ■the slot as you .round over the edge. When that's done, cut the dotted line. The chain is attached by drilling a hole through the bottom of the snout of the handle for a l/4"-Dia. x l-l/4"-long dowel that passes through the last link of the chain. A nail or screw, if you prefer, would work just as well. jre |


