Creative Woodworks & crafts 2003-11, страница 52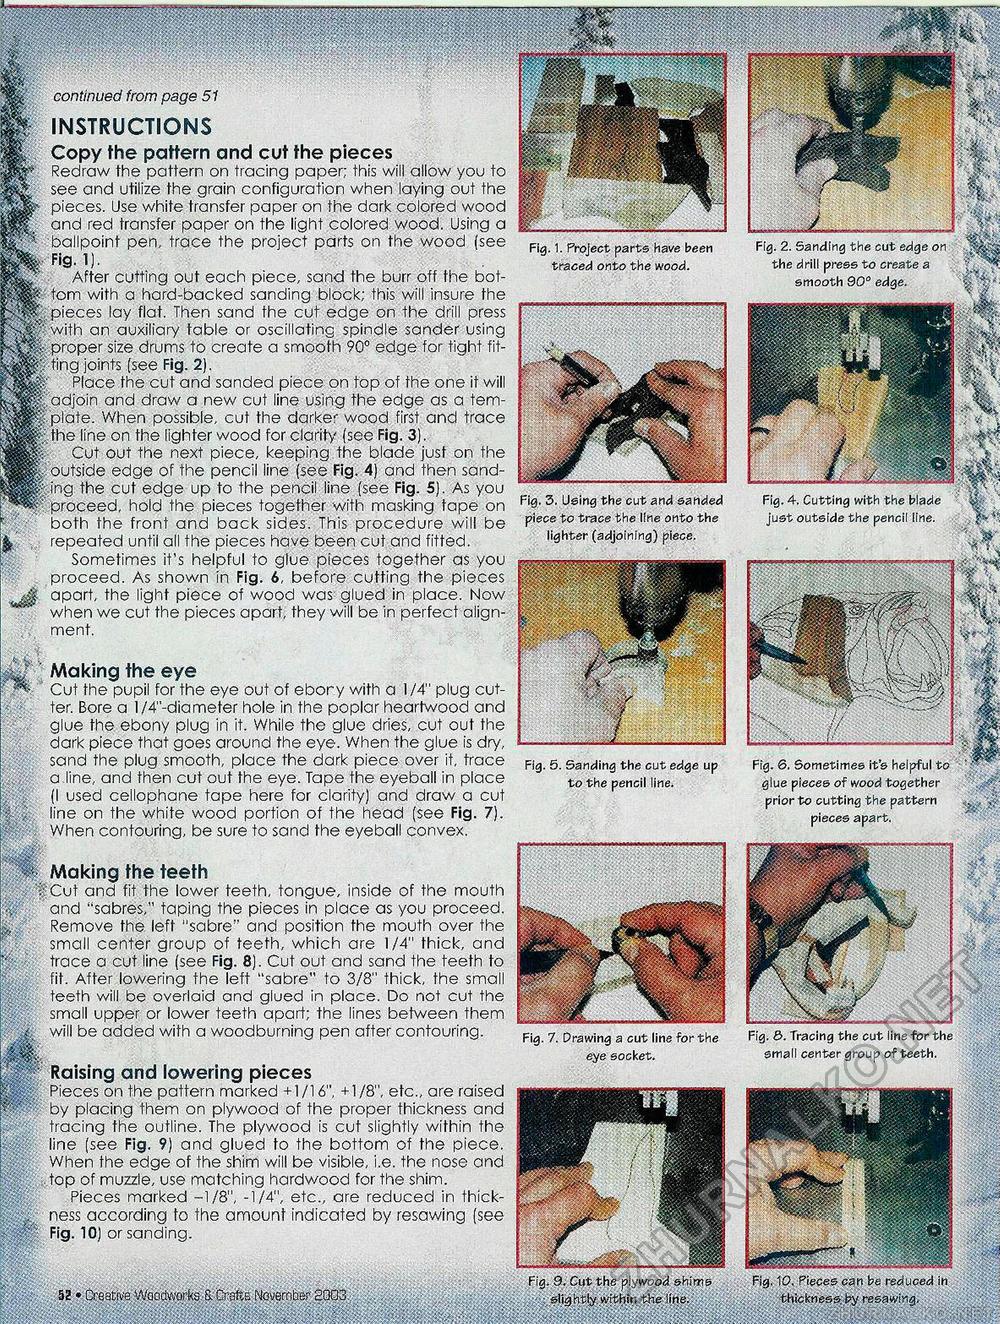
1|| continued from page 51 || INSTRUCTIONS m Copy the pattern and cut the pieces Redraw the pattern on tracing paper; this will allow you to life' see and utilize the grain configuration when laying out the pieces. Use white transfer paper on the dark colored wood |||| and red transfer paper on the light colored wood. Using a ballpoint pen, trace the project parts on the wood (see fife-Fto-i)- W^d After cutting out each piece, sand the burr off the bot-pfl&v torn with a hard-backed sanding block; this will insure the pjffe pieces lay fiat. Then sand the cut edge on the drill press with an auxiliary table or oscillating spindle sander using liSl'' prop©1" size drums to create a smooth 90° edge for tight fit- ting joints (see Fig. 2). Illllt Place the cut and sanded piece on top of the one it will fejfe adjoin and draw a new cut line using the edge as a tem-CTgfe plate- When possible, cut the darker wood first and trace ^Spthe line on the lighter wood for clarity (see Fig. 3). >||8p. Cut out the next piece, keeping the blade just on the outside edge of the pencil line (see Fig. 4) and then sand-ing the cut edge up to the pencil line (see Fig. 5). As you proceed, hold the pieces together with masking tape on ■ " both the front and back sides. This procedure will be fe' repeated until all the pieces have been cut and fitted. Sometimes it's helpful to glue pieces together as you proceed. As shown in Fig. 6, before cutting the pieces <J$ apart, the light piece of wood was glued in place. Now when we cut the pieces apart, they will be in perfect alignment. Fig. 2. Sanding the cut edge on the drill press to create a smooth 90° edge. Fig. 1. Project parts have been traced onto the wood. Fig. 3. Using the cut and sanded piece to trace the line onto the lighter (adjoining) piece. Fig. 4. Cutting with the blade just outside the pencil line. Making the eye Cut the pupil for the eye out of ebory with a 1/4" plug cutter. Bore a l/4"-diameter hole in the poplar heartwood and glue the ebony plug in it. While the glue dries, cut out the dark piece that goes around the eye. When the glue is dry, sand the plug smooth, place the dark piece over it, trace a line, and then cut out the eye. Tape the eyeball in place (I used cellophane tape here for clarity) and draw a cut line on the white wood portion of the head (see Fig. 7). When contouring, be sure to sand the eyeball convex. Fig. 5. Sanding the cut edge up to the pencil line. Fig. 6. Sometimes it's helpful to glue pieces of wood together prior to cutting the pattern pieces apart. Making the teeth Cut and fit the lower teeth, tongue, inside of the mouth and "sabres," taping the pieces in place as you proceed. Remove the left "sabre" and position fhe mouth over the small center group of teeth, which are 1/4" thick, and trace a cut line (see Fig. 8). Cut out and sand the teeth to fit. After lowering the left "sabre" to 3/8" thick, the small teeth will be overlaid and glued in place. Do not cut the small upper or lower teeth apart; the lines between them will be added with a woodburning pen after contouring. Fig. &. Tracing the cut line for the small center group of teeth. Fig. 7. Drawing a cut line for the eye socket. Raising and lowering pieces Pieces on the pattern marked +1/16", +1/8", etc., are raised by placing them on plywood of the proper thickness and tracing the outline. The plywood is cut slightly within the line (see Fig. 9) and glued to the bottom of the piece. When the edge of the shim will be visible, i.e. the nose and top of muzzle, use matching hardwood for the shim. Pieces marked -1/8", -1/4", etc., are reduced in thickness according to the amount indicated by resawing (see Fig. 10) or sanding. ■ i i. ■ ww Fig. 9. Cut the plywood shims ■ slightly, wfthirt the line. Fig. 10, Pieces can be reduced in thickness, by resawing. 52 •Creative. Wgodvprfer-S. Q:stts Novemfer £003. |


