Creative Woodworks & crafts 2005-06, страница 61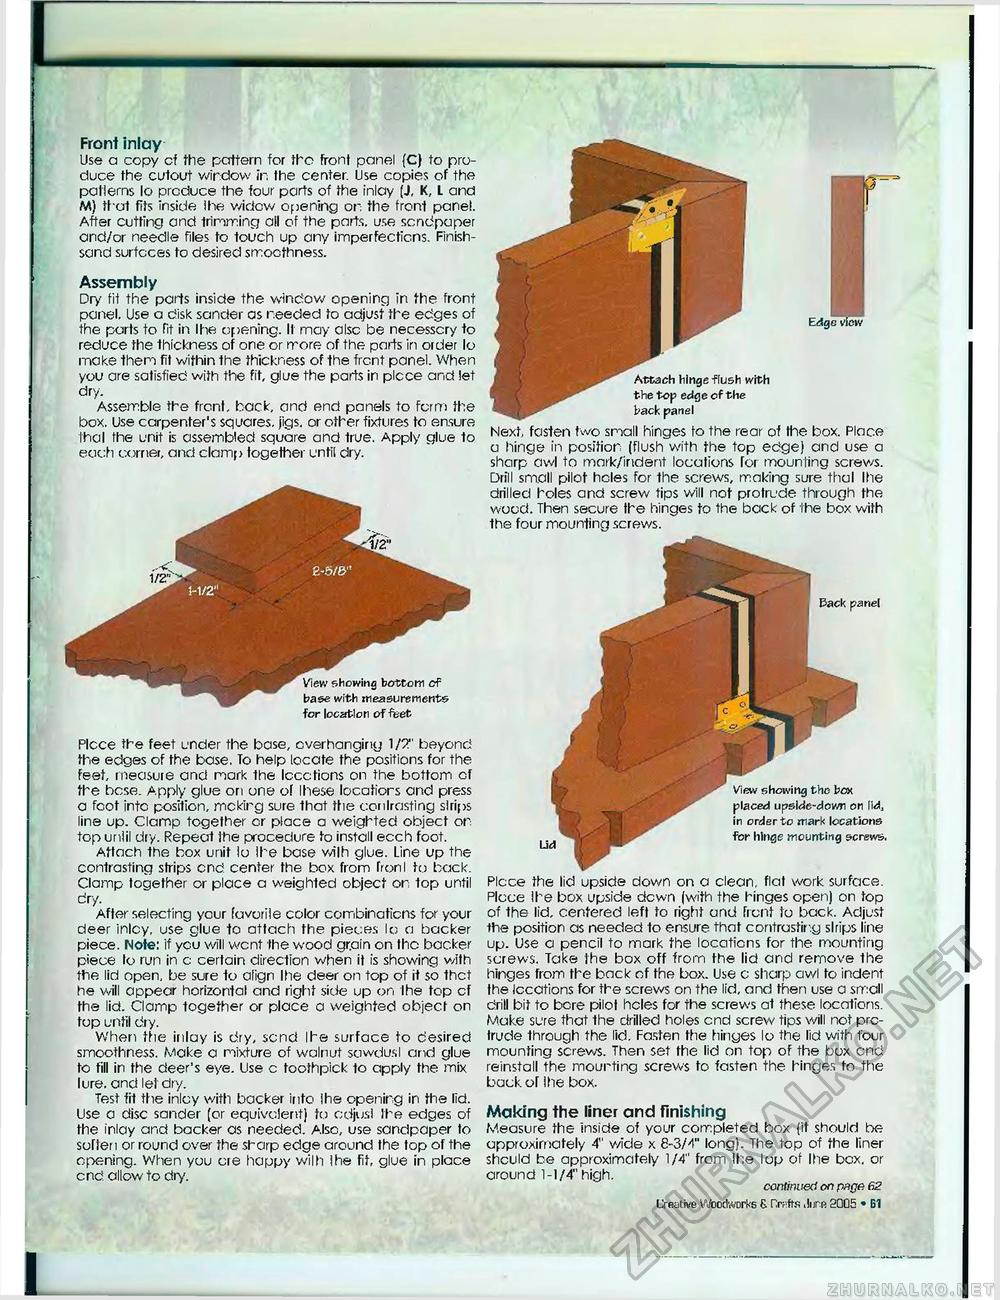
Front inlay Use a copy of the pattern for the front panel (C) to produce the cutout window in the center. Use copies of the patterns lo produce the four parts of the inlay (J, K, L and M) that fits inside ihe widow opening on the front panel. After cutting and trimming all of the parts, use sandpaper and/or needle files to touch up any imperfections. Finish-sand surfaces to desired smoothness. Assembly Dry fit the parts inside the window opening in the front panel. Use a disk sander as reeded to adjust the edges of the parts to fit in Ihe opening. It may alsc be necesscry to reduce the thickness of one or more of the parts in order lo make them fit within the thickness of the front panel. When you are satisfied with the fit, glue the parts in plcce and let dry. Assemble the front, back, and end panels fo form the box. Use carpenter's squares, jigs, or other fixtures to ensure thai the unit is assembled square and true. Apply glue to each corner, and clamp together until dry. View showing bottom of base with measurements for location of feet Plcce the feet under the base, overhanging 1/2" beyond the edges of the base. To help locate the positions for the feet, measure and mark the Iccctions on the bottom cf the base. Apply glue on one of Ihese locatiors and press a foot into position, mckirg sure that the contrasting strips line up. Clamp together cr place a weighted object or top until dry. Repeat the procedure to install ecch foot. Attach the box unit lo Ihe base wilh glue. Line up the contrasting strips end center the box from fronI to back. Clarnp together or place a weighted object or top until dry. After selecting ycur (avuriie color combinations for your deer inlcy, use glue to attach the pieces lo a backer piece. Note: if ycu will went the wood grain on the backer piece lo run in c certain direction when it is showing with the lid open, be sure to align Ihe deer on top of it so thct he will appear horizontal and right side up on Ihe top cf the lid. Clamp together or place a weighted object on top until dry. When the inlay is dry, send Ihe surface to desired smoothness. Make a mixture of walnut sawdusl and glue to fill in the deer's eye. Use c toothpick to apply the mix lure, and lei dry. Test fit the inlcy with backet into Ihe openirg in the lid. Use a disc sander (or equivalent) to cdjusl Ihe edges of the inlay and backer as needed. Also, use sandpaper to soften or round over the sharp edge around the top of the opening. When you ere happy wilh Ihe fit, glue in place end allow to dry. Making the liner and finishing Measure the inside of your completed box (if should be approximately 4" wide x 8-3/4" long). The top of the liner should be approximately 1/4" from Ihe lop of Ihe box. or around 1-1/4" high. continued on page 62 Creative Woodworks 6 Hrsfts .lire 2QQ5 • 61 ATOach hinge flush with the top edge of the back panel Next, fasten two small hinges to the rear of the box. Place a hinge in position (flush with the top edge) and use a sharp awl to mark/irtdent locations for mounting screws. Drill small pilot holes for the screws, making sure thai Ihe drilled holes and screw tips will not protrude through the wood. Then secure the hinges to the back of the box with the four mounting screws. Pack panet Plcce the lid upside down on a clean, flat work surface. Plcce ihe box upside dewn (with the hinges open) on top of the lid, centered left to right and Trent to back. Adjust the position as needed to ensure that contrasting skips line up. Use a pencil to mark the locations for the mounting screws. Take [he box off from the lid and remove the hinges from the back of the box. Use c sharp awl to indent the locations for the screws on the lid, and then use a small drill bit to bcre pilot holes for the screws at these locations. Make sure that the drilled holes end screw tips will not protrude through the lid. Fasten the hinges lo the lid with four mounting screws. Then set the lid on top of the box end reinstall the mounting screws to fasten the hinges to the back of Ihe box. View showing the box placed upside-down on lid, in order to mark locations for hinge mounting screws. |


