Creative Woodworks & crafts 2005-06, страница 65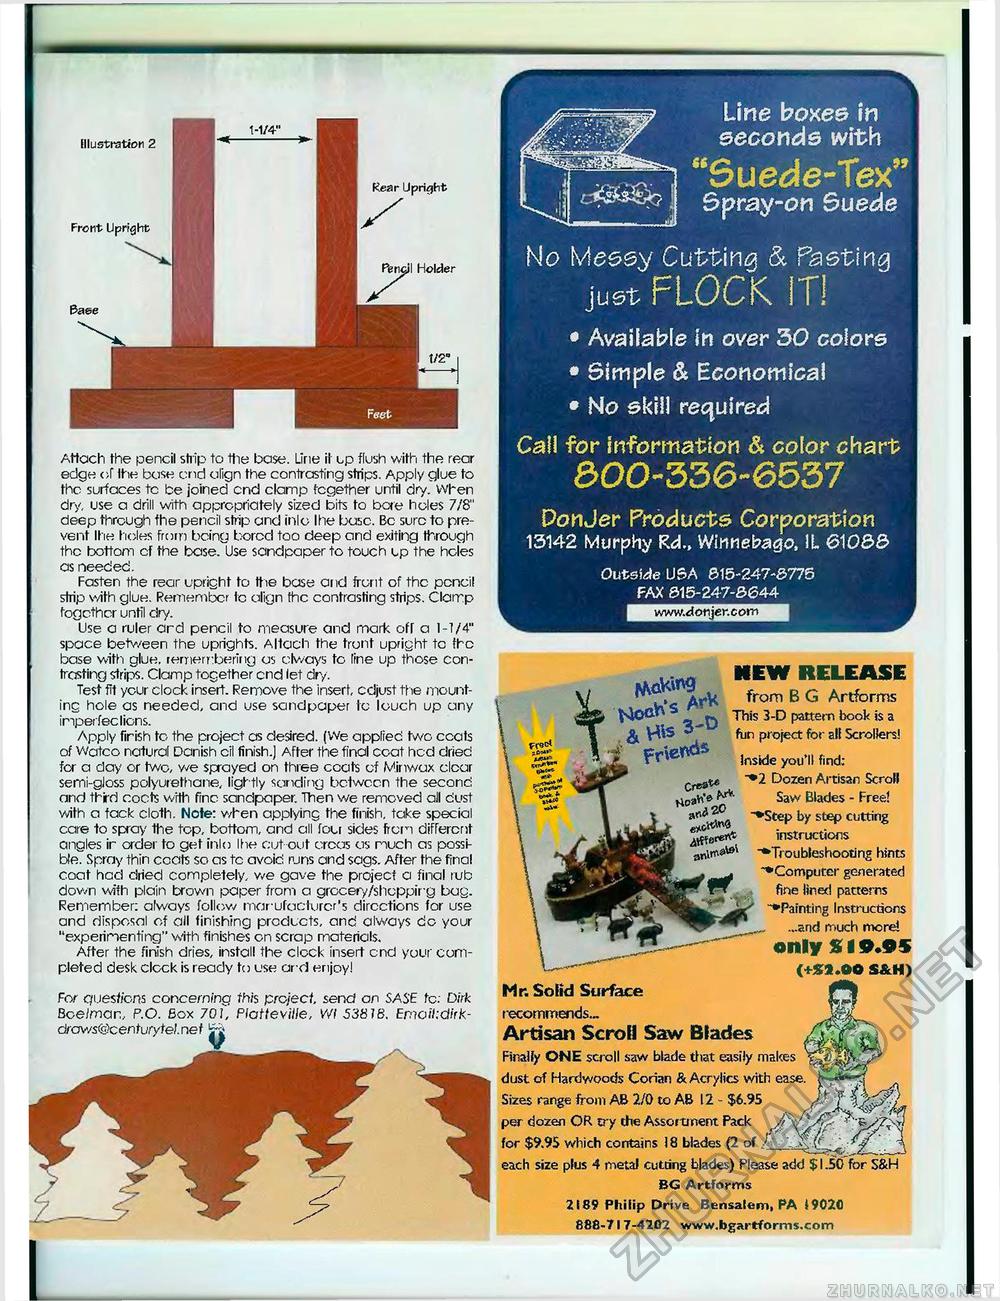
illustration 2 Front Upright Rear Upright AHcich the pencil strip to the base. Line it up flush with the rear edge of Ihe base end align the contrasting strips. Apply glue to the surfaces tc be joined end clamp together until dry. When dry, use a drill with appropriately sized bits to bore holes 7/8" deep through the pencil strip and inlo Ihe base. Be sure to prevent Ihe holes from being bored too deep and exiting through the bottom cf the base. Use sandpaper to touch up the holes as needed. Fasten the rear upright to the base and front of the pencil strip with glue. Remember tc align the contrasting strips. Clamp together until dry. Use a ruler ard pencil to measure and mart oft a 1-1/4" space between the uprights. Altach the front upright tc the base with glue, remembering as always to line up those contrasting strips. Clamp together end let dry. Test fit your clock insert. Remove the insert, cdjust the mounting hole as needed, and use sandpaper la louch up any imperfec lions. Apply firish to the project as desired. (We applied two ccats of Watco natural Danish cil finish.) After the final coat hed dried fcr a day or two, we sprayed on three ccats of Minwax clear semi-gloss polyurethane, lightly sanding between the second and third coats wrlh fine sandpaper. Then we removed all dust with a tack cloth. Note: when applying the finish, take special care to spray the top, bottom, and all four sides from different angles ir order to get inlo Ihe cut out areas as much as possible. Spray thin coats so as tc avoid runs and sags. After the final coat had dried completely, we gave the project a final rub down with plain brown paper from a grocery/shopping bag. Remember: always follow manufacturer's directions for use and disposal of all finishing products, and always do your "experimenting" with finishes on scrap materials. After the finish dries, install the clock insert end your completed desk clock is ready to use ar d enjoy! For questions concerning this project, send an SASE tc: Dirk Bee/mar, P.O. Box 701, Platteville, Wl 538 78. Emoikdirk-drav/s©centurytel.nef js-j? Line boxes In seconds with '3uede-Tex9 Spray-on Suede No Meeey Cutting & Pasting just FLOCK IT! • Available in over 30 colore • Simple & Economical • No ekiil required Call for information & color chart 500-336-6537 DonJer Products Corporation 13142 Murphy Kd., Winnebago, IL 610&& Outside USA 615-247-5775 FAX 015-247-5644 &H\s3;d ftnefl"5 rervt HEW RELEASE from B G Artforms This 3-D pattern book is a fun project for all Scrollers! Inside you'll find: "•2 Dozen Artisan Scroll Saw Blades - Free! "•Step by step cutting instructions "•Troubleshooting hints "•Computer generated fine lined patterns "•Painting Instructions ...and much more! only SI9JS (+S9.00 S&H) Mr. Solid Surface recommends.- Artisan Scroll Saw Blades Finally ONE scroll saw blade that easily mates dust of Hardwoods Corian & Acrylics with ease Sizes range from AB 2/0 to AB 12 - $6.95 per dozen OR try the Assortment Pack for $9.95 which contains 18 blades (2 of each size plus 4 metal cutting blades) Please add $ I 0G Artforms 2189 Philip Drive Bensalem, PA I902C 888-71 7-4202 www.bgartforms.com |


