Creative Woodworks & crafts 2009-04, страница 36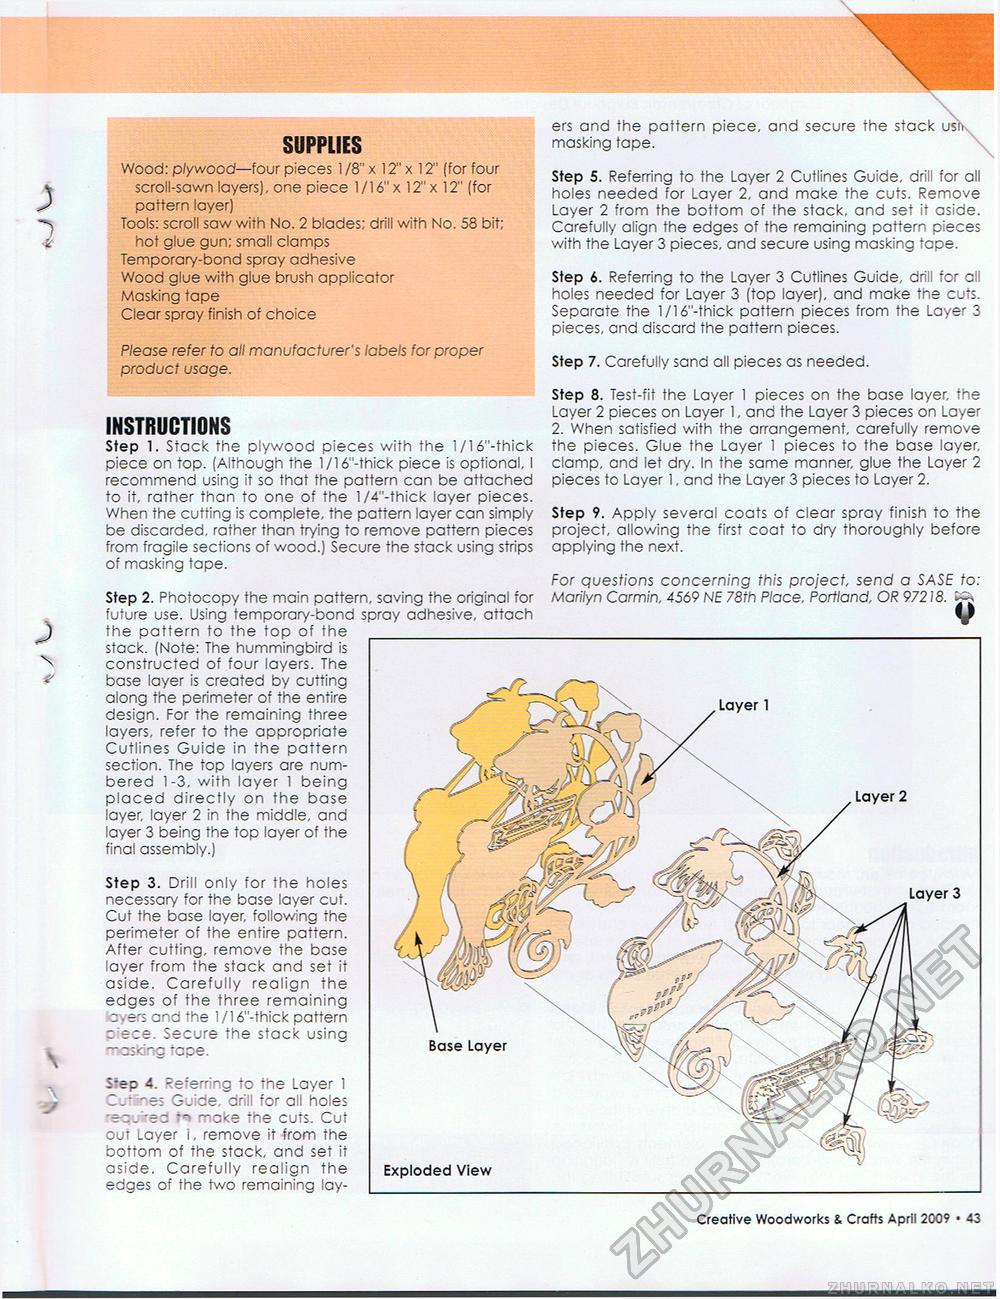
SUPPLIES Wood: plywood—four pieces 1 /8" x 12" x 12" (for four scroll-sown layers), one piece 1/16" x 12" x 12" (for pattern layer) Tools: scroll saw with No. 2 blades; drill with No. 58 bit; hot glue gun; small clamps Temporary-bond spray adhesive Wood glue with glue brush applicator Masking tape Clear spray finish of choice Please refer to all manufacturer's labels for proper product usage. 3 ers and the pattern piece, and secure the stack us"r masking tape. Step 5. Referring to the Layer 2 Cutlines Guide, drill for all holes needed for Layer 2, and make the cuts. Remove Layer 2 from the bottom of the stack, and set it aside. Carefully align the edges of the remaining pattern pieces with the Layer 3 pieces, and secure using masking tape. Step 6. Referring to the Layer 3 Cutlines Guide, drill for all holes needed for Layer 3 (top layer), and make the cuts. Separate the l/16"-thick pattern pieces from the Layer 3 pieces, and discard the pattern pieces. Step 7. Carefully sand all pieces as needed. Step 3. Drill only for the holes necessary for the base layer cut. Cut the base layer, following the perimeter of the entire pattern. After cutting, remove the base layer from the stack and set it aside. Carefully realign the edges of the three remaining c. ers and the 1/16"-thick pattern c ece. Secure the stack using Tiasking rape. S*ep 4. Referring to the Layer 1 Cutines Guide, drill for all holes ~~ 'nake the cuts. Cut out Layer i, remove it from the bottom of the stack, and set it aside. Carefully realign the edges of the two remaining lay- INSTRUCTIONS Step 1. Stack the plywood pieces with the 1/16"-thick piece on top. (Although the l/16"-thick piece is optional, I recommend using it so that the pattern can be attached to it, rather than to one of the l/4"-thick layer pieces. When the cutting is complete, the pattern layer can simply be discarded, rather than trying to remove pattern pieces from fragile sections of wood.) Secure the stack using strips of masking tape. Step 2. Photocopy the main pattern, saving the original for future use. Using temporary-bond spray adhesive, attach the pattern to the top of the stack. (Note: The hummingbird is constructed of four layers. The base layer is created by cutting along the perimeter of the entire design. For the remaining three layers, refer to the appropriate Cutlines Guide in the pattern section. The top layers are numbered 1-3, with layer 1 being placed directly on the base layer, layer 2 in the middle, and layer 3 being the top layer of the final assembly.) Step 8. Test-fit the Layer 1 pieces on the base layer, the Layer 2 pieces on Layer 1, and the Layer 3 pieces on Layer 2. When satisfied with the arrangement, carefully remove the pieces. Glue the Layer 1 pieces to the base layer, clamp, and let dry. In the same manner, glue the Layer 2 pieces to Layer 1, and the Layer 3 pieces to Layer 2. Step 9. Apply several coats of clear spray finish to the project, allowing the first coat to dry thoroughly before applying the next. For questions concerning this project, send a SASE to: Marilyn Carmin, 4569 NE 78th Place, Portland, OR 97218. Creative Woodworks & Crafts April 2009 • 11 |


