Popular Woodworking 2000-01 № 112, страница 38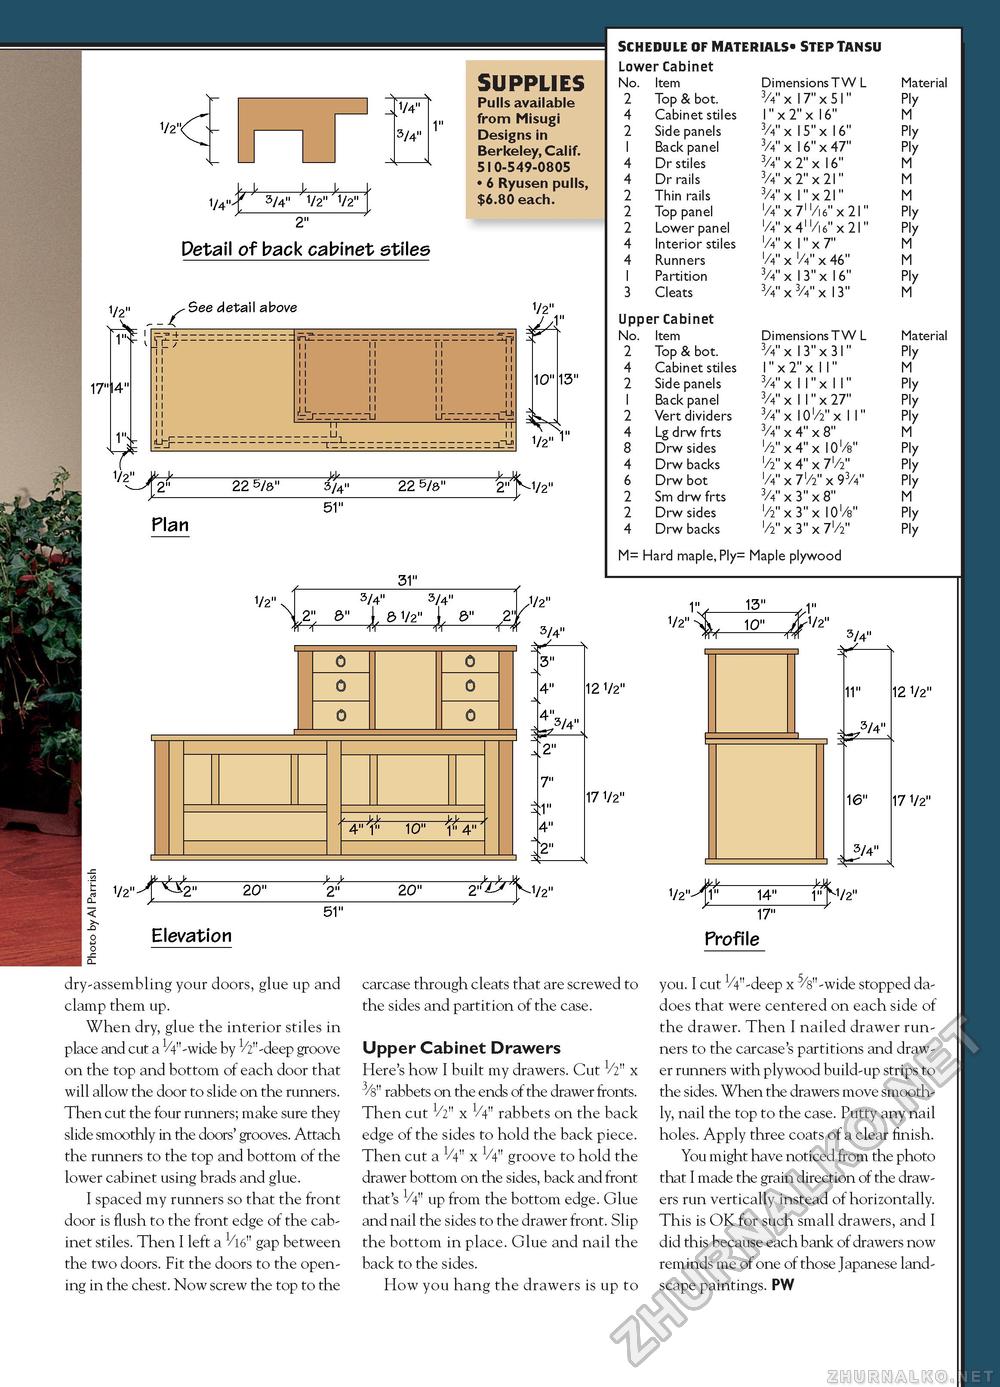
1/2"< 1/4" 3/4" W^W W [ 2" Detail of back cabinet stiles SUPPLIES Pulls available from Misugi Designs in Berkeley, Calif. 510-549-0805 • 6 Ryusen pulls, $6.80 each. 1/2" £ See detail above Plan 1/2" 1/2"
1/2" 3/4" — 1/2" 3/4" — it-hk -hfr- 4" 1" 10" 1" 4" 3/4" 2" SCHEDULE OF MATERIALS* STEP TANSU Lower Cabinet SCHEDULE OF MATERIALS* STEP TANSU Lower Cabinet
Dimensions T W L W x 13"x 31" 1" x 2" x 11" 3/4" x 11" x 11" W x 11" x 27" 3/4" x 10 '/2" x 11" V4" x 4" x 8" '/2" x 4" x iOlV ''/2" x 4" x 7i/2" W x 7i/2" x 93/t" W x 3" x 8" i/2" x 3" x iO^" ^ x 3" x 7i/2" Material Ply M Ply Ply Ply M Ply Ply Ply M Ply Ply
Dimensions T W L W x 13"x 31" 1" x 2" x 11" 3/4" x 11" x 11" W x 11" x 27" 3/4" x 10 '/2" x 11" V4" x 4" x 8" '/2" x 4" x iOlV ''/2" x 4" x 7i/2" W x 7i/2" x 93/t" W x 3" x 8" i/2" x 3" x iO^" ^ x 3" x 7i/2" 12 1/2" Material Ply M Ply Ply Ply M Ply Ply Ply M Ply Ply 17 1/2" 20" 2" 20" 2^^1/2" 51" Elevation 12 1/2" 17 1/2" 1/2" 14" THM/2" 17" Profile dry-assembling your doors, glue up and clamp them up. When dry, glue the interior stiles in place and cut a 1/4"-wide by 1/2" -deep groove on the top and bottom of each door that will allow the door to slide on the runners. Then cut the four runners; make sure they slide smoothly in the doors' grooves. Attach the runners to the top and bottom of the lower cabinet using brads and glue. I spaced my runners so that the front door is flush to the front edge of the cabinet stiles. Then I left a gap between the two doors. Fit the doors to the opening in the chest. Now screw the top to the carcase through cleats that are screwed to the sides and partition of the case. Upper Cabinet Drawers Here's how I built my drawers. Cut 1/2" x 3/8" rabbets on the ends of the drawer fronts. Then cut V2" x V4" rabbets on the back edge of the sides to hold the back piece. Then cut a V4" x V4" groove to hold the drawer bottom on the sides, back and front that's V4" up from the bottom edge. Glue and nail the sides to the drawer front. Slip the bottom in place. Glue and nail the back to the sides. How you hang the drawers is up to you. I cut V4"-deep x 5/8"-wide stopped dadoes that were centered on each side of the drawer. Then I nailed drawer runners to the carcase's partitions and drawer runners with plywood build-up strips to the sides. When the drawers move smoothly, nail the top to the case. Putty any nail holes. Apply three coats of a clear finish. You might have noticed from the photo that I made the grain direction of the drawers run vertically instead of horizontally. This is OK for such small drawers, and I did this because each bank of drawers now reminds me of one of those Japanese landscape paintings. PW |
|||||||||||||||||||||||||||||||||||||||||||||||||||||||||||||||||||||||||||||||||||||||||||||||||||||||||


