Popular Woodworking 2000-01 № 112, страница 49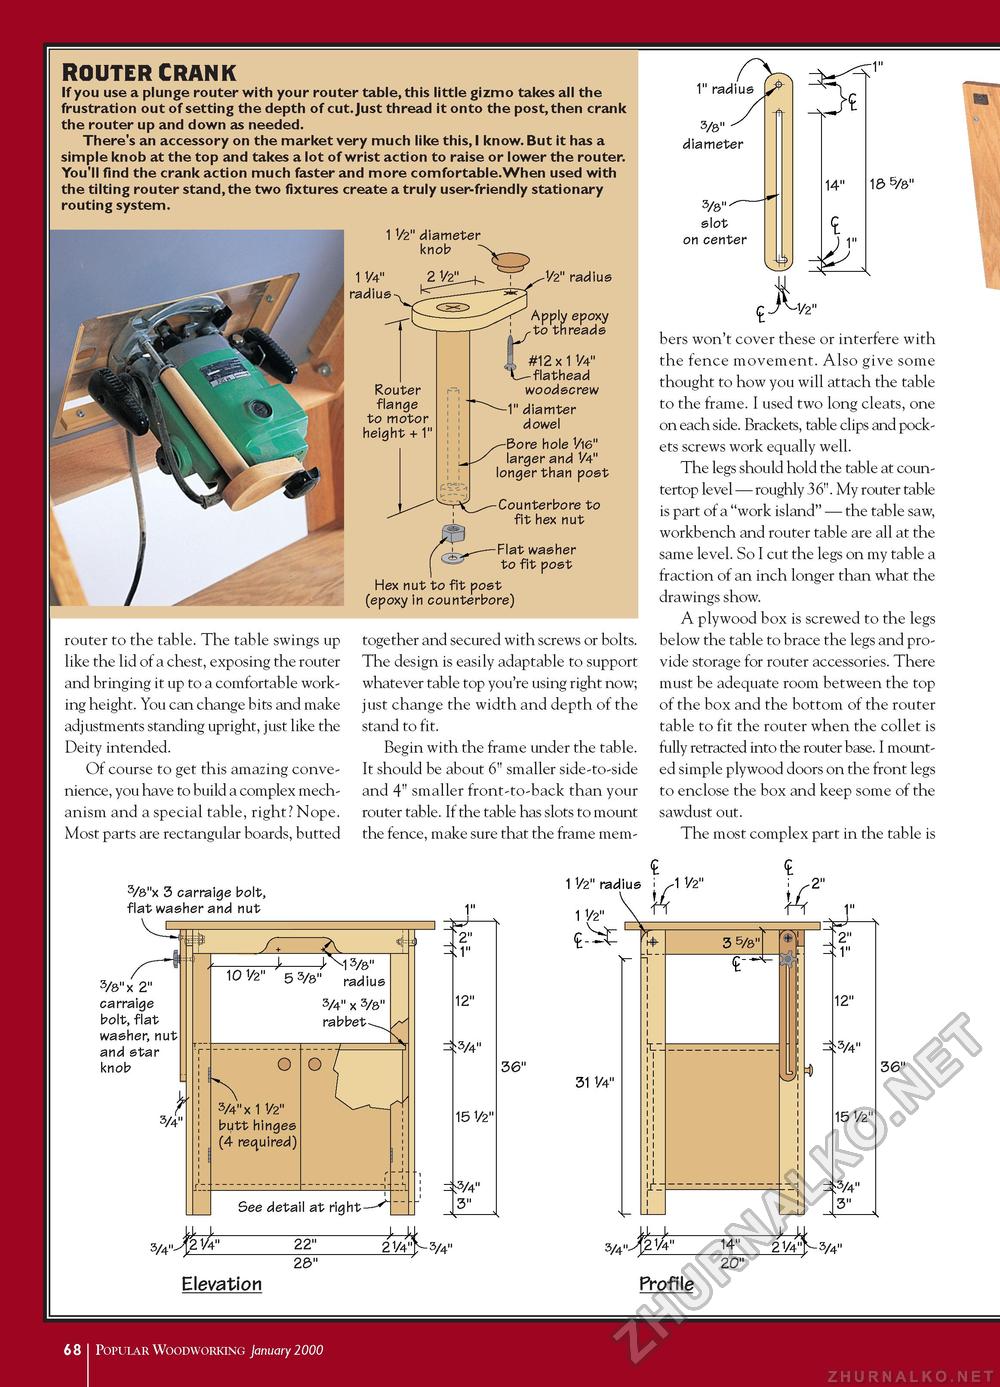
ROUTER CRANK If you use a plunge router with your router table, this little gizmo takes all the frustration out of setting the depth of cut. Just thread it onto the post,then crank the router up and down as needed. There's an accessory on the market very much like this, I know. But it has a simple knob at the top and takes a lot of wrist action to raise or lower the router. You'll find the crank action much faster and more comfortable.When used with the tilting router stand, the two fixtures create a truly user-friendly stationary routing system. 1 1/2" diameter knob 1 1/4" radius router to the table. The table swings up like the lid of a chest, exposing the router and bringing it up to a comfortable working height. You can change bits and make adjustments standing upright, just like the Deity intended. Of course to get this amazing convenience, you have to build a complex mechanism and a special table, right? Nope. Most parts are rectangular boards, butted V2" radius Router flange to motor height + 1" ..ly ePo*y to threads #12 x 1 1/4" flathead woodscrew -1" diamter dowel Bore hole 1/16" larger and V4" longer than post unterbore to fit hex nut 1" radius 3/8" diameter 3/8""~ slot on center 14" <L 1" 18 5/8" ; J^-1/2" -Flat washer to fit post Hex nut to fit post (epoxy in counterbore) together and secured with screws or bolts. The design is easily adaptable to support whatever table top you're using right now; just change the width and depth of the stand to fit. Begin with the frame under the table. It should be about 6" smaller side-to-side and 4" smaller front-to-back than your router table. If the table has slots to mount the fence, make sure that the frame mem- bers won't cover these or interfere with the fence movement. Also give some thought to how you will attach the table to the frame. I used two long cleats, one on each side. Brackets, table clips and pockets screws work equally well. The legs should hold the table at coun-tertop level — roughly 36". My router table is part of a "work island" — the table saw, workbench and router table are all at the same level. So I cut the legs on my table a fraction of an inch longer than what the drawings show. A plywood box is screwed to the legs below the table to brace the legs and provide storage for router accessories. There must be adequate room between the top of the box and the bottom of the router table to fit the router when the collet is fully retracted into the router base. I mounted simple plywood doors on the front legs to enclose the box and keep some of the sawdust out. The most complex part in the table is 3/8"x 3 carraige bolt, flat washer and nut 3/8" x 2" carraige bolt, flat washer, nut and star knob y 3/4" 4-> 4_ N 3/8" 10 V2" 5 3/8" radius 3/4" x 3/8" rabbet O ^ 3/4" x 1 V2" butt hinges (4 required) See detail at right- 3/4" " V4" ■ 22" 1" 2" 1" 12" 3/4" 15 V22 3/4" 3" 2 1/4 28" Elevation 1 1/2" radius i 1/2" V 1 1/2" \ 36" 31 1/4" k- 3/4" V4" ■ 2" 1" 3 5/8" 20" Profile 2" 1" 12" 3/4" 15 V2" 3/4" 3" 14" 2 1/4 " ^2/4" 36" 40 I Popular Woodworking January 2000 |


