Popular Woodworking 2000-01 № 112, страница 52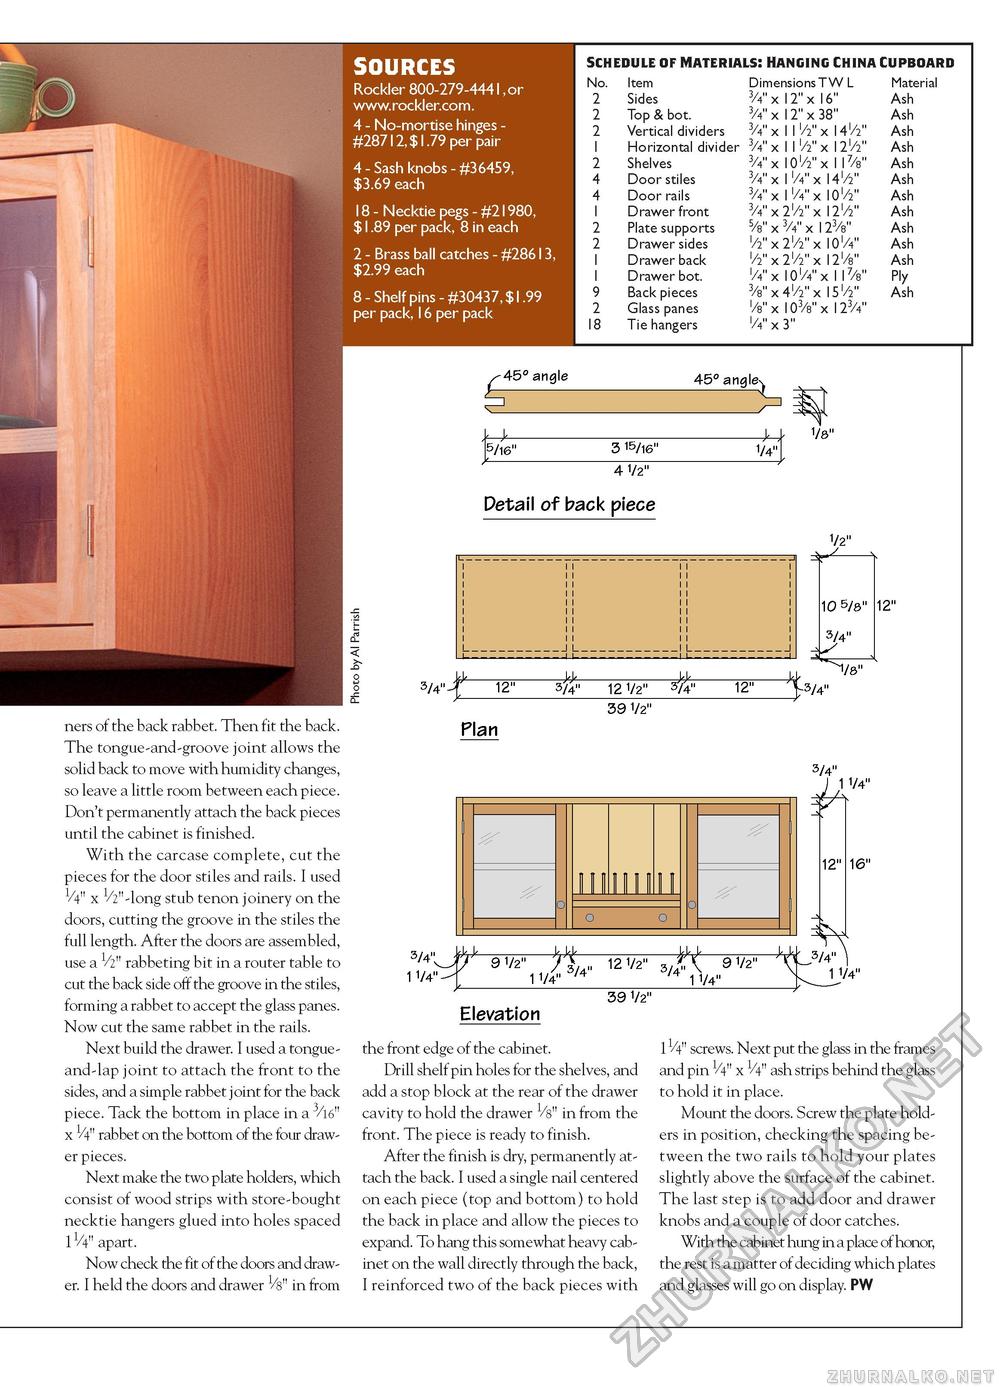
SCHEDULE OF MATERIALS! HANGING CHINA CUPBOARD SCHEDULE OF MATERIALS! HANGING CHINA CUPBOARD
45° angle- 1/8"
12" 12" 39 1/2" ^3/4" ~1/8" ners of the back rabbet. Then fit the back. The tongue-and-groove joint allows the solid back to move with humidity changes, so leave a little room between each piece. Don't permanently attach the back pieces until the cabinet is finished. With the carcase complete, cut the pieces for the door stiles and rails. I used V4" x 1/2"-long stub tenon joinery on the doors, cutting the groove in the stiles the full length. After the doors are assembled, use a V2" rabbeting bit in a router table to cut the back side off the groove in the stiles, forming a rabbet to accept the glass panes. Now cut the same rabbet in the rails. Next build the drawer. I used a tongue-and-lap joint to attach the front to the sides, and a simple rabbet joint for the back piece. Tack the bottom in place in a x 1/4" rabbet on the bottom of the four drawer pieces. Next make the two plate holders, which consist of wood strips with store-bought necktie hangers glued into holes spaced 1V4" apart. Now check the fit of the doors and drawer. I held the doors and drawer 1/s" in from Plan 11111 *U1/4" 3/4" f 12" 16" 3/4" 1 1/4l 9V,11/>t 121/2" 3^.91* ^ffi^ Elevation 39 1/2" the front edge of the cabinet. Drill shelf pin holes for the shelves, and add a stop block at the rear of the drawer cavity to hold the drawer Vs" in from the front. The piece is ready to finish. After the finish is dry, permanently attach the back. I used a single nail centered on each piece (top and bottom) to hold the back in place and allow the pieces to expand. To hang this somewhat heavy cabinet on the wall directly through the back, I reinforced two of the back pieces with 1/4" screws. Next put the glass in the frames and pin 1/4" x 1/4" ash strips behind the glass to hold it in place. Mount the doors. Screw the plate holders in position, checking the spacing between the two rails to hold your plates slightly above the surface of the cabinet. The last step is to add door and drawer knobs and a couple of door catches. With the cabinet hung in a place of honor, the rest is a matter of deciding which plates and glasses will go on display. PW |
|||||||||||||||||||||||||||||||||||||||||||||||||||||||||||||||||||||||||||||||||||||||


