Popular Woodworking 2000-02 № 113, страница 21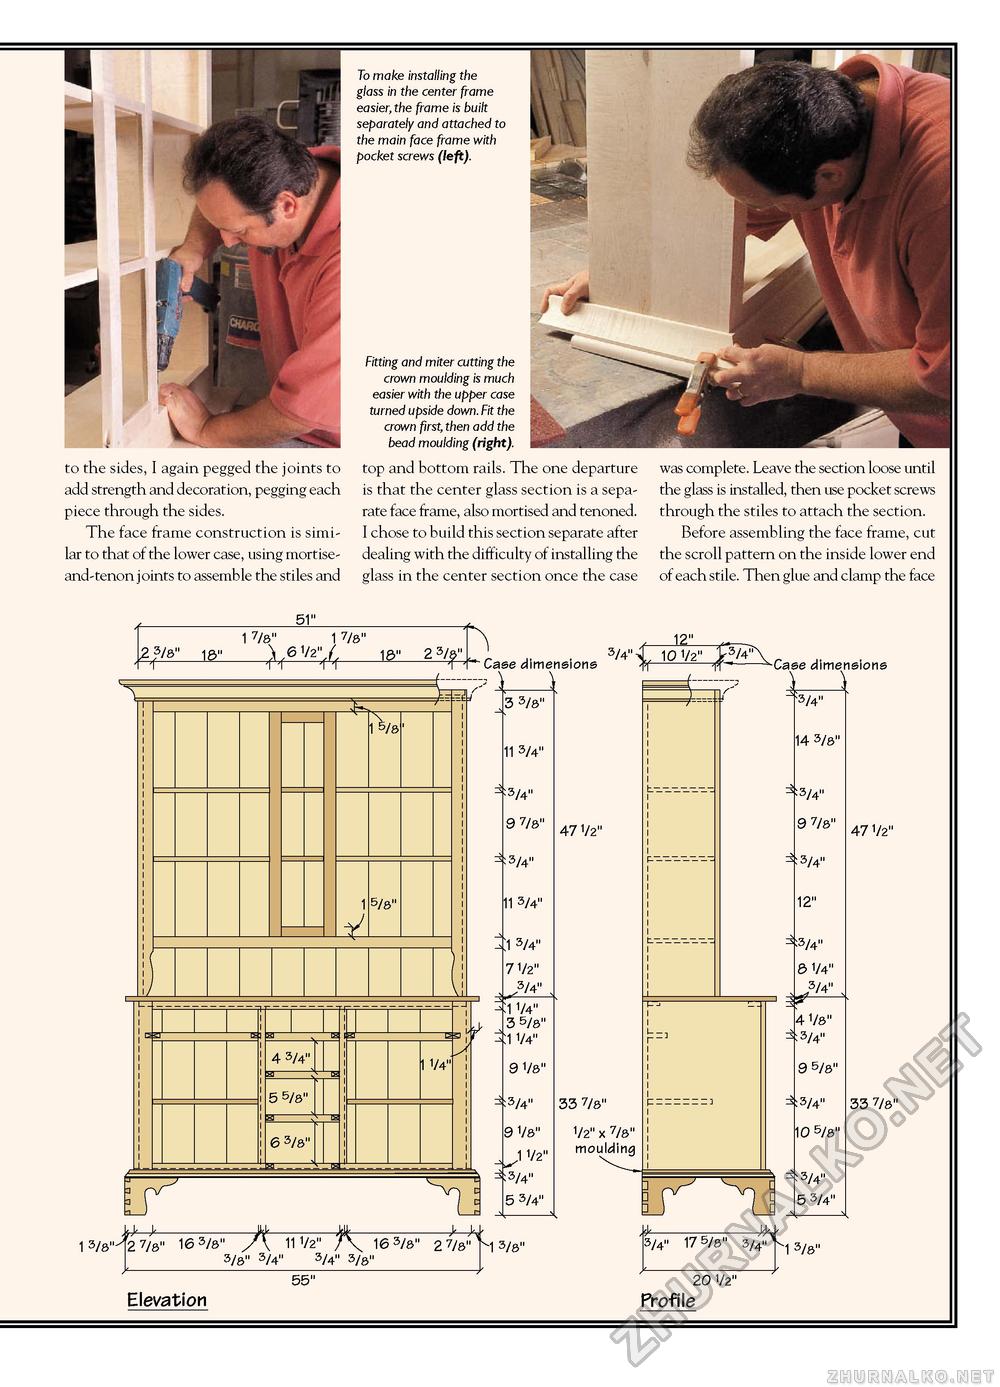
To make installing the glass in the center frame easier, the frame is built separately and attached to the main face frame with pocket screws (left). to the sides, I again pegged the joints to add strength and decoration, pegging each piece through the sides. The face frame construction is similar to that of the lower case, using mortise-and-tenon joints to assemble the stiles and Fitting and miter cutting the crown moulding is much easier with the upper case turned upside down. Fit the crown first, then add the bead moulding (right). top and bottom rails. The one departure is that the center glass section is a separate face frame, also mortised and tenoned. I chose to build this section separate after dealing with the difficulty of installing the glass in the center section once the case was complete. Leave the section loose until the glass is installed, then use pocket screws through the stiles to attach the section. Before assembling the face frame, cut the scroll pattern on the inside lower end of each stile. Then glue and clamp the face 51" 1 7/8" 1 7/8" 2 3/8" 18" Xg1/2"/ 18" -rt- 1 5/8 5/8" 4 3/4" 5 5/8" 6 3/8" 2 3/8" ' Case dimensions 3/4" 1 1/4" .A 3 3/8" 11 3/4" 3/4" 9 7/8" 3/4" 11 3/4" 1 3/4" 7 1/2" 3/4" :1 1/4" 3 5/8" 1 1/4" 9 1/8" 3/4" 9 1/8" ^,1 1/2" :3/4" 5 3/4" 1 3/8^2 7/8" 16 3/8" J\ 11 1/2" /V 16 3/8" 2 7/8^1 3/8" 3/8" 3/4" 3/4" 3/8" 55" Elevation 47 1/2" 33 7/8" 1/2" x 7/8" moulding Case dimensions i_i 3/4" 14 3/8" 3/4" 9 7/8" 3/4" 12" 3/4" 8 1/4" 3/4" . 4 1/8" 3/4" 9 5/8" 3/4" 10 5/8" 3/4" 5 3/4" 20 1/2" Profile 47 1/2" 33 7/8" |


