Popular Woodworking 2001-06 № 122, страница 44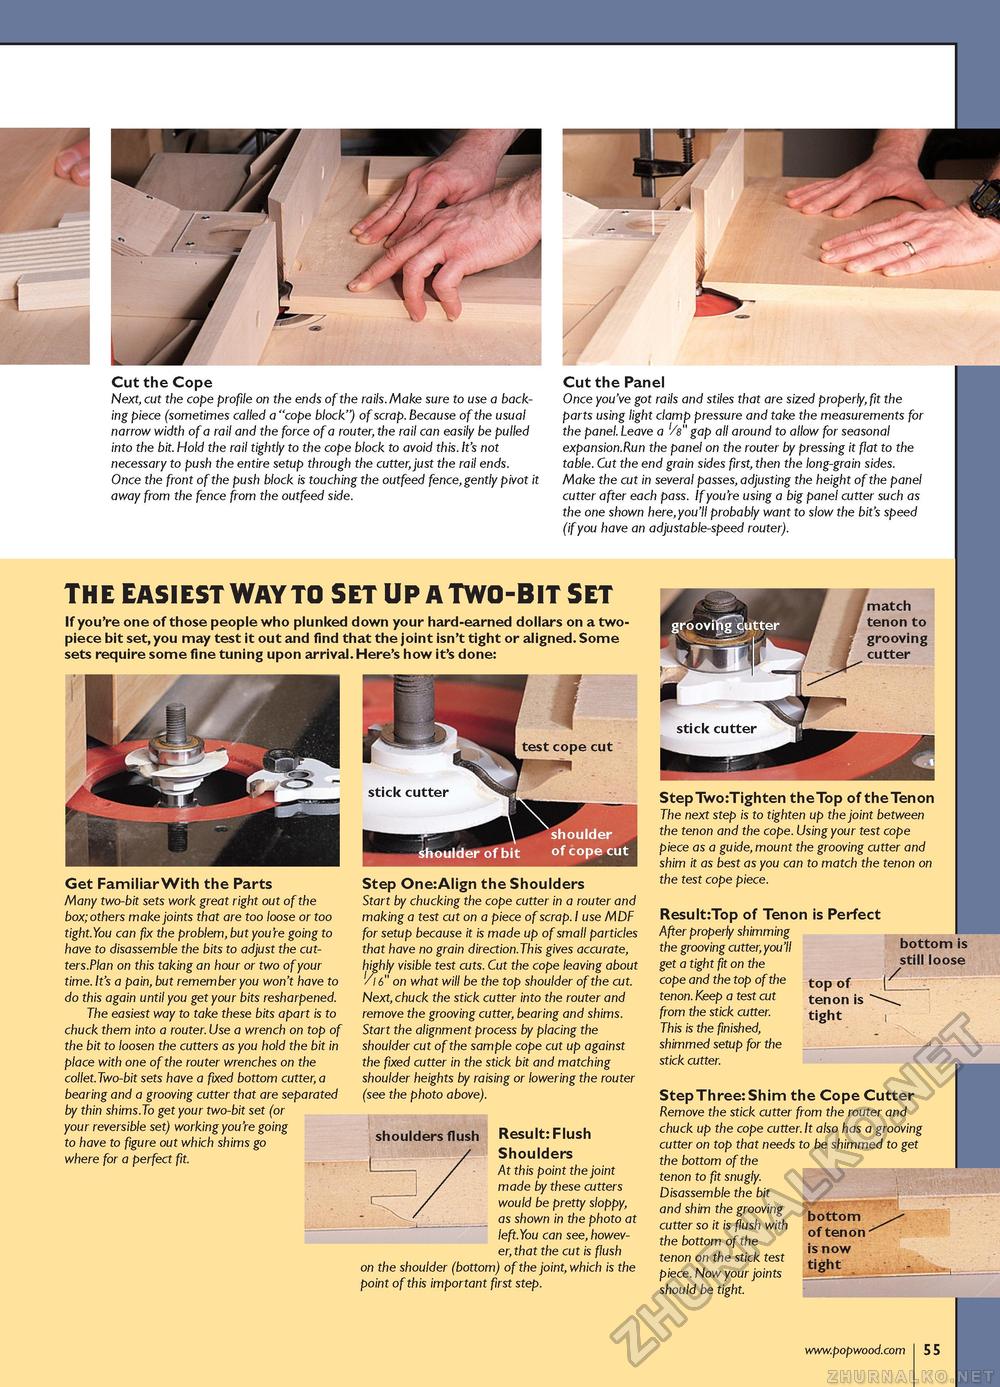
Cut the Cope Next, cut the cope profile on the ends of the rails.Make sure to use a backing piece (sometimes called a "cope block") of scrap. Because of the usual narrow width of a rail and the force of a router, the rail can easily be pulled into the bit. Hold the rail tightly to the cope block to avoid this. It's not necessary to push the entire setup through the cutter, just the rail ends. Once the front of the push block is touching the outfeed fence, gently pivot it away from the fence from the outfeed side. Cut the Panel Once you've got rails and stiles that are sized properly, fit the parts using light clamp pressure and take the measurements for the panel. Leave a '/e" gap all around to allow for seasonal expansion.Run the panel on the router by pressing it flat to the table. Cut the end grain sides first, then the long-grain sides. Make the cut in several passes, adjusting the height of the panel cutter after each pass. If you're using a big panel cutter such as the one shown here,you'll probably want to slow the bit's speed (if you have an adjustable-speed router). the easiest way to set up a two-bit set If you're one of those people who plunked down your hard-earned dollars on a two-piece bit set,you may test it out and find that the joint isn't tight or aligned. Some sets require some fine tuning upon arrival. Here's how it's done: Get Familiar With the Parts Many two-bit sets work great right out of the box; others make joints that are too loose or too tight.You can fix the problem, but you're going to have to disassemble the bits to adjust the cut-ters.Plan on this taking an hour or two of your time. It's a pain, but remember you won't have to do this again until you get your bits resharpened. The easiest way to take these bits apart is to chuck them into a router. Use a wrench on top of the bit to loosen the cutters as you hold the bit in place with one of the router wrenches on the collet.Two-bit sets have a fixed bottom cutter, a bearing and a grooving cutter that are separated by thin shims.To get your two-bit set (or your reversible set) working you're going to have to figure out which shims go where for a perfect fit. Step One:Align the Shoulders Start by chucking the cope cutter in a router and making a test cut on a piece of scrap. I use MDF for setup because it is made up of small particles that have no grain direction.This gives accurate, highly visible test cuts. Cut the cope leaving about 16" on what will be the top shoulder of the cut. Next, chuck the stick cutter into the router and remove the grooving cutter, bearing and shims. Start the alignment process by placing the shoulder cut of the sample cope cut up against the fixed cutter in the stick bit and matching shoulder heights by raising or lowering the router (see the photo above). Result: Flush Shoulders At this point the joint made by these cutters would be pretty sloppy, as shown in the photo at left.You can see, however, that the cut is flush on the shoulder (bottom) of the joint, which is the point of this important first step. Step Two:Tighten the Top of the Tenon The next step is to tighten up the joint between the tenon and the cope. Using your test cope piece as a guide, mount the grooving cutter and shim it as best as you can to match the tenon on the test cope piece. Result:Top of Tenon is Perfect After properly shimming the grooving cutter, you'll get a tight fit on the cope and the top of the tenon. Keep a test cut from the stick cutter. This is the finished, shimmed setup for the stick cutter. Step Three: Shim the Cope Cutter Remove the stick cutter from the router and chuck up the cope cutter. It also has a grooving cutter on top that needs to be shimmed to get the bottom of the tenon to fit snugly. Disassemble the bit and shim the grooving cutter so it is flush with the bottom of the tenon on the stick test piece. Now your joints should be tight.
|


