Popular Woodworking 2001-06 № 122, страница 52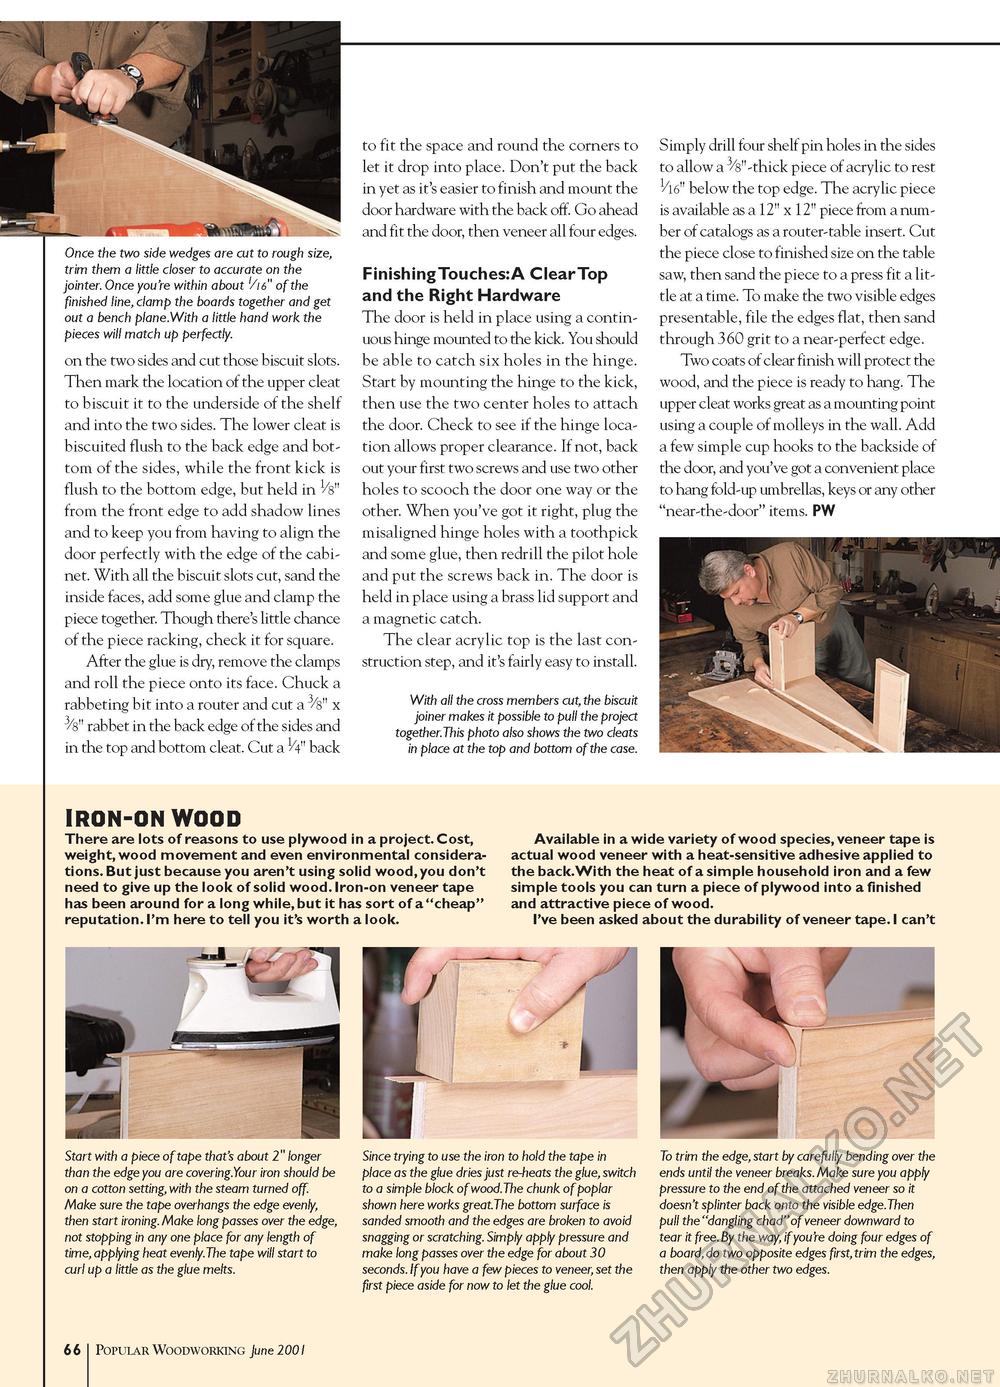
Once the two side wedges are cut to rough size, trim them a little closer to accurate on the jointer. Once you're within about '/is" of the finished line, clamp the boards together and get out a bench plane.With a little hand work the pieces will match up perfectly. on the two sides and cut those biscuit slots. Then mark the location of the upper cleat to biscuit it to the underside of the shelf and into the two sides. The lower cleat is biscuited flush to the back edge and bottom of the sides, while the front kick is flush to the bottom edge, but held in Vs" from the front edge to add shadow lines and to keep you from having to align the door perfectly with the edge of the cabinet. With all the biscuit slots cut, sand the inside faces, add some glue and clamp the piece together. Though there's little chance of the piece racking, check it for square. After the glue is dry, remove the clamps and roll the piece onto its face. Chuck a rabbeting bit into a router and cut a 3/s" x ^S" rabbet in the back edge of the sides and in the top and bottom cleat. Cut a H" back to fit the space and round the corners to let it drop into place. Don't put the back in yet as it's easier to finish and mount the door hardware with the back off. Go ahead and fit the door, then veneer all four edges. Finishing Touches:A Clear Top and the Right Hardware The door is held in place using a continuous hinge mounted to the kick. You should be able to catch six holes in the hinge. Start by mounting the hinge to the kick, then use the two center holes to attach the door. Check to see if the hinge location allows proper clearance. If not, back out your first two screws and use two other holes to scooch the door one way or the other. When you've got it right, plug the misaligned hinge holes with a toothpick and some glue, then redrill the pilot hole and put the screws back in. The door is held in place using a brass lid support and a magnetic catch. The clear acrylic top is the last construction step, and it's fairly easy to install. With all the cross members cut, the biscuit joiner makes it possible to pull the project together.This photo also shows the two cleats in place at the top and bottom of the case. Simply drill four shelf pin holes in the sides to allow a 3/8"-thick piece of acrylic to rest below the top edge. The acrylic piece is available as a 12" x 12" piece from a number of catalogs as a router-table insert. Cut the piece close to finished size on the table saw, then sand the piece to a press fit a little at a time. To make the two visible edges presentable, file the edges flat, then sand through 360 grit to a near-perfect edge. Two coats of clear finish will protect the wood, and the piece is ready to hang. The upper cleat works great as a mounting point using a couple of molleys in the wall. Add a few simple cup hooks to the backside of the door, and you've got a convenient place to hang fold-up umbrellas, keys or any other "near-the-door" items. PW IRON-ON WOOD There are lots of reasons to use plywood in a project.Cost, weight, wood movement and even environmental considerations. But just because you aren't using solid wood,you don't need to give up the look of solid wood. Iron-on veneer tape has been around for a long while,but it has sort of a "cheap" reputation. I'm here to tell you it's worth a look. Available in a wide variety of wood species, veneer tape is actual wood veneer with a heat-sensitive adhesive applied to the back.With the heat of a simple household iron and a few simple tools you can turn a piece of plywood into a finished and attractive piece of wood. I've been asked about the durability of veneer tape. I can't Start with a piece of tape that's about 2" longer than the edge you are covering.Your iron should be on a cotton setting, with the steam turned off Make sure the tape overhangs the edge evenly, then start ironing. Make long passes over the not stopping in any one place for any length of time, applying heat evenly.The tape will start to curl up a little as the glue melts. Since trying to use the iron to hold the tape in place as the glue dries just re-heats the glue, switch to a simple block of wood.The chunk of poplar shown here works great.The bottom surface is sanded smooth and the edges are broken to avoid snagging or scratching. Simply apply pressure and make long passes over the edge for about 30 seconds. If you have a few pieces to veneer, set the first piece aside for now to let the glue cool. To trim the edge, start by carefully bending over the ends until the veneer breaks. Make sure you apply pressure to the end of the attached veneer so it doesn't splinter back onto the visible edge.Then pull the "dangling chad"of veneer downward to tear it free. By the way, if you're doing four edges of a board, do two opposite edges first, trim the edges, then apply the other two edges. 66 Popular Woodworking June 2001 |


