Popular Woodworking 2001-12 № 125, страница 44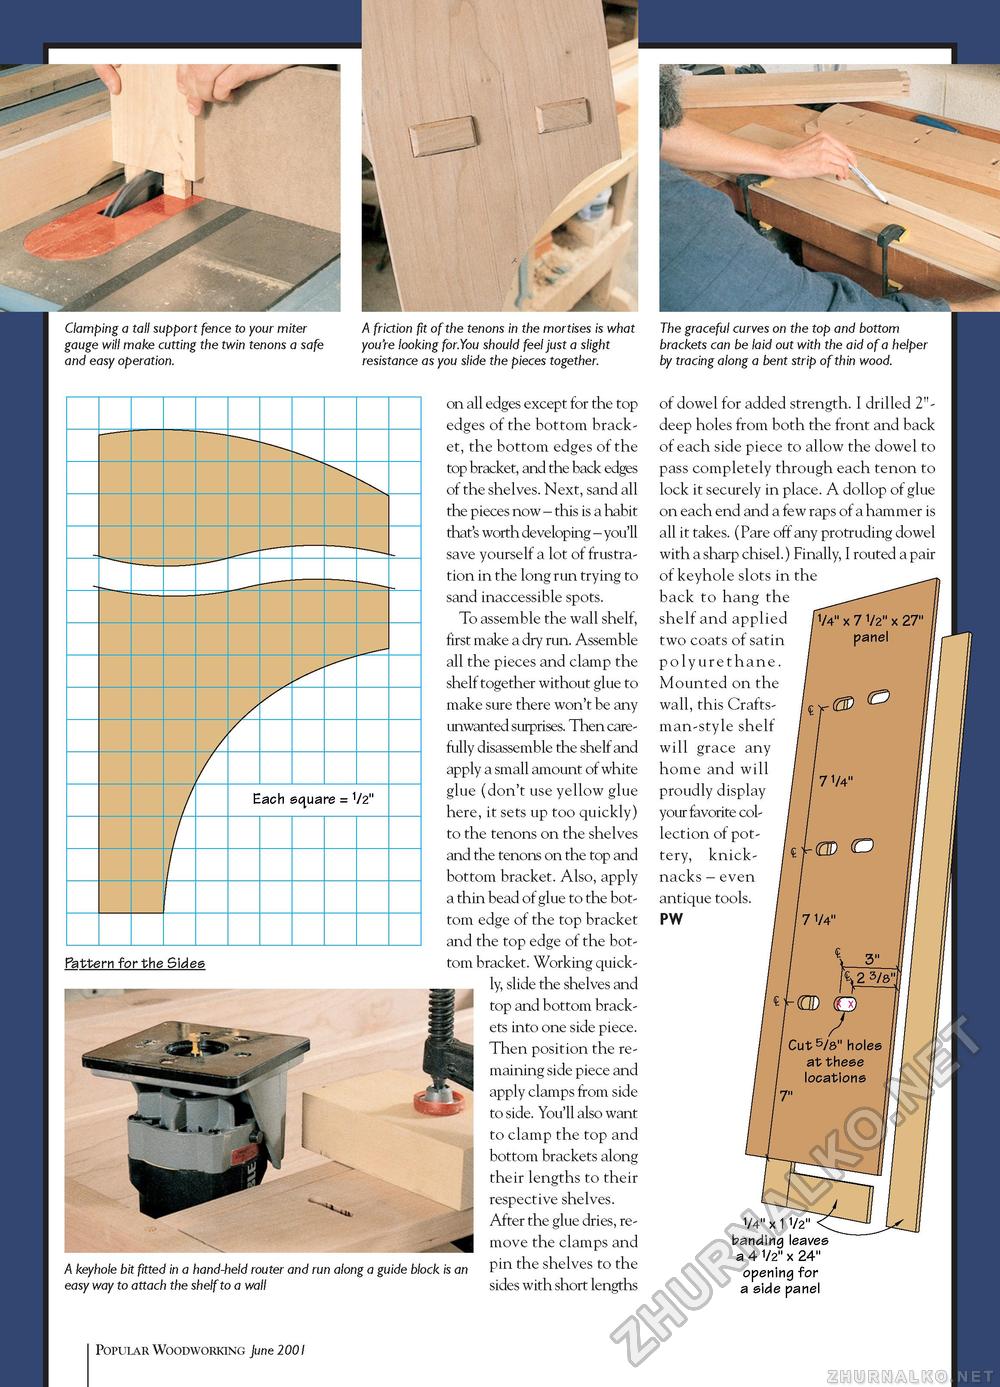
Clamping a tall support fence to your miter gauge will make cutting the twin tenons a safe and easy operation. A friction fit of the tenons in the mortises is what you're looking for.You should feel just a slight resistance as you slide the pieces together. The graceful curves on the top and bottom brackets can be laid out with the aid of a helper by tracing along a bent strip of thin wood.
Pattern for the Sides Pattern for the Sides A keyhole bit fitted in a hand-held router and run along a guide block is an easy way to attach the shelf to a wall on all edges except for the top edges of the bottom bracket, the bottom edges of the top bracket, and the back edges of the shelves. Next, sand all the pieces now - this is a habit that's worth developing - you'll save yourself a lot of frustration in the long run trying to sand inaccessible spots. To assemble the wall shelf, first make a dry run. Assemble all the pieces and clamp the shelf together without glue to make sure there won't be any unwanted surprises. Then carefully disassemble the shelf and apply a small amount of white glue (don't use yellow glue here, it sets up too quickly) to the tenons on the shelves and the tenons on the top and bottom bracket. Also, apply a thin bead of glue to the bottom edge of the top bracket and the top edge of the bottom bracket. Working quickly, slide the shelves and top and bottom brackets into one side piece. Then position the remaining side piece and apply clamps from side to side. You'll also want to clamp the top and bottom brackets along their lengths to their respective shelves. After the glue dries, remove the clamps and pin the shelves to the sides with short lengths of dowel for added strength. I drilled 2"-deep holes from both the front and back of each side piece to allow the dowel to pass completely through each tenon to lock it securely in place. A dollop of glue on each end and a few raps of a hammer is all it takes. (Pare off any protruding dowel with a sharp chisel.) Finally, I routed a pair of keyhole slots in the back to hang the shelf and applied two coats of satin polyurethane. Mounted on the wall, this Craftsman-style shelf will grace any home and will proudly display your favorite collection of pottery, knick-nacks - even antique tools. PW 1/4" x 1 1/2" \ banding leaves a 4 1/2" x 24" opening for a side panel 44 Popular Woodworking December 2001 |
||||||||||||||||||||||||||||||||||||||||||||||||||||||||||||||||||||||||||||||||||||||||||||||||||||||||||||||||||||||||||||||||||||||||||||||||||||||||||||||||||||||||||||||||||||||||||||||


