Popular Woodworking 2002-02 № 126, страница 64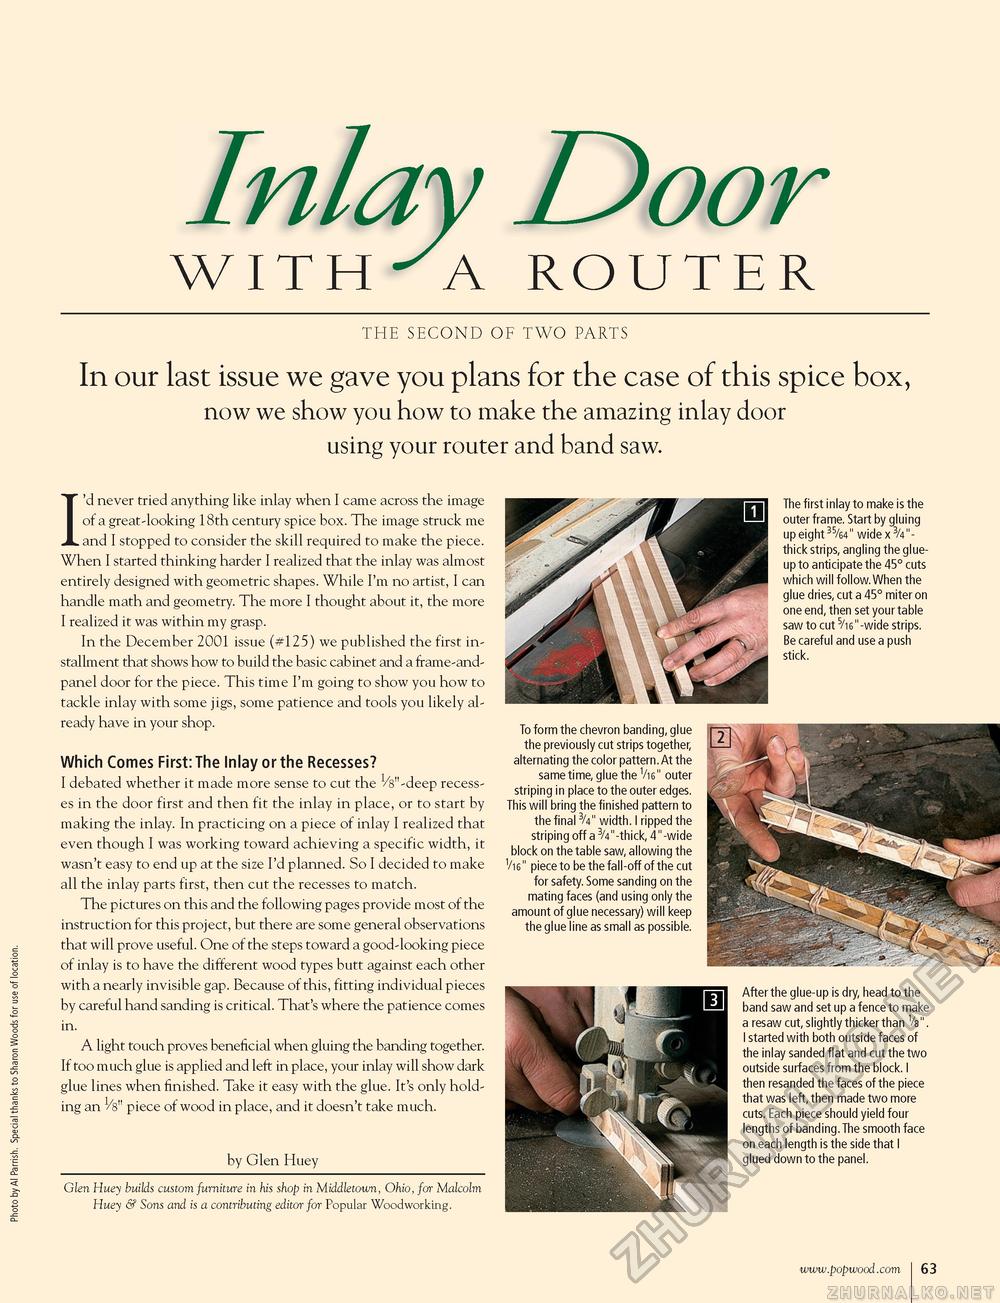
Inlay Door WITH A ROUTER THE SECOND OF TWO PARTS In our last issue we gave you plans for the case of this spice box, now we show you how to make the amazing inlay door using your router and band saw. I'd never tried anything like inlay when I came across the image of a great-looking 18th century spice box. The image struck me and I stopped to consider the skill required to make the piece. When I started thinking harder I realized that the inlay was almost entirely designed with geometric shapes. While I'm no artist, I can handle math and geometry. The more I thought about it, the more I realized it was within my grasp. In the December 2001 issue (#125) we published the first installment that shows how to build the basic cabinet and a frame-and-panel door for the piece. This time I'm going to show you how to tackle inlay with some jigs, some patience and tools you likely already have in your shop. Which Comes First: The Inlay or the Recesses? I debated whether it made more sense to cut the Vs" -deep recesses in the door first and then fit the inlay in place, or to start by making the inlay. In practicing on a piece of inlay I realized that even though I was working toward achieving a specific width, it wasn't easy to end up at the size I'd planned. So I decided to make all the inlay parts first, then cut the recesses to match. The pictures on this and the following pages provide most of the instruction for this project, but there are some general observations that will prove useful. One of the steps toward a good-looking piece of inlay is to have the different wood types butt against each other with a nearly invisible gap. Because of this, fitting individual pieces by careful hand sanding is critical. That's where the patience comes in. A light touch proves beneficial when gluing the banding together. If too much glue is applied and left in place, your inlay will show dark glue lines when finished. Take it easy with the glue. It's only holding an Vs" piece of wood in place, and it doesn't take much. by Glen Huey Glen Huey builds custom furniture in his shop in Middletown, Ohio, for Malcolm Huey & Sons and is a contributing editor for Popular Woodworking. To form the chevron banding, glue the previously cut strips together, alternating the color pattern.At the same time, glue the Vi6" outer striping in place to the outer edges. This will bring the finished pattern to the final 3/4" width. I ripped the striping off a 3/4"-thick, 4"-wide block on the table saw, allowing the Vi6" piece to be the fall-off of the cut for safety. Some sanding on the mating faces (and using only the amount of glue necessary) will keep the glue line as small as possible. The first inlay to make is the outer frame. Start by gluing up eight 35/64" wide x 3/4"-thick strips, angling the glue-up to anticipate the 45° cuts which will follow.When the glue dries, cut a 45° miter on one end, then set your table saw to cut 5/i6"-wide strips. Be careful and use a push stick. After the glue-up is dry, head to the band saw and set up a fence to make a resaw cut, slightly thicker than Vs". I started with both outside faces of the inlay sanded flat and cut the two outside surfaces from the block. I then resanded the faces of the piece that was left, then made two more cuts. Each piece should yield four lengths of banding.The smooth face on each length is the side that I glued down to the panel. www.popwood.com I 63 |


