Popular Woodworking 2002-02 № 126, страница 65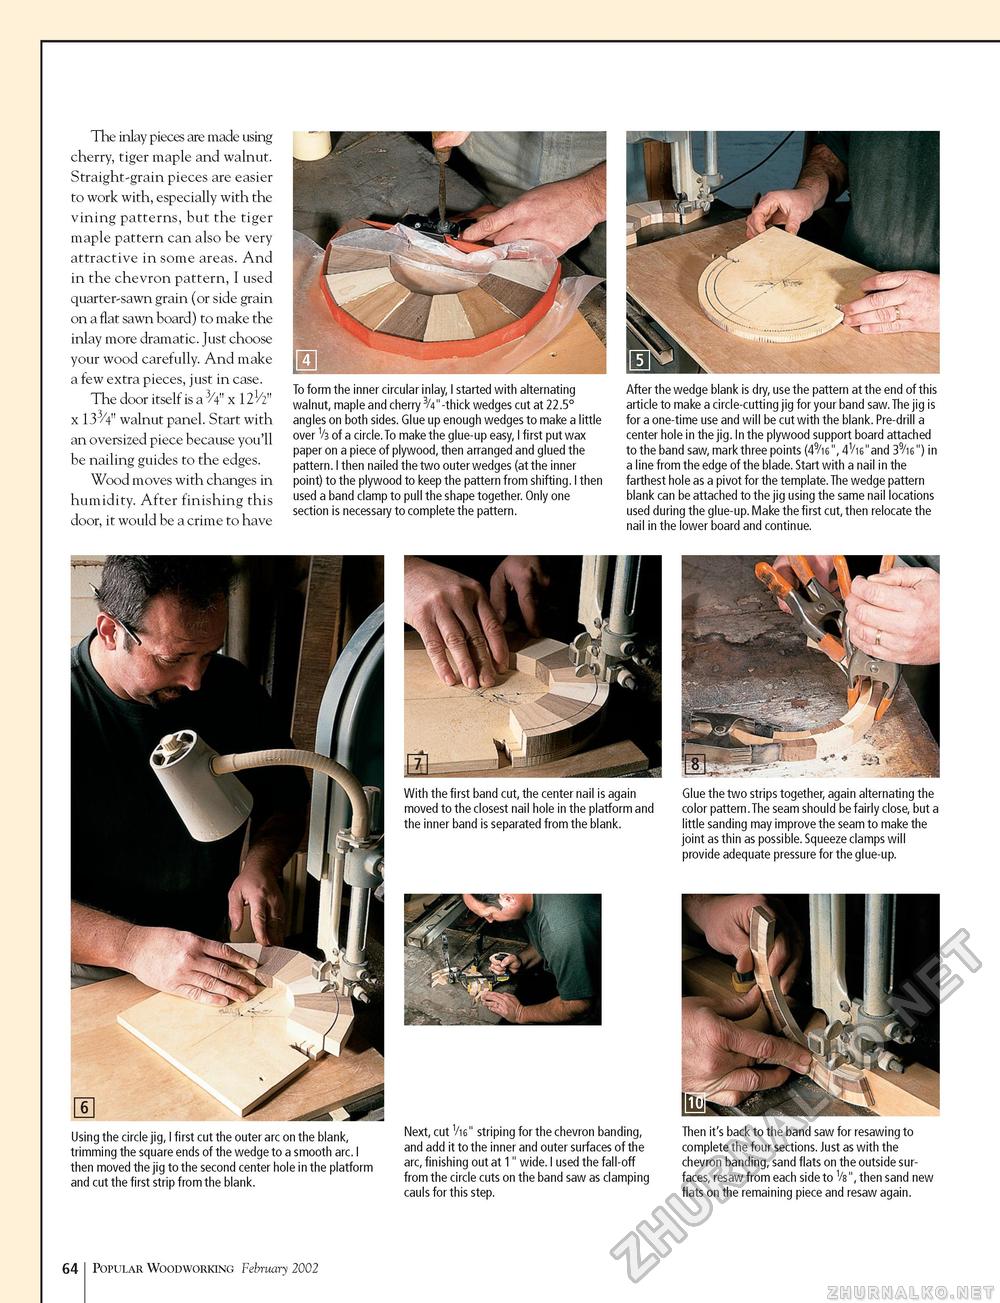
The inlay pieces are made using cherry, tiger maple and walnut. Straight-grain pieces are easier to work with, especially with the vining patterns, but the tiger maple pattern can also be very attractive in some areas. And in the chevron pattern, I used quarter-sawn grain (or side grain on a flat sawn board) to make the inlay more dramatic. Just choose your wood carefully. And make a few extra pieces, just in case. The door itself is a /4" x x 133/4" walnut panel. Start with an oversized piece because you'll be nailing guides to the edges. Wood moves with changes in humidity. After finishing this door, it would be a crime to have To form the inner circular inlay, I started with alternating walnut, maple and cherry 3/4"-thick wedges cut at 22.5° angles on both sides. Glue up enough wedges to make a little over V3 of a circle.To make the glue-up easy, I first put wax paper on a piece of plywood, then arranged and glued the pattern. I then nailed the two outer wedges (at the inner point) to the plywood to keep the pattern from shifting. I then used a band clamp to pull the shape together. Only one section is necessary to complete the pattern. After the wedge blank is dry, use the pattern at the end of this article to make a circle-cutting jig for your band saw. The jig is for a one-time use and will be cut with the blank. Pre-drill a center hole in the jig. In the plywood support board attached to the band saw, mark three points (49/i6", 41/i6"and 39/i6") in a line from the edge of the blade. Start with a nail in the farthest hole as a pivot for the template. The wedge pattern blank can be attached to the jig using the same nail locations used during the glue-up. Make the first cut, then relocate the nail in the lower board and continue. With the first band cut, the center nail is again moved to the closest nail hole in the platform and the inner band is separated from the blank. Glue the two strips together, again alternating the color pattern.The seam should be fairly close, but a little sanding may improve the seam to make the joint as thin as possible. Squeeze clamps will provide adequate pressure for the glue-up. Using the circle jig, I first cut the outer arc on the blank, trimming the square ends of the wedge to a smooth arc. I then moved the jig to the second center hole in the platform and cut the first strip from the blank. Next, cut Vi6" striping for the chevron banding, and add it to the inner and outer surfaces of the arc, finishing out at 1" wide. I used the fall-off from the circle cuts on the band saw as clamping cauls for this step. Then it's back to the band saw for resawing to complete the four sections. Just as with the chevron banding, sand flats on the outside surfaces, resaw from each side to Vs", then sand new flats on the remaining piece and resaw again. 64 Popular Woodworking February 2002 |


