Popular Woodworking 2002-04 № 127, страница 51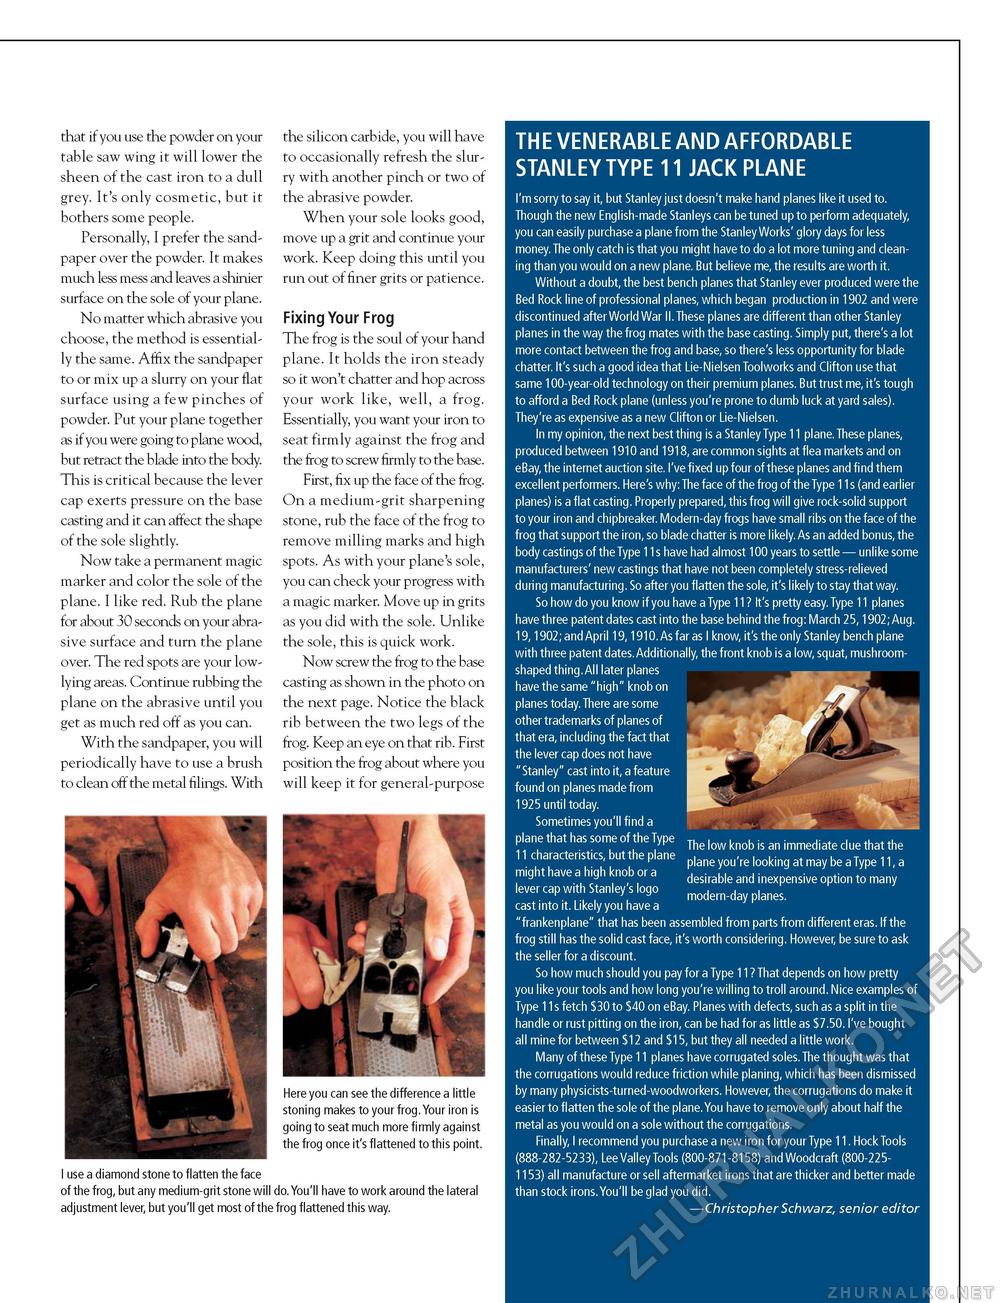
THE VENERABLE AND AFFORDABLE STANLEY TYPE 11 JACK PLANE I'm sorry to say it, but Stanley just doesn't make hand planes like it used to. Though the new English-made Stanleys can be tuned up to perform adequately, you can easily purchase a plane from the Stanley Works' glory days for less money. The only catch is that you might have to do a lot more tuning and cleaning than you would on a new plane. But believe me, the results are worth it. Without a doubt, the best bench planes that Stanley ever produced were the Bed Rock line of professional planes, which began production in 1902 and were discontinued after World War II.These planes are different than other Stanley planes in the way the frog mates with the base casting. Simply put, there's a lot more contact between the frog and base, so there's less opportunity for blade chatter. It's such a good idea that Lie-Nielsen Toolworks and Clifton use that same 100-year-old technology on their premium planes. But trust me, it's tough to afford a Bed Rock plane (unless you're prone to dumb luck at yard sales). They're as expensive as a new Clifton or Lie-Nielsen. In my opinion, the next best thing is a Stanley Type 11 plane.These planes, produced between 1910 and 1918, are common sights at flea markets and on eBay, the internet auction site. I've fixed up four of these planes and find them excellent performers. Here's why:The face of the frog of the Type 11s (and earlier planes) is a flat casting. Properly prepared, this frog will give rock-solid support to your iron and chipbreaker. Modern-day frogs have small ribs on the face of the frog that support the iron, so blade chatter is more likely.As an added bonus, the body castings of the Type 11s have had almost 100 years to settle — unlike some manufacturers' new castings that have not been completely stress-relieved during manufacturing. So after you flatten the sole, it's likely to stay that way. So how do you know if you have a Type 11? It's pretty easy. Type 11 planes have three patent dates cast into the base behind the frog: March 25,1902;Aug. 19,1902; and April 19,1910.As far as I know, it's the only Stanley bench plane with three patent dates.Additionally, the front knob is a low, squat, mushroom-shaped thing. All later planes have the same "high" knob on planes today. There are some other trademarks of planes of that era, including the fact that the lever cap does not have "Stanley" cast into it, a feature found on planes made from 1925 until today. Sometimes you'll find a plane that has some of the Type 11 characteristics, but the plane might have a high knob or a lever cap with Stanley's logo cast into it. Likely you have a "frankenplane" that has been assembled from parts from different eras. If the frog still has the solid cast face, it's worth considering. However, be sure to ask the seller for a discount. So how much should you pay for a Type 11? That depends on how pretty you like your tools and how long you're willing to troll around. Nice examples of Type 11s fetch $30 to $40 on eBay. Planes with defects, such as a split in the handle or rust pitting on the iron, can be had for as little as $7.50. I've bought all mine for between $12 and $15, but they all needed a little work. Many of these Type 11 planes have corrugated soles. The thought was that the corrugations would reduce friction while planing, which has been dismissed by many physicists-turned-woodworkers. However, the corrugations do make it easier to flatten the sole of the plane.You have to remove only about half the metal as you would on a sole without the corrugations. Finally, I recommend you purchase a new iron for your Type 11. Hock Tools (888-282-5233), Lee Valley Tools (800-871-8158) and Woodcraft (800-2251153) all manufacture or sell aftermarket irons that are thicker and better made than stock irons.You'll be glad you did. —Christopher Schwarz, senior editor The low knob is an immediate clue that the plane you're looking at may be a Type 11, a desirable and inexpensive option to many modern-day planes. that if you use the powder on your table saw wing it will lower the sheen of the cast iron to a dull grey. It's only cosmetic, but it bothers some people. Personally, I prefer the sandpaper over the powder. It makes much less mess and leaves a shinier surface on the sole of your plane. No matter which abrasive you choose, the method is essentially the same. Affix the sandpaper to or mix up a slurry on your flat surface using a few pinches of powder. Put your plane together as if you were going to plane wood, but retract the blade into the body. This is critical because the lever cap exerts pressure on the base casting and it can affect the shape of the sole slightly. Now take a permanent magic marker and color the sole of the plane. I like red. Rub the plane for about 30 seconds on your abrasive surface and turn the plane over. The red spots are your low-lying areas. Continue rubbing the plane on the abrasive until you get as much red off as you can. With the sandpaper, you will periodically have to use a brush to clean off the metal filings. With the silicon carbide, you will have to occasionally refresh the slurry with another pinch or two of the abrasive powder. When your sole looks good, move up a grit and continue your work. Keep doing this until you run out of finer grits or patience. Fixing Your Frog The frog is the soul of your hand plane. It holds the iron steady so it won't chatter and hop across your work like, well, a frog. Essentially, you want your iron to seat firmly against the frog and the frog to screw firmly to the base. First, fix up the face of the frog. On a medium-grit sharpening stone, rub the face of the frog to remove milling marks and high spots. As with your plane's sole, you can check your progress with a magic marker. Move up in grits as you did with the sole. Unlike the sole, this is quick work. Now screw the frog to the base casting as shown in the photo on the next page. Notice the black rib between the two legs of the frog. Keep an eye on that rib. First position the frog about where you will keep it for general-purpose Here you can see the difference a little stoning makes to your frog.Your iron is going to seat much more firmly against the frog once it's flattened to this point. I use a diamond stone to flatten the face of the frog, but any medium-grit stone will do.You'll have to work around the lateral adjustment lever, but you'll get most of the frog flattened this way. |


