Popular Woodworking 2002-04 № 127, страница 52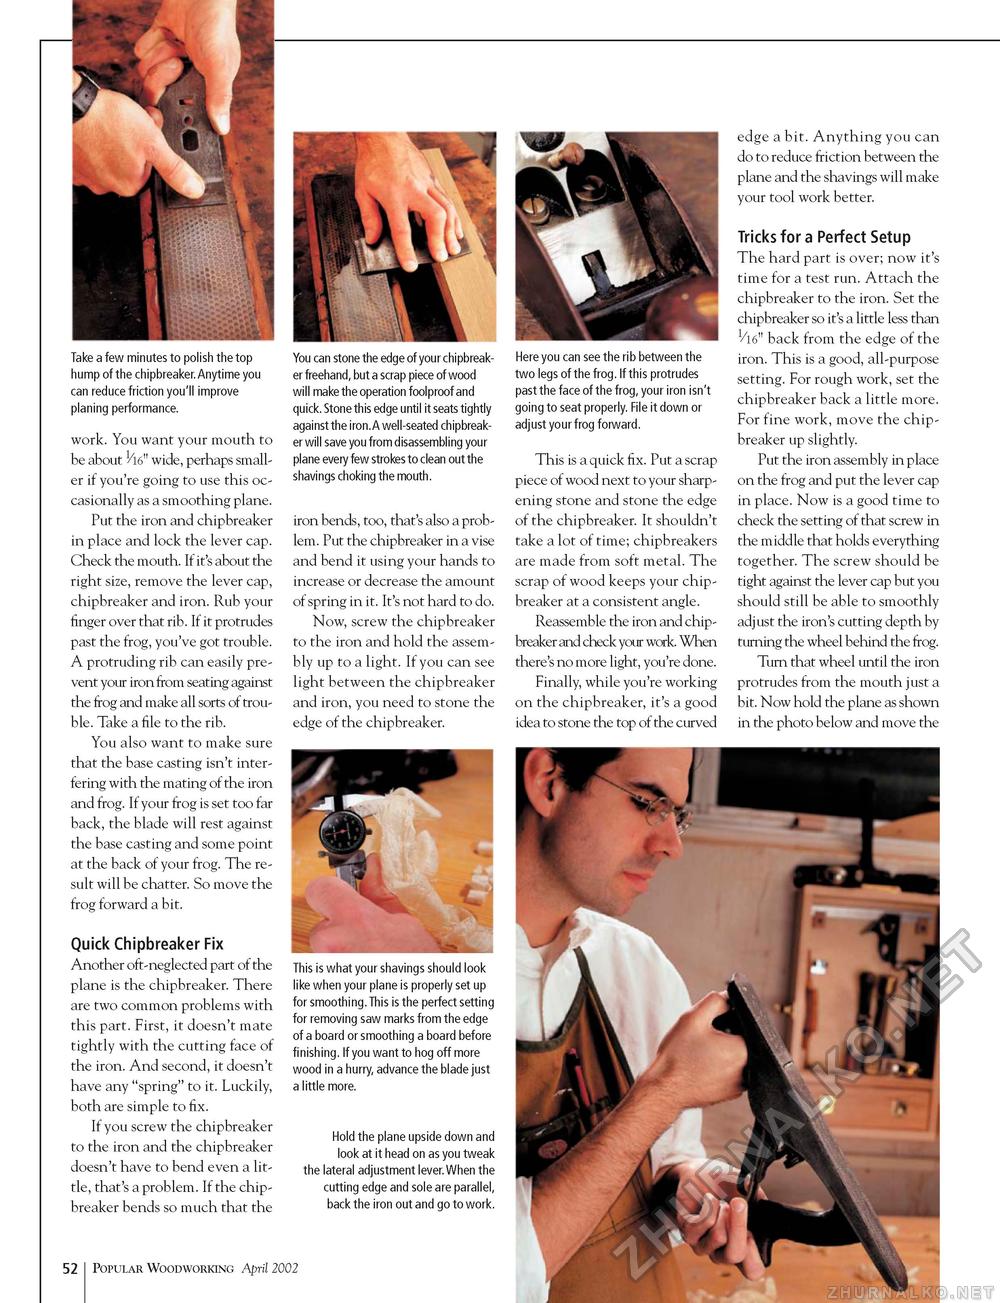
Take a few minutes to polish the top hump of the chipbreaker.Anytime you can reduce friction you'll improve planing performance. work. You want your mouth to be about V16" wide, perhaps smaller if you're going to use this occasionally as a smoothing plane. Put the iron and chipbreaker in place and lock the lever cap. Check the mouth. If it's about the right size, remove the lever cap, chipbreaker and iron. Rub your finger over that rib. If it protrudes past the frog, you've got trouble. A protruding rib can easily prevent your iron from seating against the frog and make all sorts of trouble. Take a file to the rib. You also want to make sure that the base casting isn't interfering with the mating of the iron and frog. If your frog is set too far back, the blade will rest against the base casting and some point at the back of your frog. The result will be chatter. So move the frog forward a bit. Quick Chipbreaker Fix Another oft-neglected part of the plane is the chipbreaker. There are two common problems with this part. First, it doesn't mate tightly with the cutting face of the iron. And second, it doesn't have any "spring" to it. Luckily, both are simple to fix. If you screw the chipbreaker to the iron and the chipbreaker doesn't have to bend even a little, that's a problem. If the chip-breaker bends so much that the You can stone the edge of your chipbreaker freehand, but a scrap piece of wood will make the operation foolproof and quick. Stone this edge until it seats tightly against the iron.A well-seated chipbreak-er will save you from disassembling your plane every few strokes to clean out the shavings choking the mouth. iron bends, too, that's also a problem. Put the chipbreaker in a vise and bend it using your hands to increase or decrease the amount of spring in it. It's not hard to do. Now, screw the chipbreaker to the iron and hold the assembly up to a light. If you can see light between the chipbreaker and iron, you need to stone the edge of the chipbreaker. This is what your shavings should look like when your plane is properly set up for smoothing.This is the perfect setting for removing saw marks from the edge of a board or smoothing a board before finishing. If you want to hog off more wood in a hurry, advance the blade just a little more. Hold the plane upside down and look at it head on as you tweak the lateral adjustment lever.When the cutting edge and sole are parallel, back the iron out and go to work. Here you can see the rib between the two legs of the frog. If this protrudes past the face of the frog, your iron isn't going to seat properly. File it down or adjust your frog forward. This is a quick fix. Put a scrap piece of wood next to your sharpening stone and stone the edge of the chipbreaker. It shouldn't take a lot of time; chipbreakers are made from soft metal. The scrap of wood keeps your chip-breaker at a consistent angle. Reassemble the iron and chip-breaker and check your work. When there's no more light, you're done. Finally, while you're working on the chipbreaker, it's a good idea to stone the top of the curved edge a bit. Anything you can do to reduce friction between the plane and the shavings will make your tool work better. Tricks for a Perfect Setup The hard part is over; now it's time for a test run. Attach the chipbreaker to the iron. Set the chipbreaker so it's a little less than back from the edge of the iron. This is a good, all-purpose setting. For rough work, set the chipbreaker back a little more. For fine work, move the chip-breaker up slightly. Put the iron assembly in place on the frog and put the lever cap in place. Now is a good time to check the setting of that screw in the middle that holds everything together. The screw should be tight against the lever cap but you should still be able to smoothly adjust the iron's cutting depth by turning the wheel behind the frog. Turn that wheel until the iron protrudes from the mouth just a bit. Now hold the plane as shown in the photo below and move the 52 Popular Woodworking April 2002 |


