Popular Woodworking 2002-06 № 128, страница 67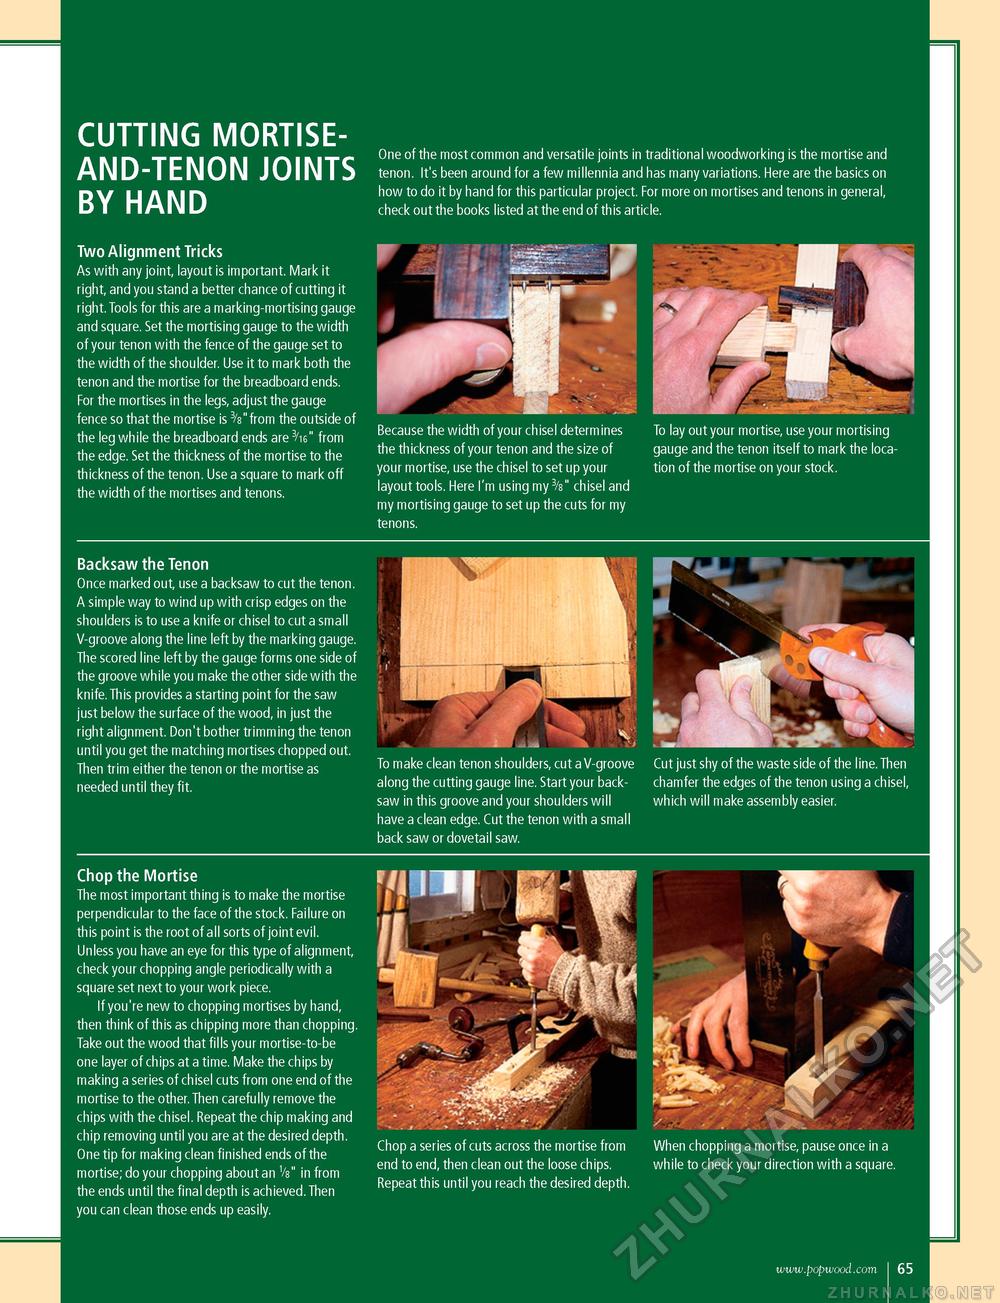
CUTTING MORTISE-AND-TENON JOINTS BY HAND One of the most common and versatile joints in traditional woodworking is the mortise and tenon. It's been around for a few millennia and has many variations. Here are the basics on how to do it by hand for this particular project. For more on mortises and tenons in general, check out the books listed at the end of this article. Two Alignment Tricks As with any joint, layout is important. Mark it right, and you stand a better chance of cutting it right. Tools for this are a marking-mortising gauge and square. Set the mortising gauge to the width of your tenon with the fence of the gauge set to the width of the shoulder. Use it to mark both the tenon and the mortise for the breadboard ends. For the mortises in the legs, adjust the gauge fence so that the mortise is 3/s"from the outside of the leg while the breadboard ends are 3/i6" from the edge. Set the thickness of the mortise to the thickness of the tenon. Use a square to mark off the width of the mortises and tenons. Backsaw the Tenon Once marked out, use a backsaw to cut the tenon. A simple way to wind up with crisp edges on the shoulders is to use a knife or chisel to cut a small V-groove along the line left by the marking gauge. The scored line left by the gauge forms one side of the groove while you make the other side with the knife.This provides a starting point for the saw just below the surface of the wood, in just the right alignment. Don't bother trimming the tenon until you get the matching mortises chopped out. Then trim either the tenon or the mortise as needed until they fit. Chop the Mortise The most important thing is to make the mortise perpendicular to the face of the stock. Failure on this point is the root of all sorts of joint evil. Unless you have an eye for this type of alignment, check your chopping angle periodically with a square set next to your work piece. If you're new to chopping mortises by hand, then think of this as chipping more than chopping. Take out the wood that fills your mortise-to-be one layer of chips at a time. Make the chips by making a series of chisel cuts from one end of the mortise to the other. Then carefully remove the chips with the chisel. Repeat the chip making and chip removing until you are at the desired depth. One tip for making clean finished ends of the mortise; do your chopping about an Vs" in from the ends until the final depth is achieved. Then you can clean those ends up easily. Because the width of your chisel determines the thickness of your tenon and the size of your mortise, use the chisel to set up your layout tools. Here I'm using my 3/s" chisel and my mortising gauge to set up the cuts for my tenons. To make clean tenon shoulders, cut a V-groove along the cutting gauge line. Start your back-saw in this groove and your shoulders will have a clean edge. Cut the tenon with a small back saw or dovetail saw. Chop a series of cuts across the mortise from end to end, then clean out the loose chips. Repeat this until you reach the desired depth. To lay out your mortise, use your mortising gauge and the tenon itself to mark the location of the mortise on your stock. Cut just shy of the waste side of the line. Then chamfer the edges of the tenon using a chisel, which will make assembly easier. \ t X ----fRM , :t, MT/s-mW When chopping a mortise, pause once in a while to check your direction with a square. www.popwood.com I 65 |


