Popular Woodworking 2002-10 № 130, страница 38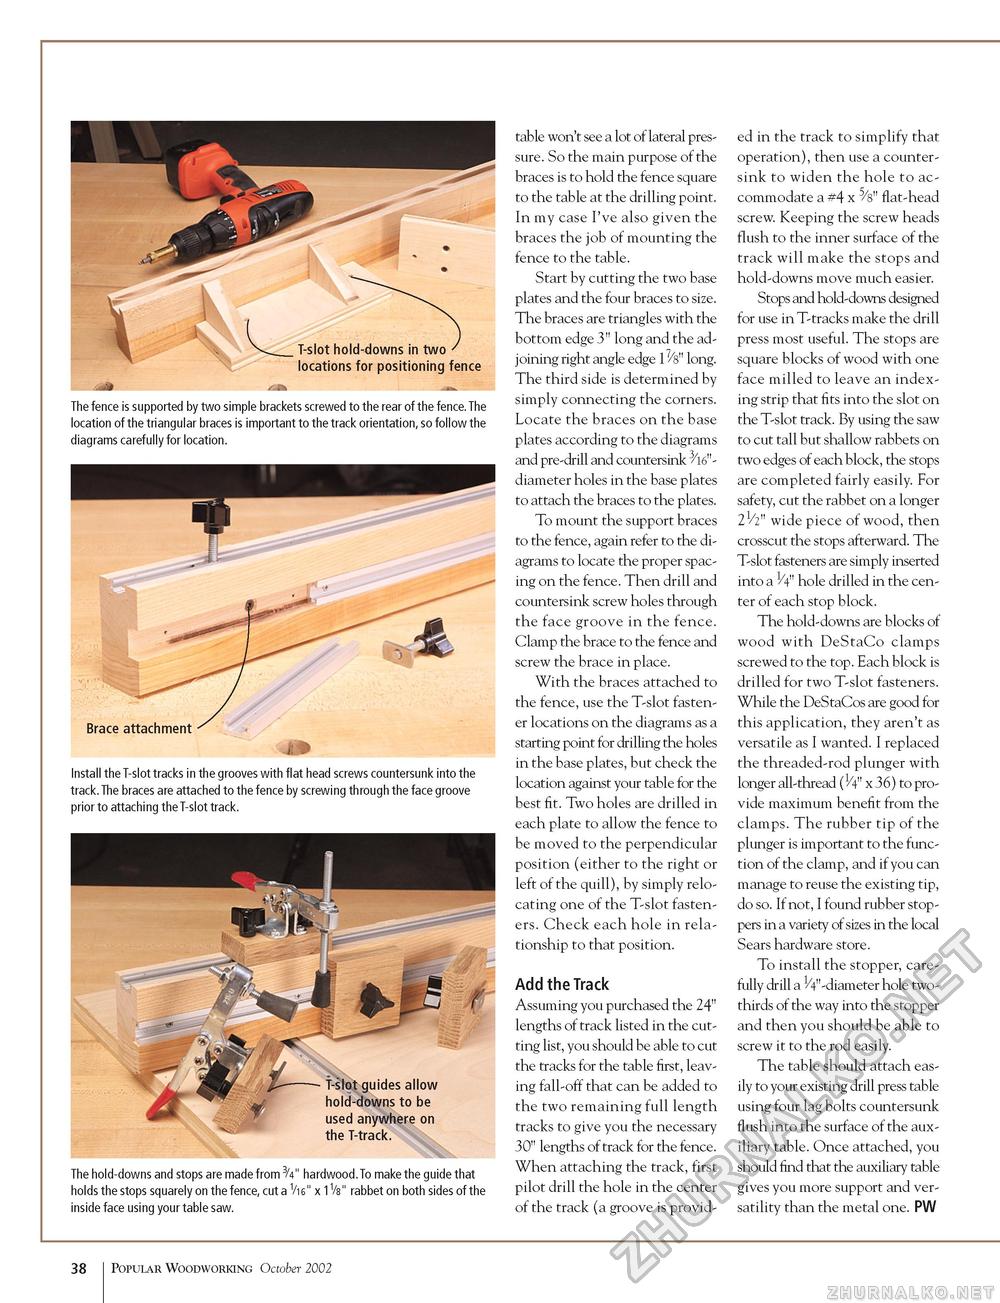
The fence is supported by two simple brackets screwed to the rear of the fence.The location of the triangular braces is important to the track orientation, so follow the diagrams carefully for location. ■ X9 Install the T-slot tracks in the grooves with flat head screws countersunk into the track. The braces are attached to the fence by screwing through the face groove prior to attaching the T-slot track. The hold-downs and stops are made from 3/4" hardwood.To make the guide that holds the stops squarely on the fence, cut a 1/i6" x 1V8" rabbet on both sides of the inside face using your table saw. table won't see a lot of lateral pressure. So the main purpose of the braces is to hold the fence square to the table at the drilling point. In my case I've also given the braces the job of mounting the fence to the table. Start by cutting the two base plates and the four braces to size. The braces are triangles with the bottom edge 3" long and the adjoining right angle edge 17/8" long. The third side is determined by simply connecting the corners. Locate the braces on the base plates according to the diagrams and pre-drill and countersink 3/16"-diameter holes in the base plates to attach the braces to the plates. To mount the support braces to the fence, again refer to the diagrams to locate the proper spacing on the fence. Then drill and countersink screw holes through the face groove in the fence. Clamp the brace to the fence and screw the brace in place. With the braces attached to the fence, use the T-slot fastener locations on the diagrams as a starting point for drilling the holes in the base plates, but check the location against your table for the best fit. Two holes are drilled in each plate to allow the fence to be moved to the perpendicular position (either to the right or left of the quill), by simply relocating one of the T-slot fasteners. Check each hole in relationship to that position. Add the Track Assuming you purchased the 24" lengths of track listed in the cutting list, you should be able to cut the tracks for the table first, leaving fall-off that can be added to the two remaining full length tracks to give you the necessary 30" lengths of track for the fence. When attaching the track, first pilot drill the hole in the center of the track (a groove is provid ed in the track to simplify that operation), then use a countersink to widen the hole to accommodate a #4 x 5/8" flat-head screw. Keeping the screw heads flush to the inner surface of the track will make the stops and hold-downs move much easier. Stops and hold-downs designed for use in T-tracks make the drill press most useful. The stops are square blocks of wood with one face milled to leave an indexing strip that fits into the slot on the T-slot track. By using the saw to cut tall but shallow rabbets on two edges of each block, the stops are completed fairly easily. For safety, cut the rabbet on a longer 21/2" wide piece of wood, then crosscut the stops afterward. The T-slot fasteners are simply inserted into a 1/4" hole drilled in the center of each stop block. The hold-downs are blocks of wood with DeStaCo clamps screwed to the top. Each block is drilled for two T-slot fasteners. While the DeStaCos are good for this application, they aren't as versatile as I wanted. I replaced the threaded-rod plunger with longer all-thread (H" x 36) to provide maximum benefit from the clamps. The rubber tip of the plunger is important to the function of the clamp, and if you can manage to reuse the existing tip, do so. If not, I found rubber stoppers in a variety of sizes in the local Sears hardware store. To install the stopper, carefully drill a ^"-diameter hole two-thirds of the way into the stopper and then you should be able to screw it to the rod easily. The table should attach easily to your existing drill press table using four lag bolts countersunk flush into the surface of the auxiliary table. Once attached, you should find that the auxiliary table gives you more support and versatility than the metal one. PW 38 Popular Woodworking October 2002 |


