Popular Woodworking 2003-06 № 134, страница 75
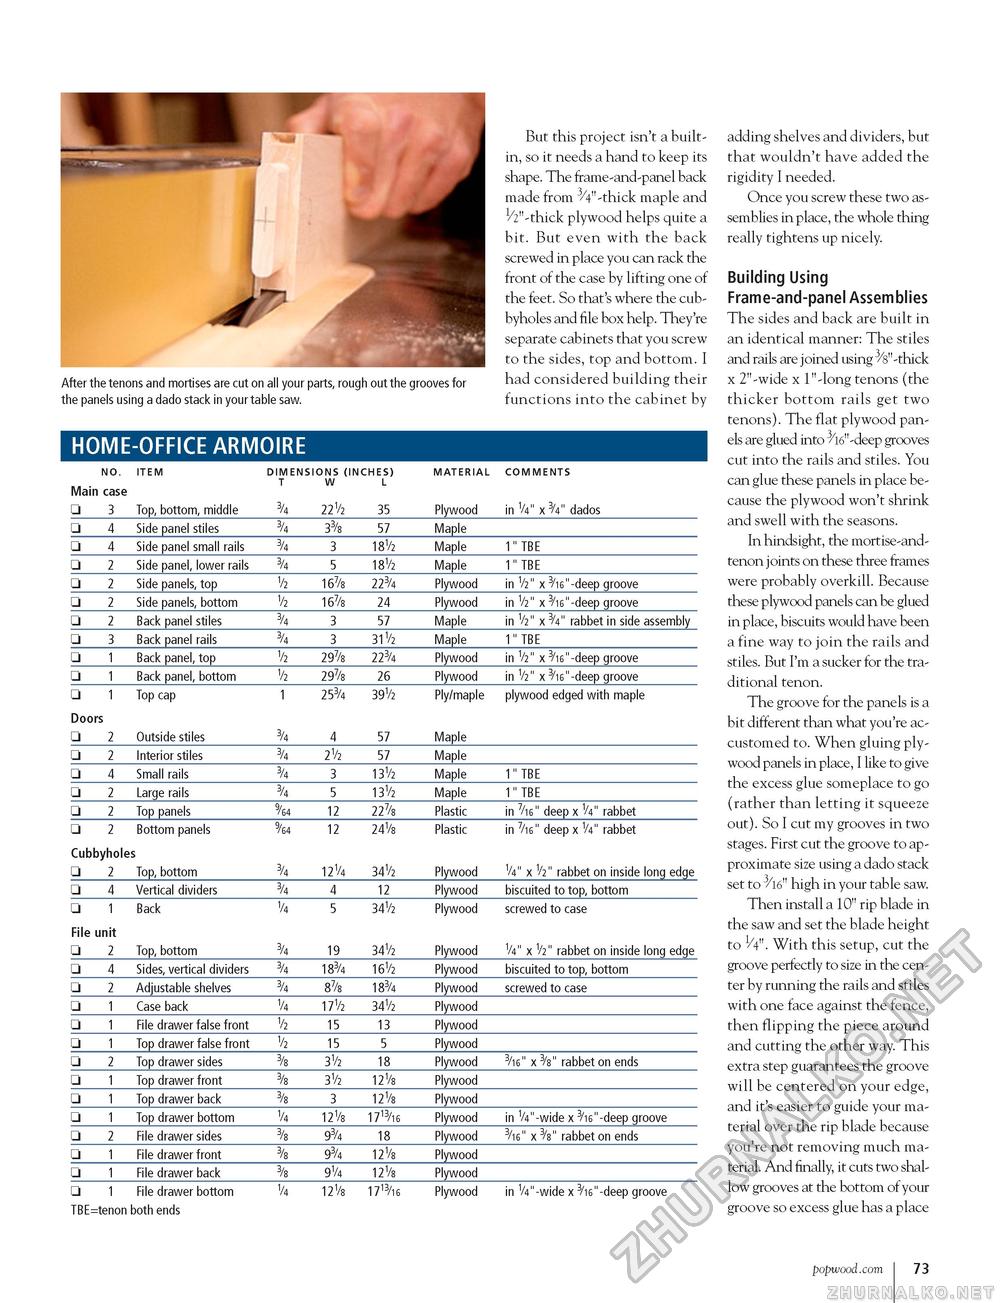
After the tenons and mortises are cut on all your parts, rough out the grooves for the panels using a dado stack in your table saw. HOME-OFFICE ARMOIRE But this project isn't a built-in, so it needs a hand to keep its shape. The frame-and-panel back made from 3/4"-thick maple and 1/2"-thick plywood helps quite a bit. But even with the back screwed in place you can rack the front of the case by lifting one of the feet. So that's where the cubbyholes and file box help. They're separate cabinets that you screw to the sides, top and bottom. I had considered building their functions into the cabinet by NO. ITEM DIMENSIONS (INCHES) MATERIAL COMMENTS NO. ITEM DIMENSIONS (INCHES) MATERIAL COMMENTS
adding shelves and dividers, but that wouldn't have added the rigidity I needed. Once you screw these two assemblies in place, the whole thing really tightens up nicely. Building Using Frame-and-panel Assemblies The sides and back are built in an identical manner: The stiles and rails are joined using 3/s"-thick x 2"-wide x 1"-long tenons (the thicker bottom rails get two tenons). The flat plywood panels are glued into /"V'-deep grooves cut into the rails and stiles. You can glue these panels in place because the plywood won't shrink and swell with the seasons. In hindsight, the mortise-and-tenon joints on these three frames were probably overkill. Because these plywood panels can be glued in place, biscuits would have been a fine way to join the rails and stiles. But I'm a sucker for the traditional tenon. The groove for the panels is a bit different than what you're accustomed to. When gluing plywood panels in place, I like to give the excess glue someplace to go (rather than letting it squeeze out). So I cut my grooves in two stages. First cut the groove to approximate size using a dado stack set to 3/16" high in your table saw. Then install a 10" rip blade in the saw and set the blade height to 1/4". With this setup, cut the groove perfectly to size in the center by running the rails and stiles with one face against the fence, then flipping the piece around and cutting the other way. This extra step guarantees the groove will be centered on your edge, and it's easier to guide your material over the rip blade because you're not removing much material. And finally, it cuts two shallow grooves at the bottom of your groove so excess glue has a place popwood.com 73 |
||||||||||||||||||||||||||||||||||||||||||||||||||||||||||||||||||||||||||||||||||||||||||||||||||||||||||||||||||||||||||||||||||||||||||||||||||||||||||||||||||||||||||||||||||||||||||||||||||||||||||||||||||||||||||||||||||||||||||||||


