Popular Woodworking 2003-08 № 135, страница 40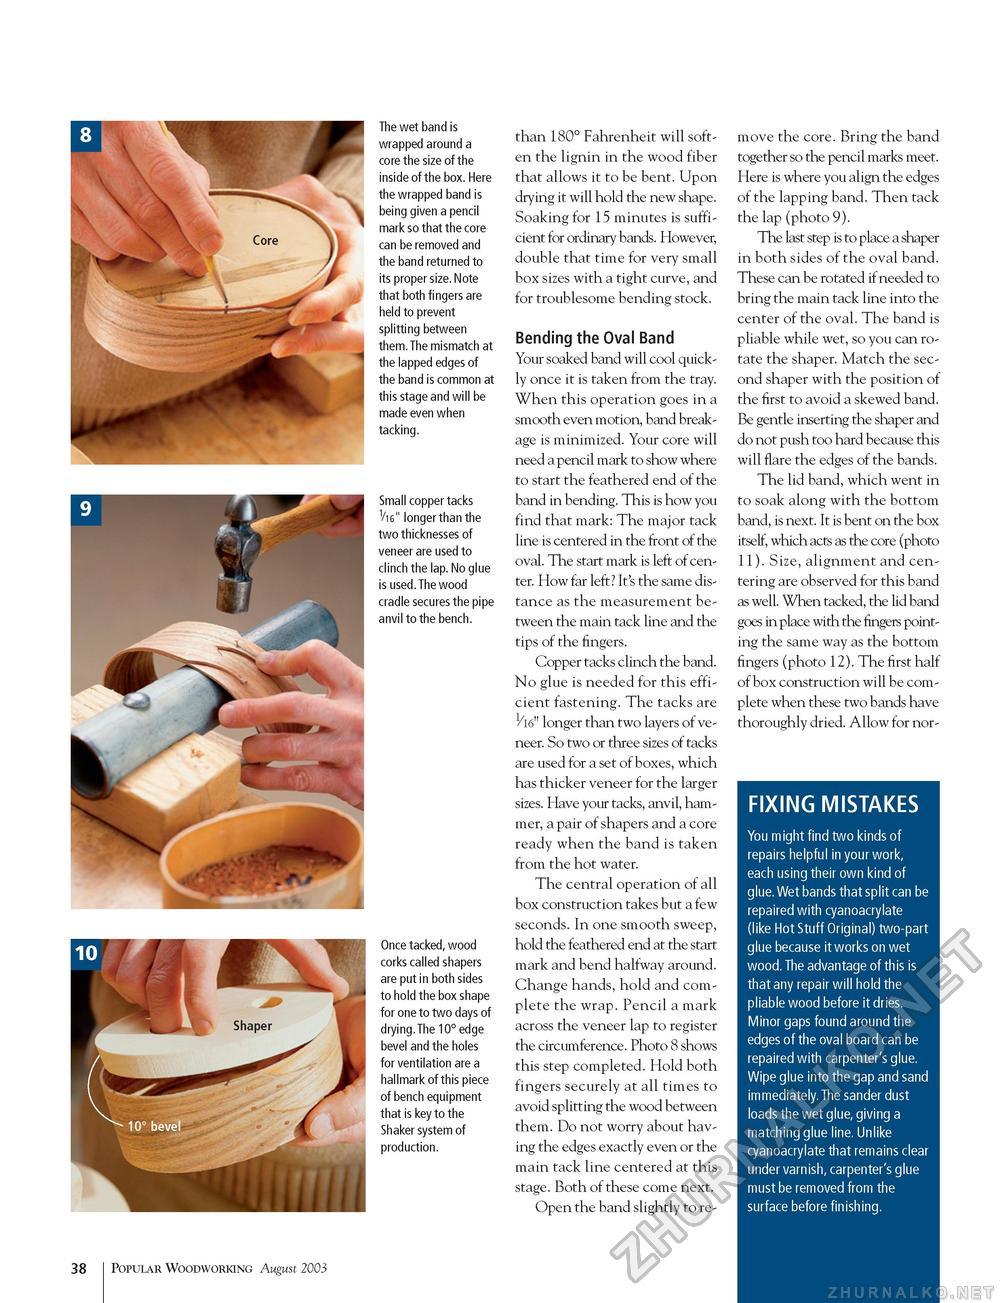
The wet band is wrapped around a core the size of the inside of the box. Here the wrapped band is being given a pencil mark so that the core can be removed and the band returned to its proper size. Note that both fingers are held to prevent splitting between them.The mismatch at the lapped edges of the band is common at this stage and will be made even when tacking. Small copper tacks V16" longer than the two thicknesses of veneer are used to clinch the lap. No glue is used.The wood cradle secures the pipe anvil to the bench. Once tacked, wood corks called shapers are put in both sides to hold the box shape for one to two days of drying.The 10° edge bevel and the holes for ventilation are a hallmark of this piece of bench equipment that is key to the Shaker system of production. than 180° Fahrenheit will soften the lignin in the wood fiber that allows it to be bent. Upon drying it will hold the new shape. Soaking for 15 minutes is sufficient for ordinary bands. However, double that time for very small box sizes with a tight curve, and for troublesome bending stock. Bending the Oval Band Your soaked band will cool quickly once it is taken from the tray. When this operation goes in a smooth even motion, band breakage is minimized. Your core will need a pencil mark to show where to start the feathered end of the band in bending. This is how you find that mark: The major tack line is centered in the front of the oval. The start mark is left of center. How far left? It's the same distance as the measurement between the main tack line and the tips of the fingers. Copper tacks clinch the band. No glue is needed for this efficient fastening. The tacks are longer than two layers of veneer. So two or three sizes of tacks are used for a set of boxes, which has thicker veneer for the larger sizes. Have your tacks, anvil, hammer, a pair of shapers and a core ready when the band is taken from the hot water. The central operation of all box construction takes but a few seconds. In one smooth sweep, hold the feathered end at the start mark and bend halfway around. Change hands, hold and complete the wrap. Pencil a mark across the veneer lap to register the circumference. Photo 8 shows this step completed. Hold both fingers securely at all times to avoid splitting the wood between them. Do not worry about having the edges exactly even or the main tack line centered at this stage. Both of these come next. Open the band slightly to re move the core. Bring the band together so the pencil marks meet. Here is where you align the edges of the lapping band. Then tack the lap (photo 9). The last step is to place a shaper in both sides of the oval band. These can be rotated if needed to bring the main tack line into the center of the oval. The band is pliable while wet, so you can rotate the shaper. Match the second shaper with the position of the first to avoid a skewed band. Be gentle inserting the shaper and do not push too hard because this will flare the edges of the bands. The lid band, which went in to soak along with the bottom band, is next. It is bent on the box itself, which acts as the core (photo 11). Size, alignment and centering are observed for this band as well. When tacked, the lid band goes in place with the fingers pointing the same way as the bottom fingers (photo 12). The first half of box construction will be complete when these two bands have thoroughly dried. Allow for nor- FIXING MISTAKES You might find two kinds of repairs helpful in your work, each using their own kind of glue. Wet bands that split can be repaired with cyanoacrylate (like Hot Stuff Original) two-part glue because it works on wet wood. The advantage of this is that any repair will hold the pliable wood before it dries. Minor gaps found around the edges of the oval board can be repaired with carpenter's glue. Wipe glue into the gap and sand immediately. The sander dust loads the wet glue, giving a matching glue line. Unlike cyanoacrylate that remains clear under varnish, carpenter's glue must be removed from the surface before finishing. 38 Popular Woodworking August 2003 |


