Popular Woodworking 2003-08 № 135, страница 42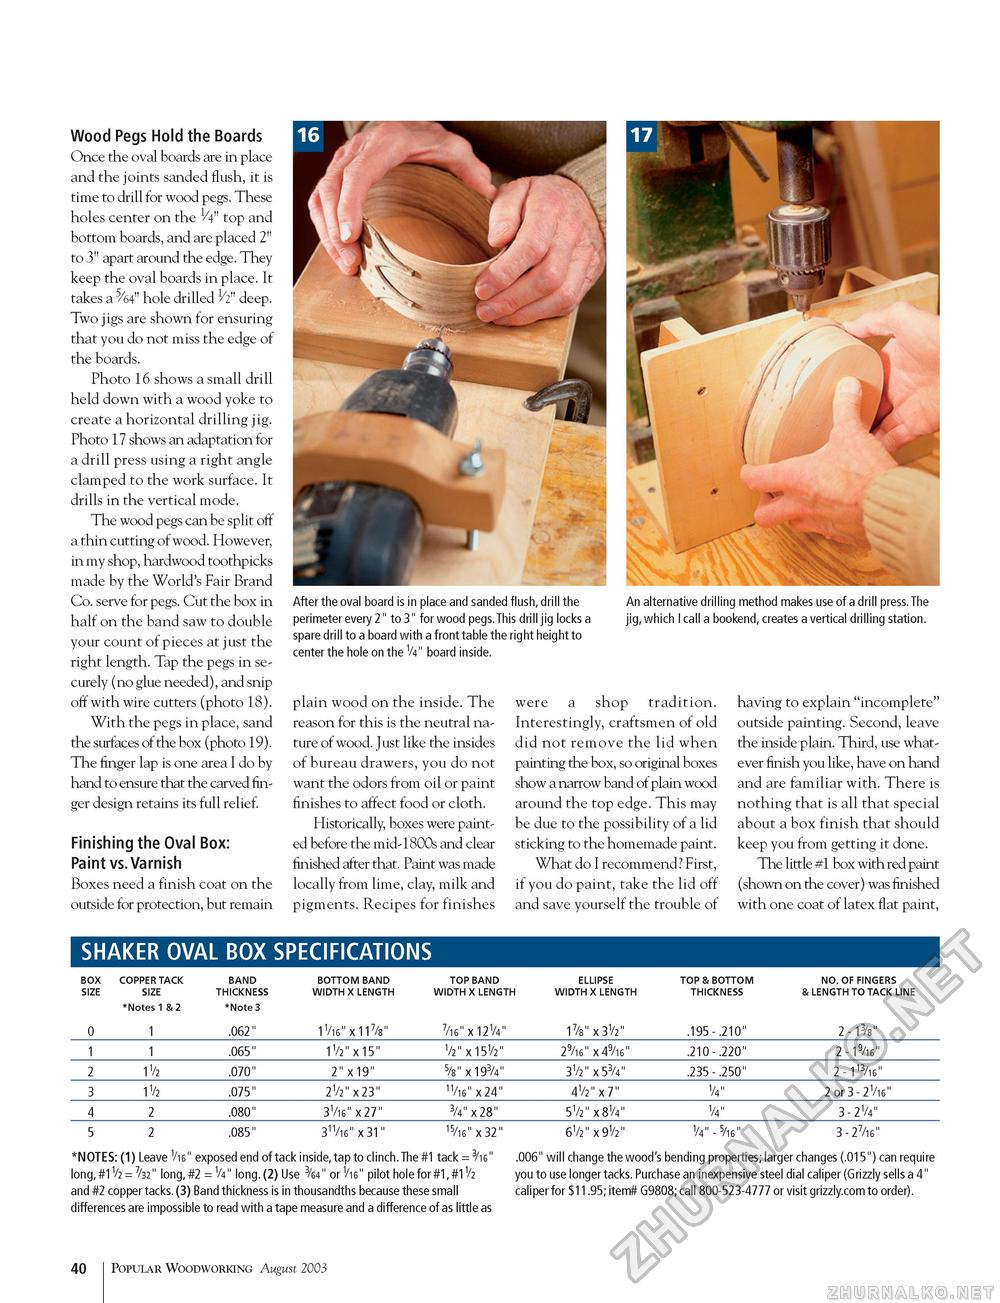
After the oval board is in place and sanded flush, drill the An alternative drilling method makes use of a drill press.The perimeter every 2" to 3" for wood pegs.This drill jig locks a jig, which I call a bookend, creates a vertical drilling station. spare drill to a board with a front table the right height to center the hole on the V4" board inside. Wood Pegs Hold the Boards Once the oval boards are in place and the joints sanded flush, it is time to drill for wood pegs. These holes center on the V4" top and bottom boards, and are placed 2" to 3" apart around the edge. They keep the oval boards in place. It takes a 5/64" hole drilled h" deep. Two jigs are shown for ensuring that you do not miss the edge of the boards. Photo 16 shows a small drill held down with a wood yoke to create a horizontal drilling jig. Photo 17 shows an adaptation for a drill press using a right angle clamped to the work surface. It drills in the vertical mode. The wood pegs can be split off a thin cutting of wood. However, in my shop, hardwood toothpicks made by the World's Fair Brand Co. serve for pegs. Cut the box in half on the band saw to double your count of pieces at just the right length. Tap the pegs in securely (no glue needed), and snip off with wire cutters (photo 18). With the pegs in place, sand the surfaces of the box (photo 19). The finger lap is one area I do by hand to ensure that the carved finger design retains its full relief. Finishing the Oval Box: Paint vs.Varnish Boxes need a finish coat on the outside for protection, but remain plain wood on the inside. The reason for this is the neutral nature of wood. Just like the insides of bureau drawers, you do not want the odors from oil or paint finishes to affect food or cloth. Historically, boxes were painted before the mid-1800s and clear finished after that. Paint was made locally from lime, clay, milk and pigments. Recipes for finishes were a shop tradition. Interestingly, craftsmen of old did not remove the lid when painting the box, so original boxes show a narrow band of plain wood around the top edge. This may be due to the possibility of a lid sticking to the homemade paint. What do I recommend? First, if you do paint, take the lid off and save yourself the trouble of having to explain "incomplete" outside painting. Second, leave the inside plain. Third, use whatever finish you like, have on hand and are familiar with. There is nothing that is all that special about a box finish that should keep you from getting it done. The little #1 box with red paint (shown on the cover) was finished with one coat of latex flat paint, SHAKER OVAL BOX SPECIFICATIONS
*NOTES: (1) Leave V16" exposed end of tack inside, tap to clinch.The #1 tack = 3/i6" .006" will change the wood's bending properties; larger changes (.015") can require long, #1/2 = 7/32" long, #2 = V4" long. (2) Use 3/64" or Vi6" pilot hole for #1,#11/2 you to use longer tacks. Purchase an inexpensive steel dial caliper (Grizzly sells a 4" and #2 copper tacks. (3) Band thickness is in thousandths because these small caliper for $11.95; item# G9808; call 800-523-4777 or visit grizzly.com to order). differences are impossible to read with a tape measure and a difference of as little as 40 Popular Woodworking August 2003 |


