Popular Woodworking 2003-11 № 137, страница 60
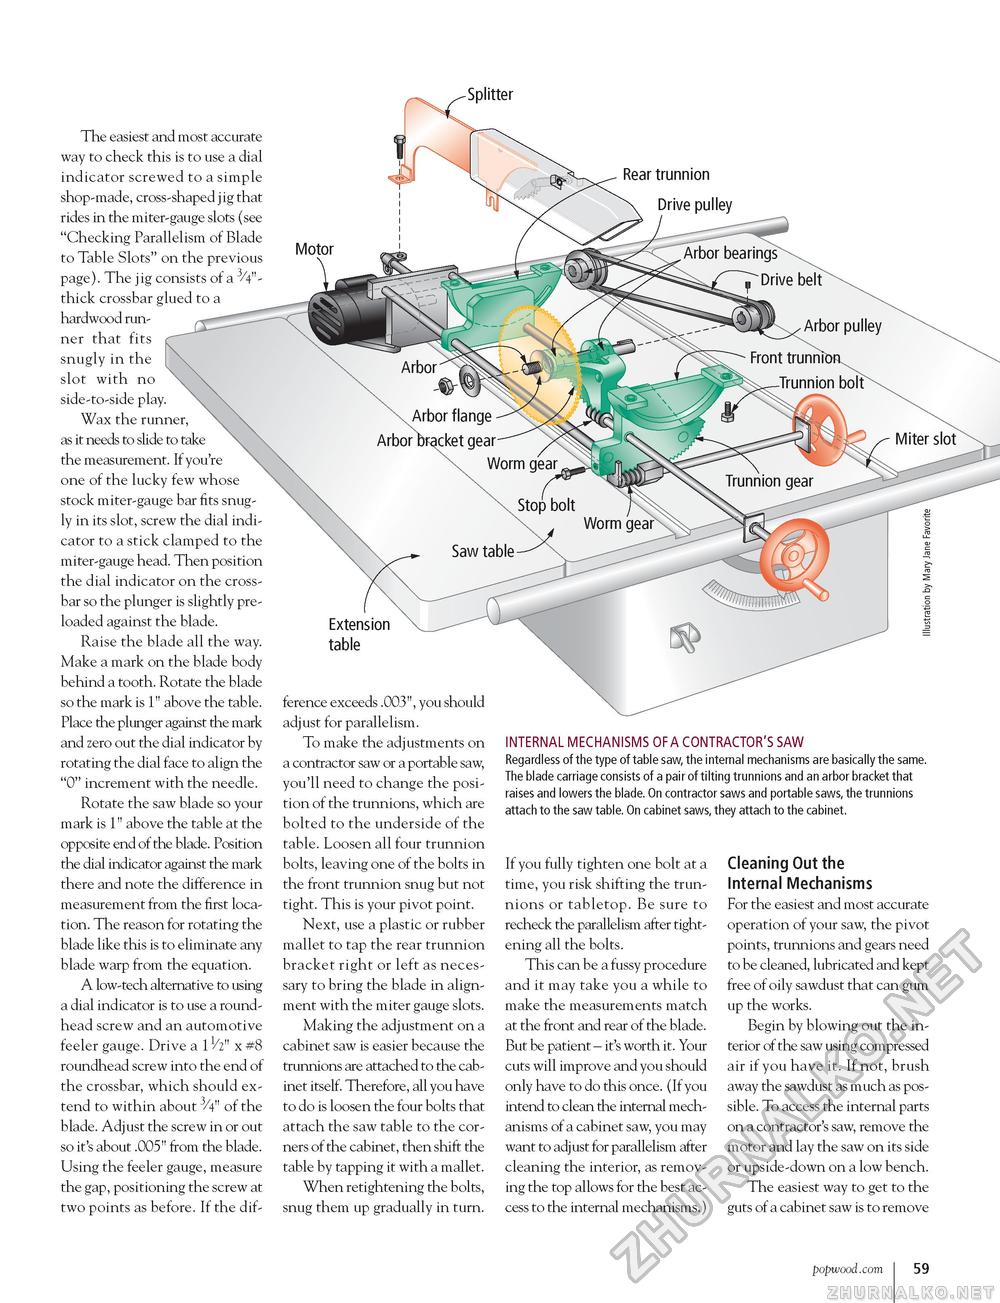
The easiest and most accurate way to check this is to use a dial indicator screwed to a simple shop-made, cross-shaped jig that rides in the miter-gauge slots (see "Checking Parallelism of Blade to Table Slots" on the previous page). The jig consists of a 3/4"-thick crossbar glued to a hardwood runner that fits snugly in the slot with no side-to-side play. Wax the runner, as it needs to slide to take the measurement. If you're one of the lucky few whose stock miter-gauge bar fits snugly in its slot, screw the dial indicator to a stick clamped to the miter-gauge head. Then position the dial indicator on the crossbar so the plunger is slightly preloaded against the blade. Raise the blade all the way. Make a mark on the blade body behind a tooth. Rotate the blade so the mark is 1" above the table. Place the plunger against the mark and zero out the dial indicator by rotating the dial face to align the "0" increment with the needle. Rotate the saw blade so your mark is 1" above the table at the opposite end of the blade. Position the dial indicator against the mark there and note the difference in measurement from the first location. The reason for rotating the blade like this is to eliminate any blade warp from the equation. A low-tech alternative to using a dial indicator is to use a roundhead screw and an automotive feeler gauge. Drive a 11/2" x #8 roundhead screw into the end of the crossbar, which should extend to within about 3/4" of the blade. Adjust the screw in or out so it's about .005" from the blade. Using the feeler gauge, measure the gap, positioning the screw at two points as before. If the dif- Motor -Splitter Rear trunnion Drive pulley „ Arbor bearings Drive belt Arbor pulley Arbor A Arbor flange Arbor bracket gear- Worm gear Front trunnio Trunnion bolt O] Miter slot Trunnion gear Stop bolt Worm gear Saw table Extension table ference exceeds .003", you should adjust for parallelism. To make the adjustments on a contractor saw or a portable saw, you'll need to change the position of the trunnions, which are bolted to the underside of the table. Loosen all four trunnion bolts, leaving one of the bolts in the front trunnion snug but not tight. This is your pivot point. Next, use a plastic or rubber mallet to tap the rear trunnion bracket right or left as necessary to bring the blade in alignment with the miter gauge slots. Making the adjustment on a cabinet saw is easier because the trunnions are attached to the cabinet itself. Therefore, all you have to do is loosen the four bolts that attach the saw table to the corners of the cabinet, then shift the table by tapping it with a mallet. When retightening the bolts, snug them up gradually in turn. INTERNAL MECHANISMS OF A CONTRACTOR'S SAW Regardless of the type of table saw, the internal mechanisms are basically the same. The blade carriage consists of a pair of tilting trunnions and an arbor bracket that raises and lowers the blade. On contractor saws and portable saws, the trunnions attach to the saw table. On cabinet saws, they attach to the cabinet. If you fully tighten one bolt at a time, you risk shifting the trunnions or tabletop. Be sure to recheck the parallelism after tightening all the bolts. This can be a fussy procedure and it may take you a while to make the measurements match at the front and rear of the blade. But be patient - it's worth it. Your cuts will improve and you should only have to do this once. (If you intend to clean the internal mechanisms of a cabinet saw, you may want to adjust for parallelism after cleaning the interior, as removing the top allows for the best access to the internal mechanisms.) Cleaning Out the Internal Mechanisms For the easiest and most accurate operation of your saw, the pivot points, trunnions and gears need to be cleaned, lubricated and kept free of oily sawdust that can gum up the works. Begin by blowing out the interior of the saw using compressed air if you have it. If not, brush away the sawdust as much as possible. To access the internal parts on a contractor's saw, remove the motor and lay the saw on its side or upside-down on a low bench. The easiest way to get to the guts of a cabinet saw is to remove popwood.com 59 |


