Popular Woodworking 2003-11 № 137, страница 76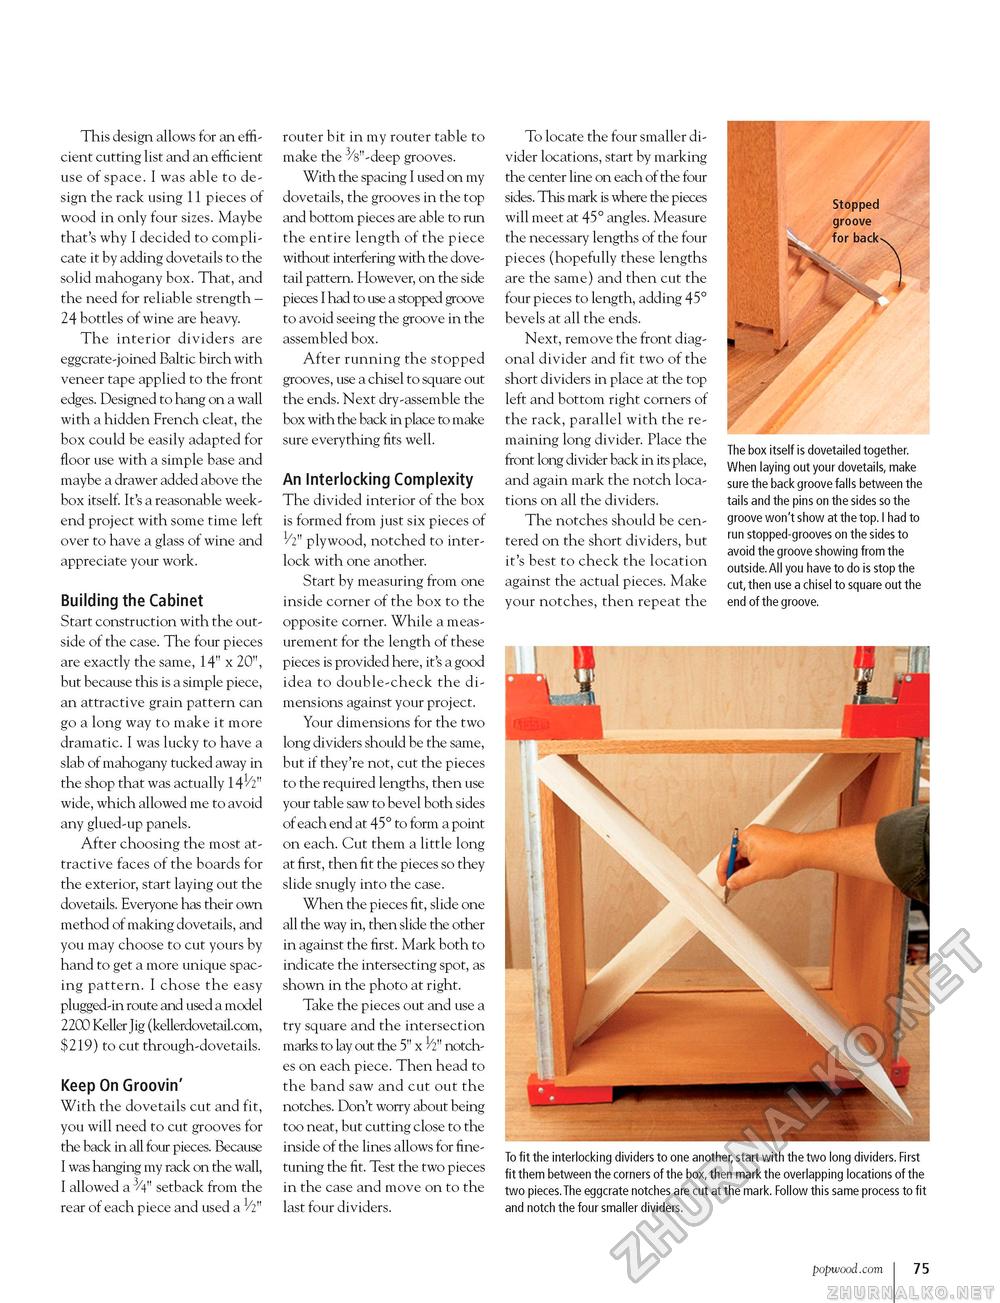
This design allows for an efficient cutting list and an efficient use of space. I was able to design the rack using 11 pieces of wood in only four sizes. Maybe that's why I decided to complicate it by adding dovetails to the solid mahogany box. That, and the need for reliable strength -24 bottles of wine are heavy. The interior dividers are eggcrate-joined Baltic birch with veneer tape applied to the front edges. Designed to hang on a wall with a hidden French cleat, the box could be easily adapted for floor use with a simple base and maybe a drawer added above the box itself. It's a reasonable weekend project with some time left over to have a glass of wine and appreciate your work. Building the Cabinet Start construction with the outside of the case. The four pieces are exactly the same, 14" x 20", but because this is a simple piece, an attractive grain pattern can go a long way to make it more dramatic. I was lucky to have a slab of mahogany tucked away in the shop that was actually 141/2" wide, which allowed me to avoid any glued-up panels. After choosing the most attractive faces of the boards for the exterior, start laying out the dovetails. Everyone has their own method of making dovetails, and you may choose to cut yours by hand to get a more unique spacing pattern. I chose the easy plugged-in route and used a model 2200 Keller Jig (kellerdovetail.com, $219) to cut through-dovetails. Keep On Groovin' With the dovetails cut and fit, you will need to cut grooves for the back in all four pieces. Because I was hanging my rack on the wall, I allowed a 3/4" setback from the rear of each piece and used a 1/2" router bit in my router table to make the 3/s"-deep grooves. With the spacing I used on my dovetails, the grooves in the top and bottom pieces are able to run the entire length of the piece without interfering with the dovetail pattern. However, on the side pieces I had to use a stopped groove to avoid seeing the groove in the assembled box. After running the stopped grooves, use a chisel to square out the ends. Next dry-assemble the box with the back in place to make sure everything fits well. An Interlocking Complexity The divided interior of the box is formed from just six pieces of 1/2" plywood, notched to interlock with one another. Start by measuring from one inside corner of the box to the opposite corner. While a measurement for the length of these pieces is provided here, it's a good idea to double-check the dimensions against your project. Your dimensions for the two long dividers should be the same, but if they're not, cut the pieces to the required lengths, then use your table saw to bevel both sides of each end at 45° to form a point on each. Cut them a little long at first, then fit the pieces so they slide snugly into the case. When the pieces fit, slide one all the way in, then slide the other in against the first. Mark both to indicate the intersecting spot, as shown in the photo at right. Take the pieces out and use a try square and the intersection marks to lay out the 5" x 1/2" notches on each piece. Then head to the band saw and cut out the notches. Don't worry about being too neat, but cutting close to the inside of the lines allows for fine-tuning the fit. Test the two pieces in the case and move on to the last four dividers. To locate the four smaller divider locations, start by marking the center line on each of the four sides. This mark is where the pieces will meet at 45° angles. Measure the necessary lengths of the four pieces (hopefully these lengths are the same) and then cut the four pieces to length, adding 45° bevels at all the ends. Next, remove the front diagonal divider and fit two of the short dividers in place at the top left and bottom right corners of the rack, parallel with the remaining long divider. Place the front long divider back in its place, and again mark the notch locations on all the dividers. The notches should be centered on the short dividers, but it's best to check the location against the actual pieces. Make your notches, then repeat the The box itself is dovetailed together. When laying out your dovetails, make sure the back groove falls between the tails and the pins on the sides so the groove won't show at the top. I had to run stopped-grooves on the sides to avoid the groove showing from the outside.All you have to do is stop the cut, then use a chisel to square out the end of the groove. To fit the interlocking dividers to one another, start with the two long dividers. First fit them between the corners of the box, then mark the overlapping locations of the two pieces.The eggcrate notches are cut at the mark. Follow this same process to fit and notch the four smaller dividers. popwood.com 75 |


