Popular Woodworking 2004-02 № 139, страница 54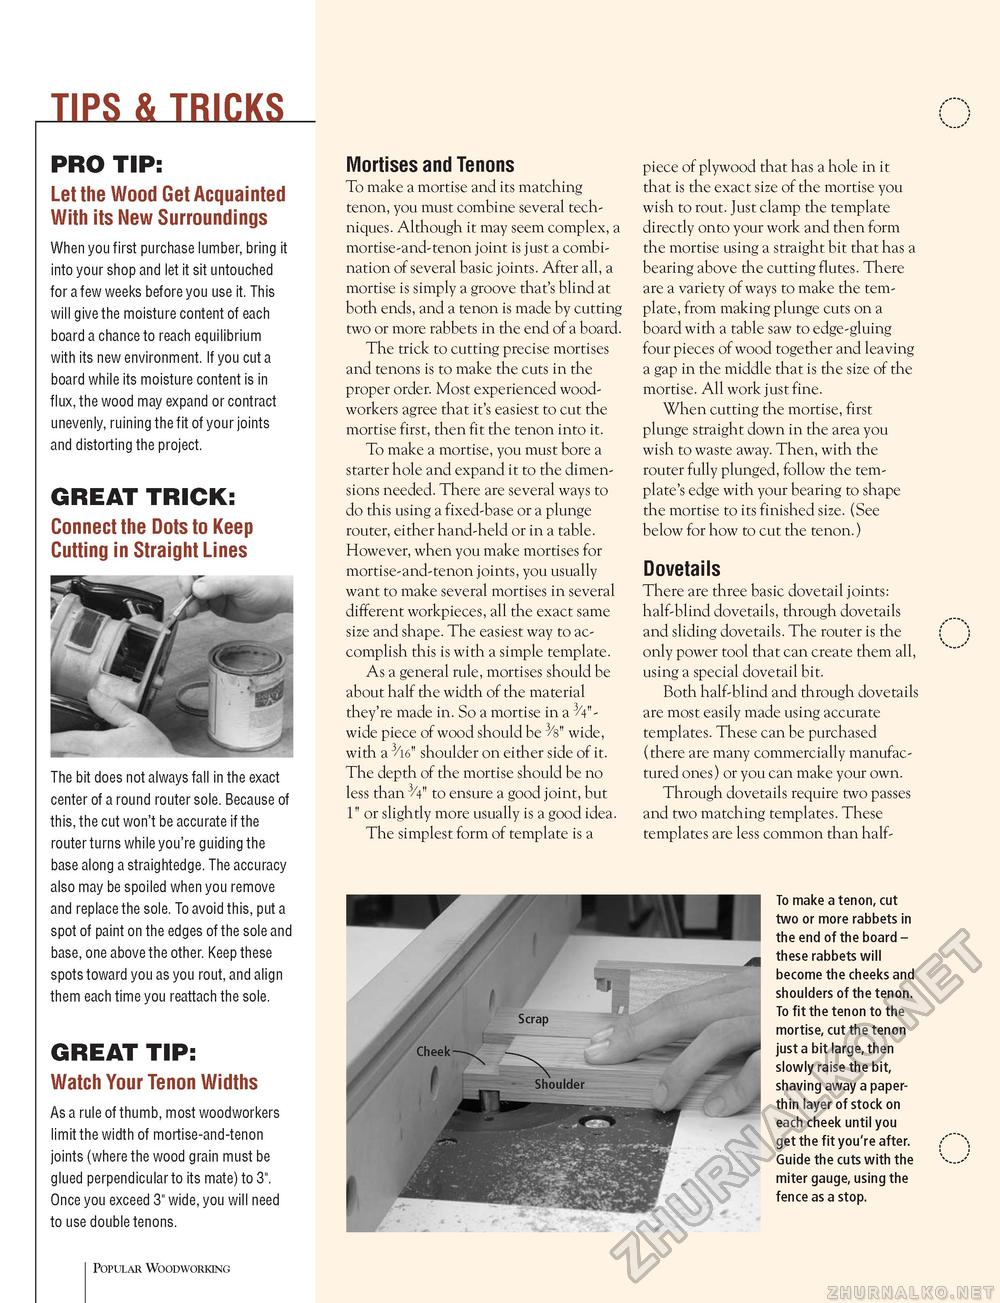
TIPS & TRICKS PRO TIP: Let the Wood Get Acquainted With its New Surroundings When you first purchase lumber, bring it into your shop and let it sit untouched for a few weeks before you use it. This will give the moisture content of each board a chance to reach equilibrium with its new environment. If you cut a board while its moisture content is in flux, the wood may expand or contract unevenly, ruining the fit of your joints and distorting the project. GREAT TRICK: Connect the Dots to Keep Cutting in Straight Lines The bit does not always fall in the exact center of a round router sole. Because of this, the cut won't be accurate if the router turns while you're guiding the base along a straightedge. The accuracy also may be spoiled when you remove and replace the sole. To avoid this, put a spot of paint on the edges of the sole and base, one above the other. Keep these spots toward you as you rout, and align them each time you reattach the sole. GREAT TIP: Watch Your Tenon Widths As a rule of thumb, most woodworkers limit the width of mortise-and-tenon joints (where the wood grain must be glued perpendicular to its mate) to 3". Once you exceed 3" wide, you will need to use double tenons. Popular Woodworking Mortises and Tenons To make a mortise and its matching tenon, you must combine several techniques. Although it may seem complex, a mortise-and-tenon joint is just a combination of several basic joints. After all, a mortise is simply a groove that's blind at both ends, and a tenon is made by cutting two or more rabbets in the end of a board. The trick to cutting precise mortises and tenons is to make the cuts in the proper order. Most experienced woodworkers agree that it's easiest to cut the mortise first, then fit the tenon into it. To make a mortise, you must bore a starter hole and expand it to the dimensions needed. There are several ways to do this using a fixed-base or a plunge router, either hand-held or in a table. However, when you make mortises for mortise-and-tenon joints, you usually want to make several mortises in several different workpieces, all the exact same size and shape. The easiest way to accomplish this is with a simple template. As a general rule, mortises should be about half the width of the material they're made in. So a mortise in a 3/4"-wide piece of wood should be 3/s" wide, with a 3/i6" shoulder on either side of it. The depth of the mortise should be no less than 3/4" to ensure a good joint, but i" or slightly more usually is a good idea. The simplest form of template is a piece of plywood that has a hole in it that is the exact size of the mortise you wish to rout. Just clamp the template directly onto your work and then form the mortise using a straight bit that has a bearing above the cutting flutes. There are a variety of ways to make the template, from making plunge cuts on a board with a table saw to edge-gluing four pieces of wood together and leaving a gap in the middle that is the size of the mortise. All work just fine. When cutting the mortise, first plunge straight down in the area you wish to waste away. Then, with the router fully plunged, follow the template's edge with your bearing to shape the mortise to its finished size. (See below for how to cut the tenon.) Dovetails There are three basic dovetail joints: half-blind dovetails, through dovetails and sliding dovetails. The router is the only power tool that can create them all, using a special dovetail bit. Both half-blind and through dovetails are most easily made using accurate templates. These can be purchased (there are many commercially manufactured ones) or you can make your own. Through dovetails require two passes and two matching templates. These templates are less common than half- To make a tenon, cut two or more rabbets in the end of the board -these rabbets will become the cheeks and shoulders of the tenon. To fit the tenon to the mortise, cut the tenon just a bit large, then slowly raise the bit, shaving away a paper-thin layer of stock on each cheek until you get the fit you're after. Guide the cuts with the miter gauge, using the fence as a stop. |


