Popular Woodworking 2004-04 № 140, страница 39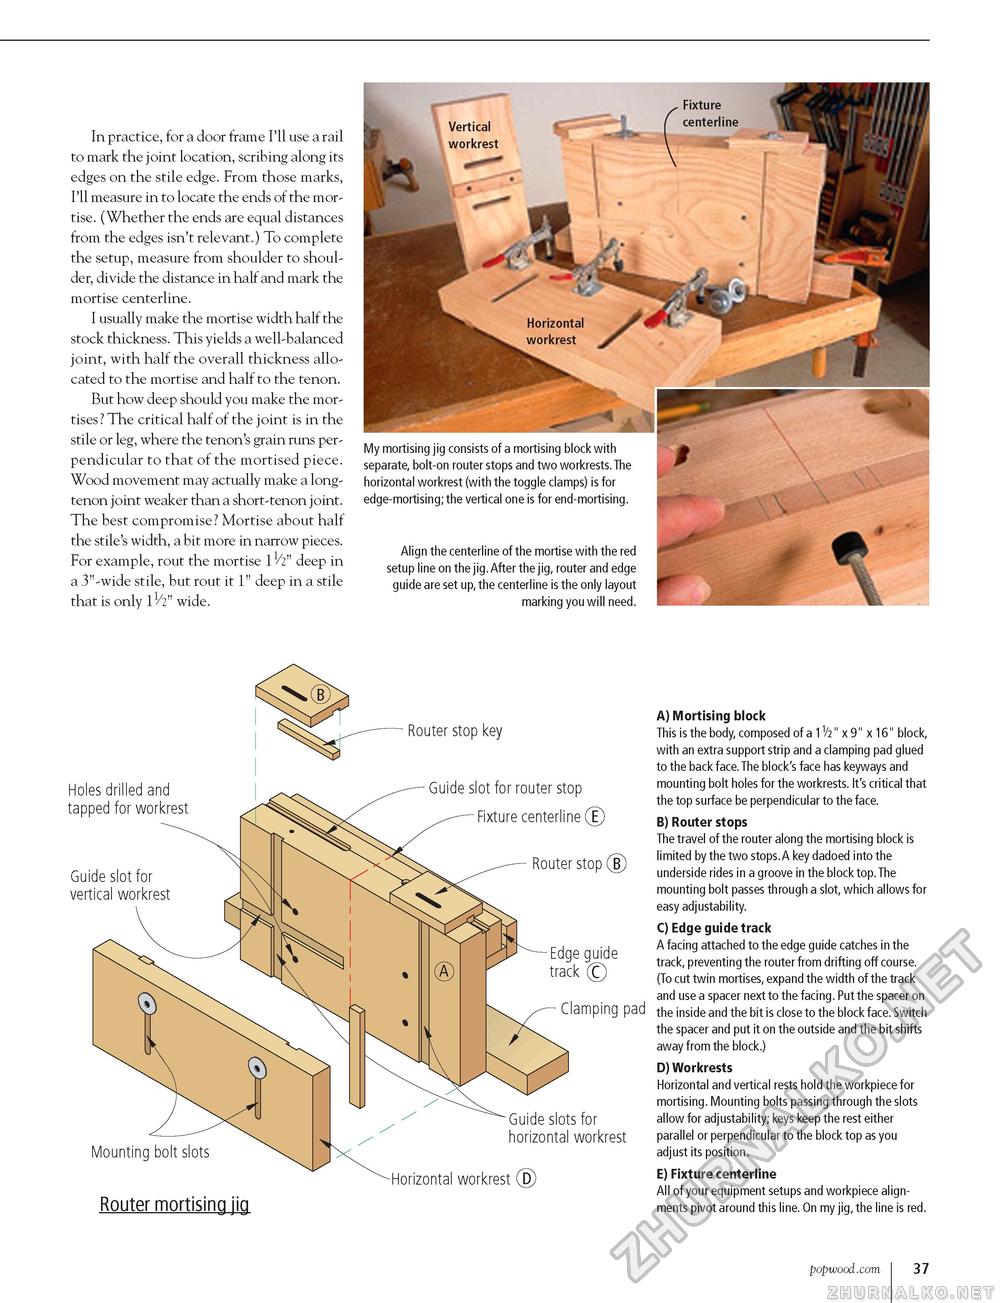
In practice, for a door frame I'll use a rail to mark the joint location, scribing along its edges on the stile edge. From those marks, I'll measure in to locate the ends of the mortise. (Whether the ends are equal distances from the edges isn't relevant.) To complete the setup, measure from shoulder to shoulder, divide the distance in half and mark the mortise centerline. I usually make the mortise width half the stock thickness. This yields a well-balanced joint, with half the overall thickness allocated to the mortise and half to the tenon. But how deep should you make the mortises? The critical half of the joint is in the stile or leg, where the tenon's grain runs perpendicular to that of the mortised piece. Wood movement may actually make a long-tenon joint weaker than a short-tenon joint. The best compromise? Mortise about half the stile's width, a bit more in narrow pieces. For example, rout the mortise 1V2" deep in a 3"-wide stile, but rout it 1" deep in a stile that is only 11/2" wide. My mortising jig consists of a mortising block with separate, bolt-on router stops and two workrests. The horizontal workrest (with the toggle clamps) is for edge-mortising; the vertical one is for end-mortising. Align the centerline of the mortise with the red setup line on the jig. After the jig, router and edge guide are set up, the centerline is the only layout marking you will need. Holes drilled and tapped for workrest Guide slot for vertical workrest Router stop key Guide slot for router stop Fixture centerline (E Router stop (B Edge guide track (C Mounting bolt slots Router mortising jig Horizontal workrest @ A) Mortising block This is the body, composed of a 1V2" x 9" x 16" block, with an extra support strip and a clamping pad glued to the back face. The block's face has keyways and mounting bolt holes for the workrests. It's critical that the top surface be perpendicular to the face. B) Router stops The travel of the router along the mortising block is limited by the two stops.A key dadoed into the underside rides in a groove in the block top.The mounting bolt passes through a slot, which allows for easy adjustability. C) Edge guide track A facing attached to the edge guide catches in the track, preventing the router from drifting off course. (To cut twin mortises, expand the width of the track and use a spacer next to the facing. Put the spacer on Clamping pad the inside and the bit is close to the block face.Switch the spacer and put it on the outside and the bit shifts away from the block.) D) Workrests Horizontal and vertical rests hold the workpiece for mortising. Mounting bolts passing through the slots allow for adjustability; keys keep the rest either parallel or perpendicular to the block top as you adjust its position. E) Fixture centerline All of your equipment setups and workpiece alignments pivot around this line. On my jig, the line is red. Guide slots for horizontal workrest popwood.com 37 |


