Popular Woodworking 2004-04 № 140, страница 80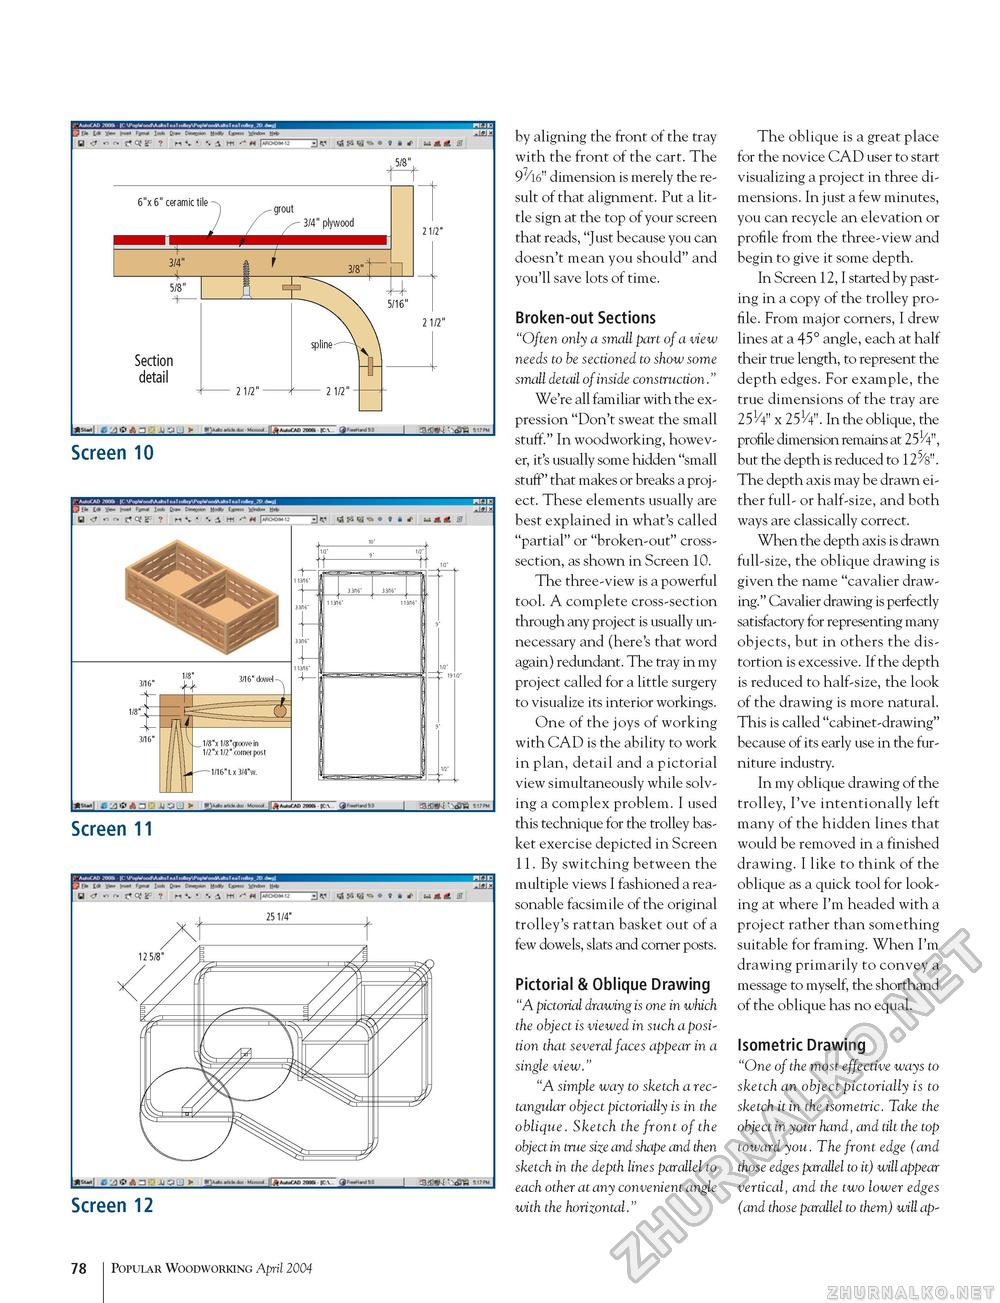
FTP >»tl# 5/8 6"x 6" ceramic tile - grout 3/4" plywood 3/4" 5/8" Section detail Hi— J _J1< L*t 3 J] ■■..!» Tim- 2 1/2" 2 1/2" 2 1/2" 2 1/2" Screen 10 Screen 11 i- ~~3 ^ ~ * A -if 25 1/4" Hi— j. ,]i;i atJ- j]-.i.|> r ■■ - j'-.naa Screen 12 by aligning the front of the tray with the front of the cart. The 97/16" dimension is merely the result of that alignment. Put a little sign at the top of your screen that reads, "Just because you can doesn't mean you should" and you'll save lots of time. Broken-out Sections "Often only a small part of a view needs to be sectioned to show some small detail of inside construction." We're all familiar with the expression "Don't sweat the small stuff." In woodworking, however, it's usually some hidden "small stuff" that makes or breaks a project. These elements usually are best explained in what's called "partial" or "broken-out" cross-section, as shown in Screen 10. The three-view is a powerful tool. A complete cross-section through any project is usually unnecessary and (here's that word again) redundant. The tray in my project called for a little surgery to visualize its interior workings. One of the joys of working with CAD is the ability to work in plan, detail and a pictorial view simultaneously while solving a complex problem. I used this technique for the trolley basket exercise depicted in Screen 11. By switching between the multiple views I fashioned a reasonable facsimile of the original trolley's rattan basket out of a few dowels, slats and corner posts. Pictorial & Oblique Drawing "A pictorial drawing is one in which the object is viewed in such a position that several faces appear in a single view." "A simple way to sketch a rectangular object pictorially is in the oblique. Sketch the front of the object in true size and shape and then sketch in the depth lines parallel to each other at any convenient angle with the horizontal." The oblique is a great place for the novice CAD user to start visualizing a project in three dimensions. In just a few minutes, you can recycle an elevation or profile from the three-view and begin to give it some depth. In Screen 12, I started by pasting in a copy of the trolley profile. From major corners, I drew lines at a 45° angle, each at half their true length, to represent the depth edges. For example, the true dimensions of the tray are 251/4" x 251/4". In the oblique, the profile dimension remains at 251/4", but the depth is reduced to 125/s". The depth axis may be drawn either full- or half-size, and both ways are classically correct. When the depth axis is drawn full-size, the oblique drawing is given the name "cavalier drawing." Cavalier drawing is perfectly satisfactory for representing many objects, but in others the distortion is excessive. If the depth is reduced to half-size, the look of the drawing is more natural. This is called "cabinet-drawing" because of its early use in the furniture industry. In my oblique drawing of the trolley, I've intentionally left many of the hidden lines that would be removed in a finished drawing. I like to think of the oblique as a quick tool for looking at where I'm headed with a project rather than something suitable for framing. When I'm drawing primarily to convey a message to myself, the shorthand of the oblique has no equal. Isometric Drawing "One of the most effective ways to sketch an object pictorially is to sketch it in the isometric. Take the object in your hand, and tilt the top toward you. The front edge (and those edges parallel to it) will appear vertical, and the two lower edges (and those parallel to them) will ap- 78 Popular Woodworking April 2004 |


