Popular Woodworking 2004-08 № 142, страница 64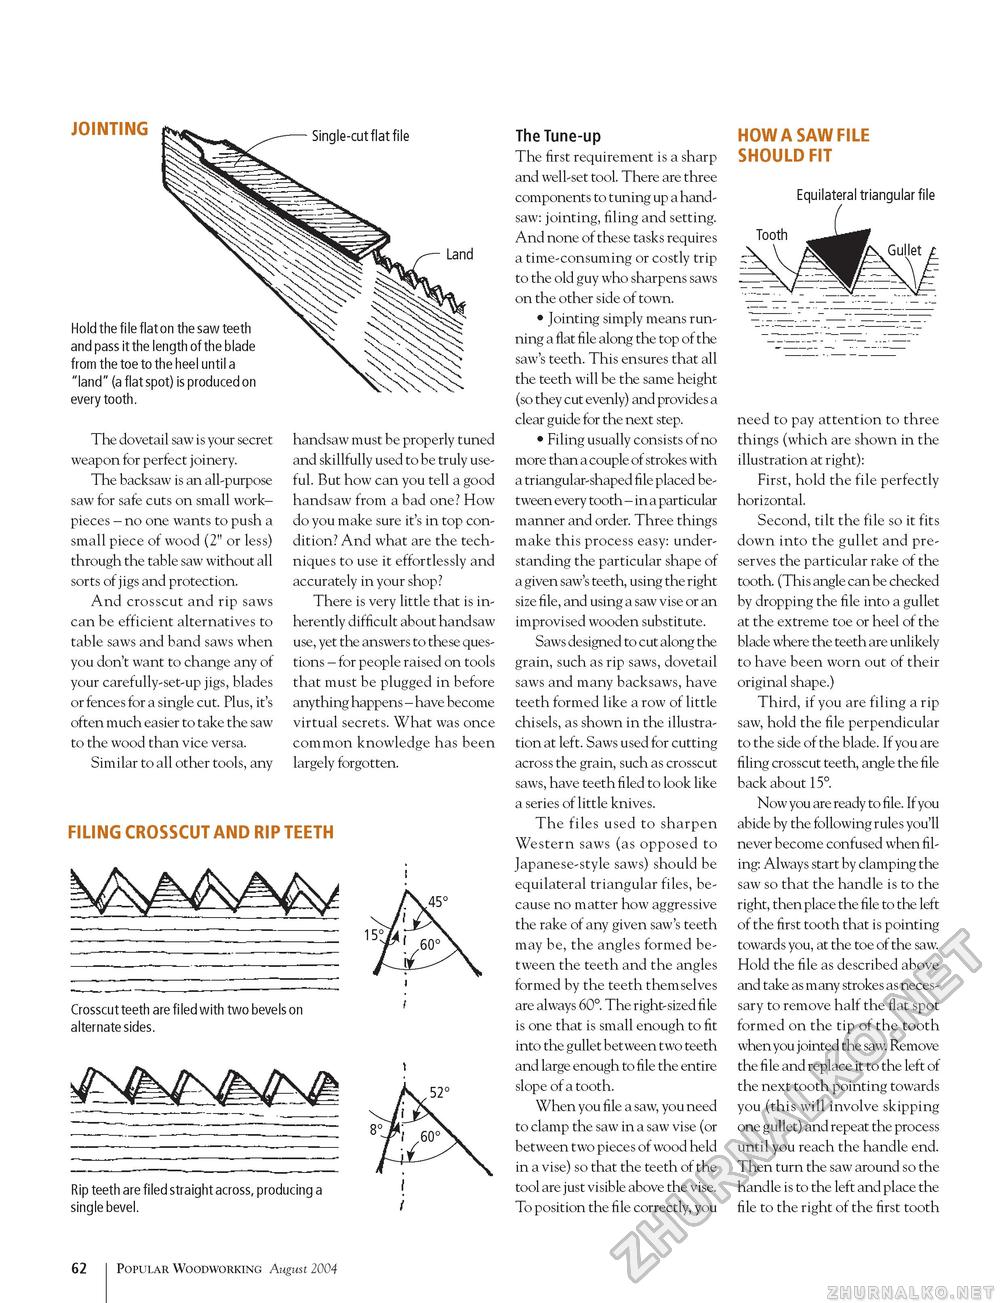
JOINTING Single-cut flat file Land Hold the file flat on the saw teeth and pass it the length of the blade from the toe to the heel until a "land" (a flat spot) is produced on every tooth. The dovetail saw is your secret weapon for perfect joinery. The backsaw is an all-purpose saw for safe cuts on small work-pieces - no one wants to push a small piece of wood (2" or less) through the table saw without all sorts of jigs and protection. And crosscut and rip saws can be efficient alternatives to table saws and band saws when you don't want to change any of your carefully-set-up jigs, blades or fences for a single cut. Plus, it's often much easier to take the saw to the wood than vice versa. Similar to all other tools, any handsaw must be properly tuned and skillfully used to be truly useful. But how can you tell a good handsaw from a bad one? How do you make sure it's in top condition? And what are the techniques to use it effortlessly and accurately in your shop? There is very little that is inherently difficult about handsaw use, yet the answers to these questions - for people raised on tools that must be plugged in before anything happens - have become virtual secrets. What was once common knowledge has been largely forgotten. FILING CROSSCUT AND RIP TEETH Crosscut teeth are filed with two bevels on ' alternate sides. Rip teeth are filed straight across, producing a ! single bevel. I The Tune-up The first requirement is a sharp and well-set tool. There are three components to tuning up a handsaw: jointing, filing and setting. And none of these tasks requires a time-consuming or costly trip to the old guy who sharpens saws on the other side of town. • Jointing simply means running a flat file along the top of the saw's teeth. This ensures that all the teeth will be the same height (so they cut evenly) and provides a clear guide for the next step. • Filing usually consists of no more than a couple of strokes with a triangular-shaped file placed between every tooth - in a particular manner and order. Three things make this process easy: understanding the particular shape of a given saw's teeth, using the right size file, and using a saw vise or an improvised wooden substitute. Saws designed to cut along the grain, such as rip saws, dovetail saws and many backsaws, have teeth formed like a row of little chisels, as shown in the illustration at left. Saws used for cutting across the grain, such as crosscut saws, have teeth filed to look like a series of little knives. The files used to sharpen Western saws (as opposed to Japanese-style saws) should be equilateral triangular files, because no matter how aggressive the rake of any given saw's teeth may be, the angles formed between the teeth and the angles formed by the teeth themselves are always 60°. The right-sized file is one that is small enough to fit into the gullet between two teeth and large enough to file the entire slope of a tooth. When you file a saw, you need to clamp the saw in a saw vise (or between two pieces of wood held in a vise) so that the teeth of the tool are just visible above the vise. To position the file correctly, you HOW A SAW FILE SHOULD FIT Equilateral triangular file need to pay attention to three things (which are shown in the illustration at right): First, hold the file perfectly horizontal. Second, tilt the file so it fits down into the gullet and preserves the particular rake of the tooth. (This angle can be checked by dropping the file into a gullet at the extreme toe or heel of the blade where the teeth are unlikely to have been worn out of their original shape.) Third, if you are filing a rip saw, hold the file perpendicular to the side of the blade. If you are filing crosscut teeth, angle the file back about 15°. Now you are ready to file. If you abide by the following rules you'll never become confused when filing: Always start by clamping the saw so that the handle is to the right, then place the file to the left of the first tooth that is pointing towards you, at the toe of the saw. Hold the file as described above and take as many strokes as necessary to remove half the flat spot formed on the tip of the tooth when you jointed the saw. Remove the file and replace it to the left of the next tooth pointing towards you (this will involve skipping one gullet) and repeat the process until you reach the handle end. Then turn the saw around so the handle is to the left and place the file to the right of the first tooth 62 Popular Woodworking August 2004 |


