Popular Woodworking 2004-10 № 143, страница 78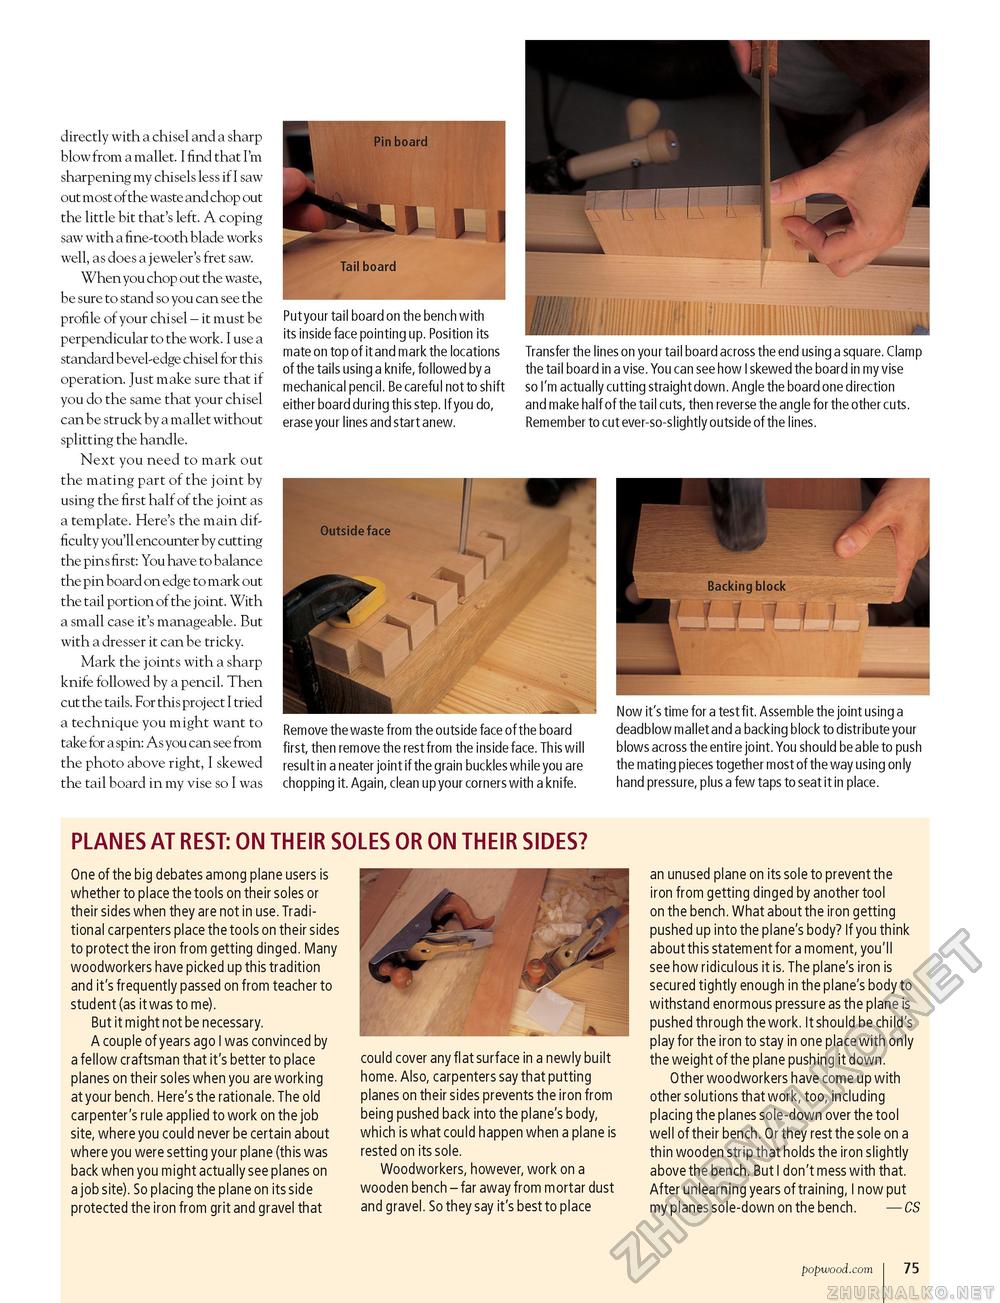
directly with a chisel and a sharp blow from a mallet. I find that I'm sharpening my chisels less if I saw out most of the waste and chop out the little bit that's left. A coping saw with a fine-tooth blade works well, as does a jeweler's fret saw. When you chop out the waste, be sure to stand so you can see the profile of your chisel - it must be perpendicular to the work. I use a standard bevel-edge chisel for this operation. Just make sure that if you do the same that your chisel can be struck by a mallet without splitting the handle. Next you need to mark out the mating part of the joint by using the first half of the joint as a template. Here's the main difficulty you'll encounter by cutting the pins first: You have to balance the pin board on edge to mark out the tail portion of the joint. With a small case it's manageable. But with a dresser it can be tricky. Mark the joints with a sharp knife followed by a pencil. Then cut the tails. For this proj ect I tried a technique you might want to take for a spin: As you can see from the photo above right, I skewed the tail board in my vise so I was Put your tail board on the bench with its inside face pointing up. Position its mate on top of it and mark the locations of the tails using a knife, followed by a mechanical pencil. Be careful not to shift either board during this step. If you do, erase your lines and start anew. Transfer the lines on your tail board across the end using a square. Clamp the tail board in a vise. You can see how I skewed the board in my vise so I'm actually cutting straight down. Angle the board one direction and make half of the tail cuts, then reverse the angle for the other cuts. Remember to cut ever-so-slightly outside of the lines. Remove the waste from the outside face of the board first, then remove the rest from the inside face. This will result in a neater joint if the grain buckles while you are chopping it. Again, clean up your corners with a knife. Now it's time for a test fit. Assemble the joint using a deadblow mallet and a backing block to distribute your blows across the entire joint. You should be able to push the mating pieces together most of the way using only hand pressure, plus a few taps to seat it in place. PLANES AT REST: ON THEIR SOLES OR ON THEIR SIDES? One of the big debates among plane users is whether to place the tools on their soles or their sides when they are not in use. Traditional carpenters place the tools on their sides to protect the iron from getting dinged. Many woodworkers have picked up this tradition and it's frequently passed on from teacher to student (as it was to me). But it might not be necessary. A couple of years ago I was convinced by a fellow craftsman that it's better to place planes on their soles when you are working at your bench. Here's the rationale. The old carpenter's rule applied to work on the job site, where you could never be certain about where you were setting your plane (this was back when you might actually see planes on a job site). So placing the plane on its side protected the iron from grit and gravel that could cover any flat surface in a newly built home. Also, carpenters say that putting planes on their sides prevents the iron from being pushed back into the plane's body, which is what could happen when a plane is rested on its sole. Woodworkers, however, work on a wooden bench - far away from mortar dust and gravel. So they say it's best to place an unused plane on its sole to prevent the iron from getting dinged by another tool on the bench. What about the iron getting pushed up into the plane's body? If you think about this statement for a moment, you'll see how ridiculous it is. The plane's iron is secured tightly enough in the plane's body to withstand enormous pressure as the plane is pushed through the work. It should be child's play for the iron to stay in one place with only the weight of the plane pushing it down. Other woodworkers have come up with other solutions that work, too, including placing the planes sole-down over the tool well of their bench. Or they rest the sole on a thin wooden strip that holds the iron slightly above the bench. But I don't mess with that. After unlearning years of training, I now put my planes sole-down on the bench. — CS popwood.com 75 |


