Popular Woodworking 2004-11 № 144, страница 64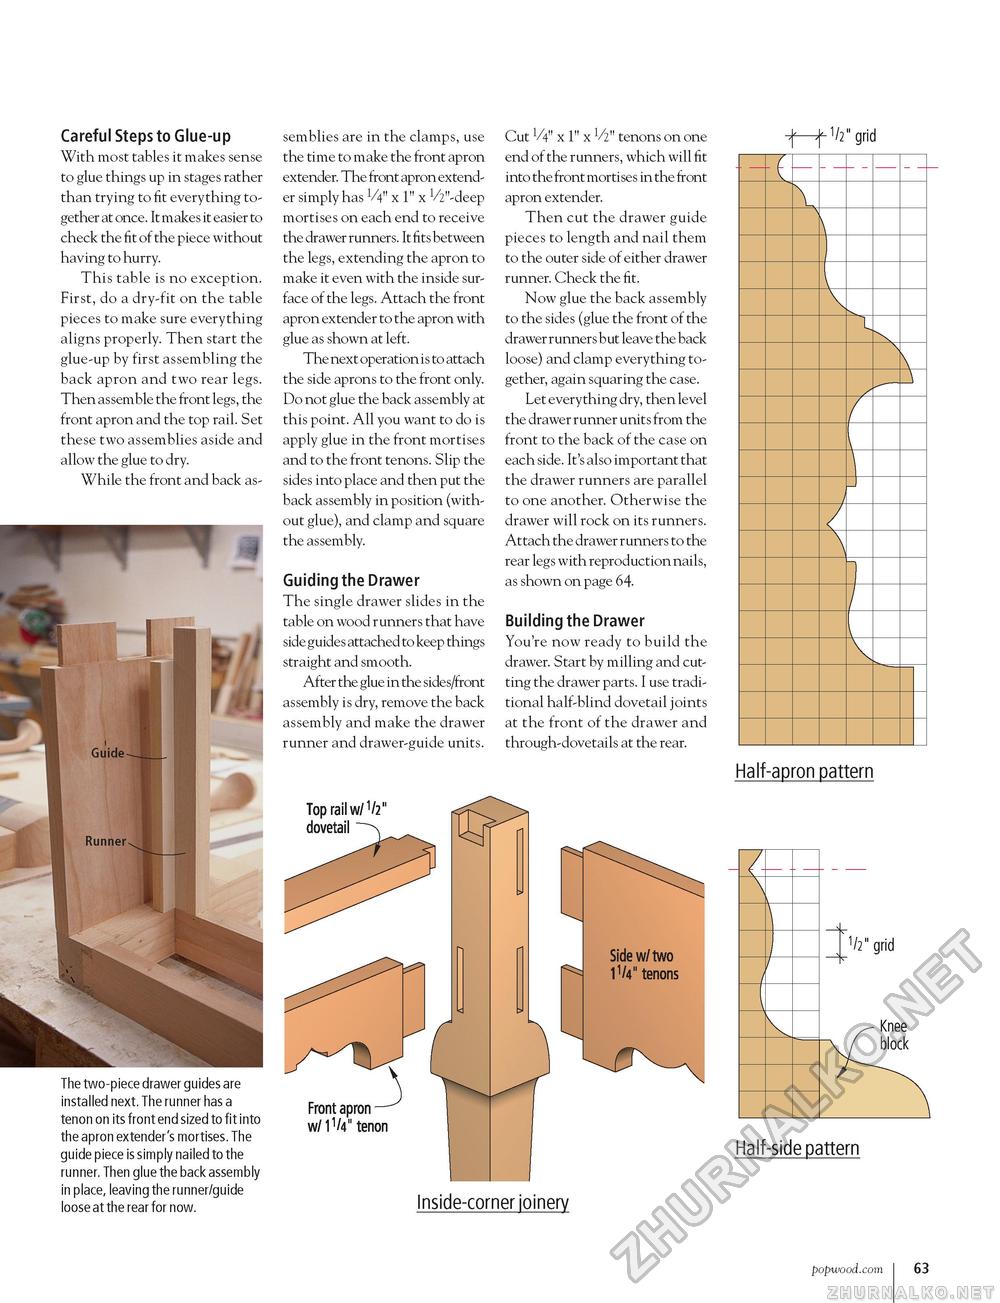
Careful Steps to Glue-up With most tables it makes sense to glue things up in stages rather than trying to fit everything together at once. It makes it easier to check the fit of the piece without having to hurry. This table is no exception. First, do a dry-fit on the table pieces to make sure everything aligns properly. Then start the glue-up by first assembling the back apron and two rear legs. Then assemble the front legs, the front apron and the top rail. Set these two assemblies aside and allow the glue to dry. While the front and back as- The two-piece drawer guides are installed next. The runner has a tenon on its front end sized to fit into the apron extender's mortises. The guide piece is simply nailed to the runner. Then glue the back assembly in place, leaving the runner/guide loose at the rear for now. semblies are in the clamps, use the time to make the front apron extender. The front apron extender simply has V4" x 1" x V2"-deep mortises on each end to receive the drawer runners. It fits between the legs, extending the apron to make it even with the inside surface of the legs. Attach the front apron extender to the apron with glue as shown at left. The next operation is to attach the side aprons to the front only. Do not glue the back assembly at this point. All you want to do is apply glue in the front mortises and to the front tenons. Slip the sides into place and then put the back assembly in position (without glue), and clamp and square the assembly. Guiding the Drawer The single drawer slides in the table on wood runners that have side guides attached to keep things straight and smooth. After the glue in the sides/front assembly is dry, remove the back assembly and make the drawer runner and drawer-guide units. Cut V4" x 1" x Vz" tenons on one end of the runners, which will fit into the front mortises in the front apron extender. Then cut the drawer guide pieces to length and nail them to the outer side of either drawer runner. Check the fit. Now glue the back assembly to the sides (glue the front of the drawer runners but leave the back loose) and clamp everything together, again squaring the case. Let everything dry, then level the drawer runner units from the front to the back of the case on each side. It's also important that the drawer runners are parallel to one another. Otherwise the drawer will rock on its runners. Attach the drawer runners to the rear legs with reproduction nails, as shown on page 64. Building the Drawer You're now ready to build the drawer. Start by milling and cutting the drawer parts. I use traditional half-blind dovetail joints at the front of the drawer and through-dovetails at the rear. grid
Half-apron pattern Half-side pattern Inside-corner joinery popwood.com 63 |


