Popular Woodworking 2004-11 № 144, страница 65
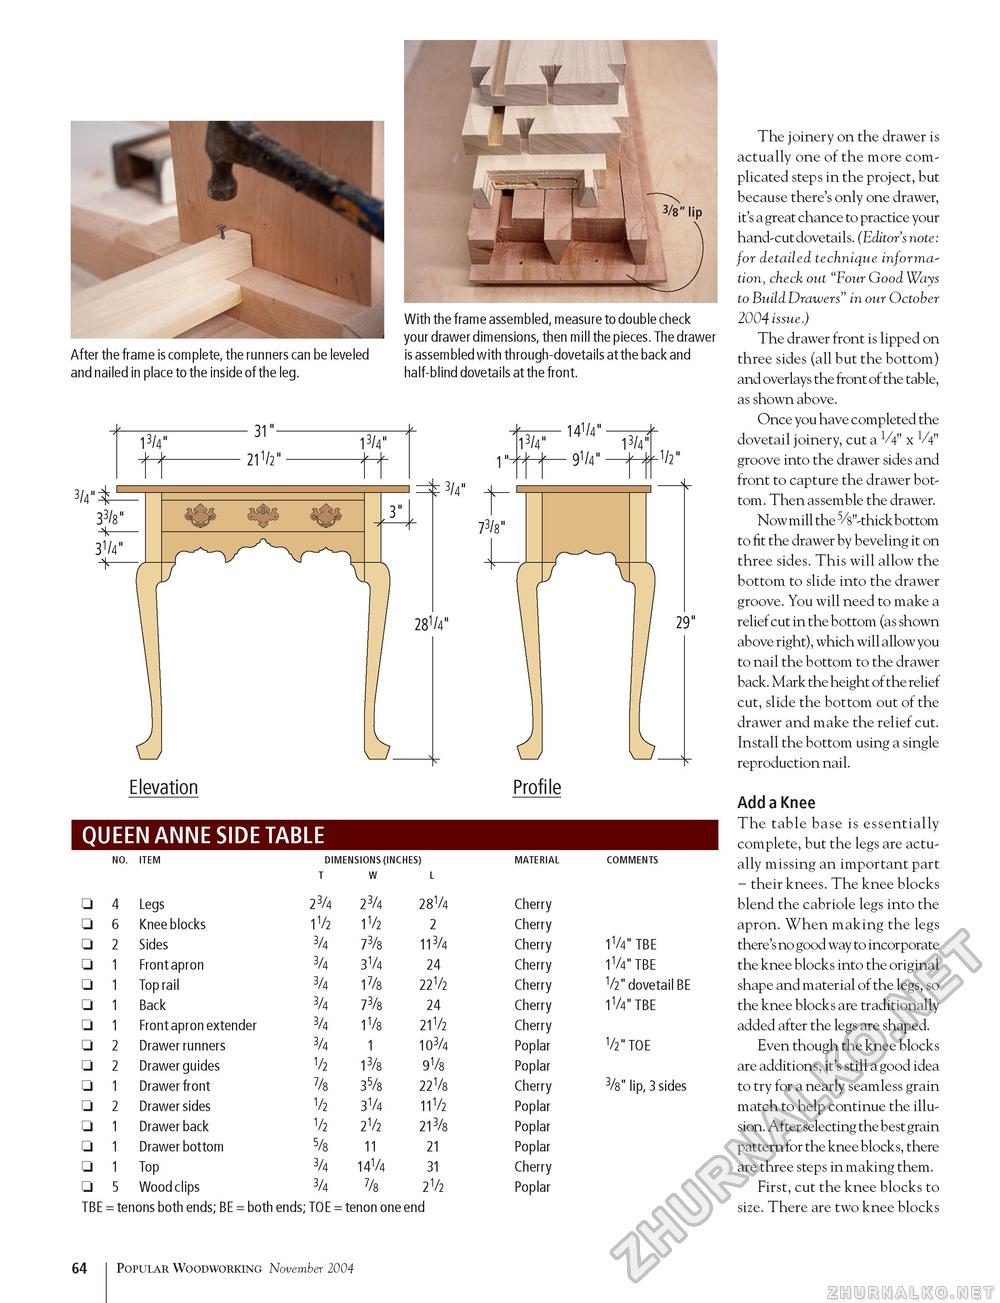
After the frame is complete, the runners can be leveled and nailed in place to the inside of the leg. With the frame assembled, measure to double check your drawer dimensions, then mill the pieces. The drawer is assembled with through-dovetails at the back and half-blind dovetails at the front. 281/4" ±-14l/4»-jf. 13/4" 13/4" ^— 9V4" > Y 1V Elevation Profile QUEEN ANNE SIDE TABLE □ 4 Legs □ 6 Knee blocks □ 2 Sides □ 1 Front apron □ 1 Top rail □ 1 Back □ 1 Front apron extender □ 2 Drawer runners □ 2 Drawer guides □ 1 Drawer front □ 2 Drawer sides □ 1 Drawer back □ 1 Drawer bottom □ 1 Top □ 5 Wood clips TBE = tenons both ends; BE = both ends; TOE = tenon one end
Cherry Cherry Cherry Cherry Cherry Cherry Cherry Poplar Poplar Cherry Poplar Poplar Poplar Cherry Poplar 1V4" TBE 1V4" TBE V2" dovetail BE iW'TBE V2" TOE 3/8" lip, 3 sides NO. ITEM The joinery on the drawer is actually one of the more complicated steps in the project, but because there's only one drawer, it's a great chance to practice your hand-cut dovetails. (Editor's note: for detailed technique information, check out "Four Good Ways to Build Drawers" in our October 2004 issue.) The drawer front is lipped on three sides (all but the bottom) and overlays the front of the table, as shown above. Once you have completed the dovetail joinery, cut a 1/4" x groove into the drawer sides and front to capture the drawer bottom. Then assemble the drawer. Now mill the 5/s"-thick bottom to fit the drawer by beveling it on three sides. This will allow the bottom to slide into the drawer groove. You will need to make a relief cut in the bottom (as shown above right), which will allow you to nail the bottom to the drawer back. Mark the height of the relief cut, slide the bottom out of the drawer and make the relief cut. Install the bottom using a single reproduction nail. Add a Knee The table base is essentially complete, but the legs are actually missing an important part - their knees. The knee blocks blend the cabriole legs into the apron. When making the legs there's no good way to incorporate the knee blocks into the original shape and material of the legs, so the knee blocks are traditionally added after the legs are shaped. Even though the knee blocks are additions, it's still a good idea to try for a nearly seamless grain match to help continue the illusion. After selecting the best grain pattern for the knee blocks, there are three steps in making them. First, cut the knee blocks to size. There are two knee blocks 64 Popular Woodworking November 2004 |
|||||||||||||||||||||||||||||||||||||||||||||||||||


