Popular Woodworking 2004-11 № 144, страница 68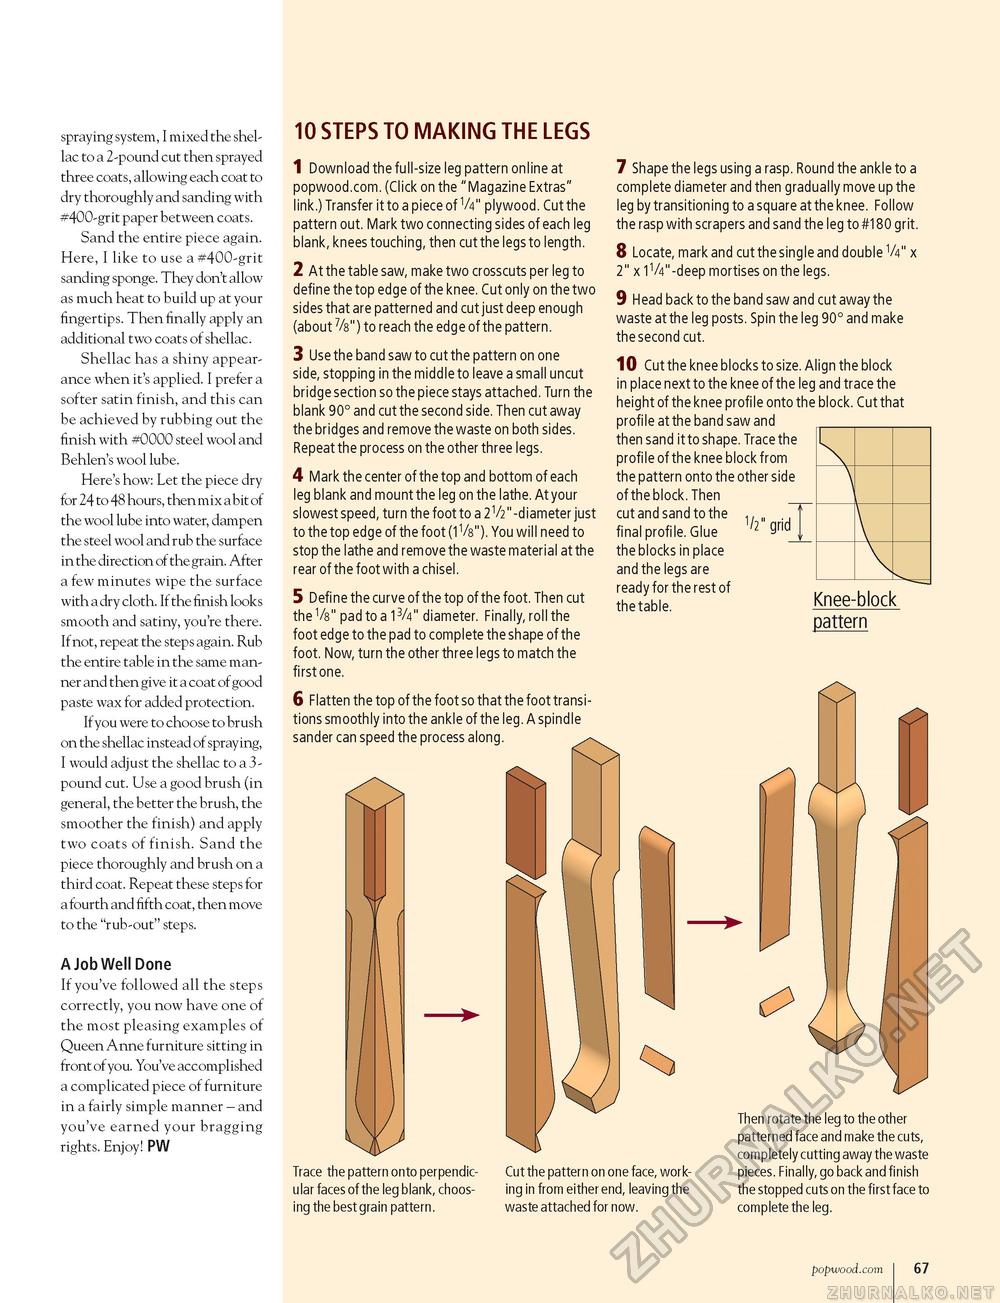
spraying system, I mixed the shellac to a 2-pound cut then sprayed three coats, allowing each coat to dry thoroughly and sanding with #400-grit paper between coats. Sand the entire piece again. Here, I like to use a #400-grit sanding sponge. They don't allow as much heat to build up at your fingertips. Then finally apply an additional two coats of shellac. Shellac has a shiny appearance when it's applied. I prefer a softer satin finish, and this can be achieved by rubbing out the finish with #0000 steel wool and Behlen's wool lube. Here's how: Let the piece dry for 24 to 48 hours, then mix a bit of the wool lube into water, dampen the steel wool and rub the surface in the direction of the grain. After a few minutes wipe the surface with a dry cloth. If the finish looks smooth and satiny, you're there. If not, repeat the steps again. Rub the entire table in the same manner and then give it a coat of good paste wax for added protection. If you were to choose to brush on the shellac instead of spraying, I would adjust the shellac to a 3-pound cut. Use a good brush (in general, the better the brush, the smoother the finish) and apply two coats of finish. Sand the piece thoroughly and brush on a third coat. Repeat these steps for a fourth and fifth coat, then move to the "rub-out" steps. A Job Well Done If you've followed all the steps correctly, you now have one of the most pleasing examples of Queen Anne furniture sitting in front of you. You've accomplished a complicated piece of furniture in a fairly simple manner - and you've earned your bragging rights. Enjoy! PW 10 STEPS TO MAKING THE LEGS 1 Download the full-size leg pattern online at popwood.com. (Click on the "Magazine Extras" link.) Transfer it to a piece of V4" plywood. Cut the pattern out. Mark two connecting sides of each leg blank, knees touching, then cut the legs to length. 2 At the table saw, make two crosscuts per leg to define the top edge of the knee. Cut only on the two sides that are patterned and cut just deep enough (about %") to reach the edge of the pattern. 3 Use the band saw to cut the pattern on one side, stopping in the middle to leave a small uncut bridge section so the piece stays attached. Turn the blank 90° and cut the second side. Then cut away the bridges and remove the waste on both sides. Repeat the process on the other three legs. 4 Mark the center of the top and bottom of each leg blank and mount the leg on the lathe. At your slowest speed, turn the foot to a 2V2" -diameter just to the top edge of the foot (1V8"). You will need to stop the lathe and remove the waste material at the rear of the foot with a chisel. 5 Define the curve of the top of the foot. Then cut the V8" pad to a 13/4" diameter. Finally, roll the foot edge to the pad to complete the shape of the foot. Now, turn the other three legs to match the fi rst one. 6 Flatten the top of the foot so that the foot transitions smoothly into the ankle of the leg. A spindle sander can speed the process along. 7 Shape the legs using a rasp. Round the ankle to a complete diameter and then gradually move up the leg by transitioning to a square at the knee. Follow the rasp with scrapers and sand the leg to #180 grit. 8 Locate, mark and cut the single and double V4" x 2" x 1V4"-deep mortises on the legs. 9 Head back to the band saw and cut away the waste at the leg posts. Spin the leg 90° and make the second cut. 10|Cut the knee blocks to size. Align the block in place next to the knee of the leg and trace the height of the knee profile onto the block. Cut that profile at the band saw and then sand it to shape. Trace the profile of the knee block from the pattern onto the other side of the block. Then cut and sand to the final profile. Glue the blocks in place and the legs are ready for the rest of the table. V2" grid Knee-block pattern Trace the pattern onto perpendicular faces of the leg blank, choosing the best grain pattern. Cut the pattern on one face, working in from either end, leaving the waste attached for now. Then rotate the leg to the other patterned face and make the cuts, completely cutting away the waste pieces. Finally, go back and finish the stopped cuts on the first face to complete the leg. popwood.com 67 |


