Popular Woodworking 2005-02 № 146, страница 51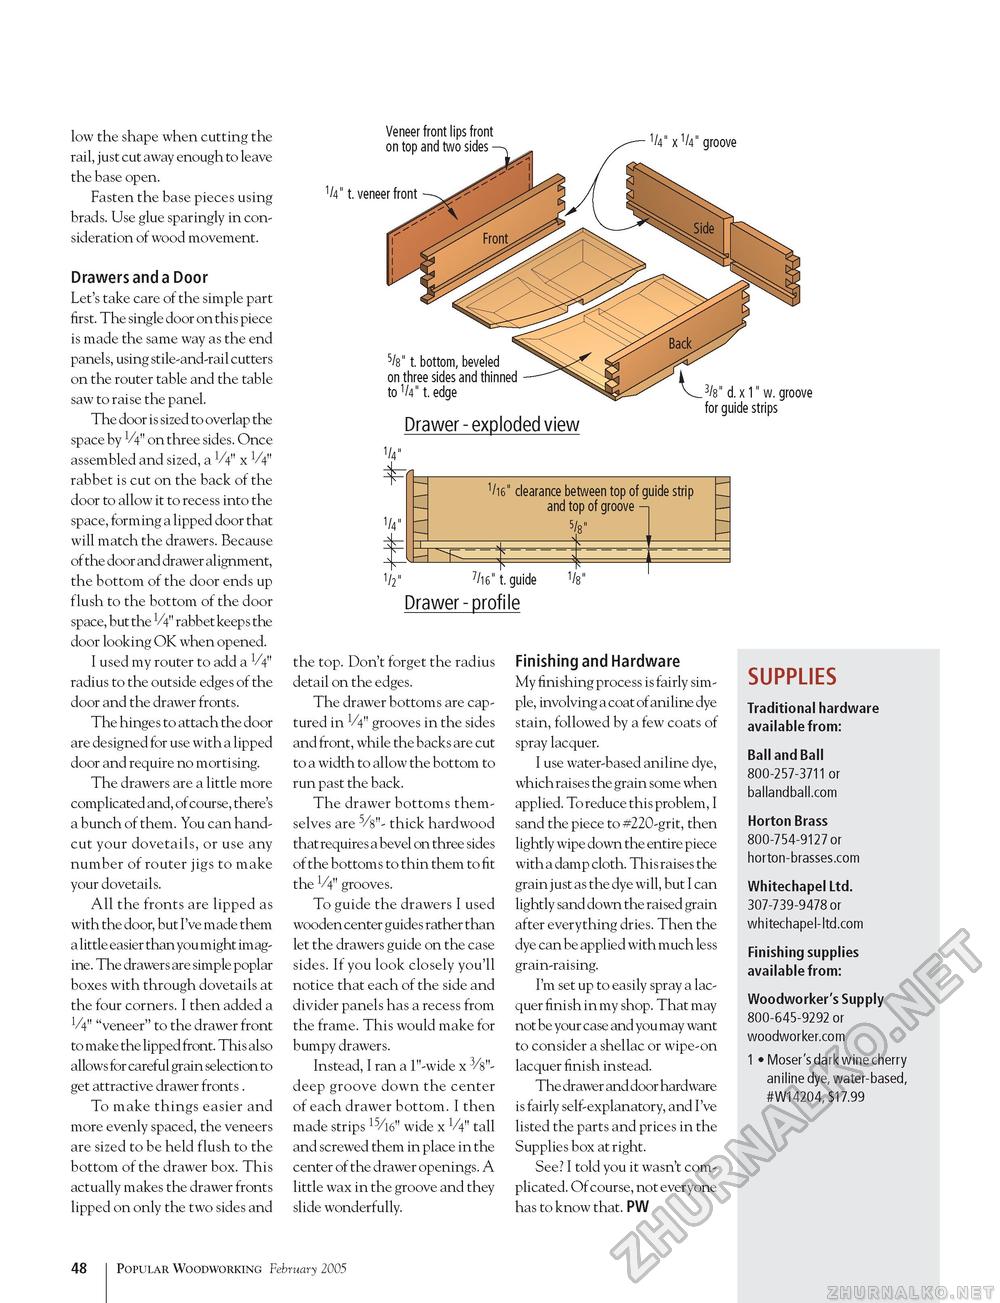
low the shape when cutting the rail, just cut away enough to leave the base open. Fasten the base pieces using brads. Use glue sparingly in consideration of wood movement. Drawers and a Door Let's take care of the simple part first. The single door on this piece is made the same way as the end panels, using stile-and-rail cutters on the router table and the table saw to raise the panel. The door is sized to overlap the space by V4" on three sides. Once assembled and sized, a 1/4" x V4" rabbet is cut on the back of the door to allow it to recess into the space, forming a lipped door that will match the drawers. Because of the door and drawer alignment, the bottom of the door ends up flush to the bottom of the door space, but the V4" rabbet keeps the door looking OK when opened. I used my router to add a 1/4" radius to the outside edges of the door and the drawer fronts. The hinges to attach the door are designed for use with a lipped door and require no mortising. The drawers are a little more complicated and, of course, there's a bunch of them. You can hand-cut your dovetails, or use any number of router jigs to make your dovetails. All the fronts are lipped as with the door, but I've made them a little easier than you might imagine. The drawers are simple poplar boxes with through dovetails at the four corners. I then added a V4" "veneer" to the drawer front to make the lipped front. This also allows for careful grain selection to get attractive drawer fronts . To make things easier and more evenly spaced, the veneers are sized to be held flush to the bottom of the drawer box. This actually makes the drawer fronts lipped on only the two sides and V
V 7/i6"t.guide Vs" Drawer - profile the top. Don't forget the radius detail on the edges. The drawer bottoms are captured in V4" grooves in the sides and front, while the backs are cut to a width to allow the bottom to run past the back. The drawer bottoms themselves are - thick hardwood that requires a bevel on three sides of the bottoms to thin them to fit the V4" grooves. To guide the drawers I used wooden center guides rather than let the drawers guide on the case sides. If you look closely you'll notice that each of the side and divider panels has a recess from the frame. This would make for bumpy drawers. Instead, I ran a 1"-wide x deep groove down the center of each drawer bottom. I then made strips wide x V4" tall and screwed them in place in the center of the drawer openings. A little wax in the groove and they slide wonderfully. Finishing and Hardware My finishing process is fairly simple, involving a coat of aniline dye stain, followed by a few coats of spray lacquer. I use water-based aniline dye, which raises the grain some when applied. To reduce this problem, I sand the piece to #220-grit, then lightly wipe down the entire piece with a damp cloth. This raises the grain just as the dye will, but I can lightly sand down the raised grain after everything dries. Then the dye can be applied with much less grain-raising. I'm set up to easily spray a lacquer finish in my shop. That may not be your case and you may want to consider a shellac or wipe-on lacquer finish instead. The drawer and door hardware is fairly self-explanatory, and I've listed the parts and prices in the Supplies box at right. See? I told you it wasn't complicated. Of course, not everyone has to know that. PW SUPPLIES Traditional hardware available from: Ball and Ball 800-257-3711 or ballandball.com Horton Brass 800-754-9127 or horton-brasses.com Whitechapel Ltd. 307-739-9478 or whitechapel-ltd.com Finishing supplies available from: Woodworker's Supply 800-645-9292 or woodworker.com 1 • Moser's dark wine cherry aniline dye, water-based, #W14204, $17.99 48 Popular Woodworking February 2005 |
||||||||


