Popular Woodworking 2005-02 № 146, страница 81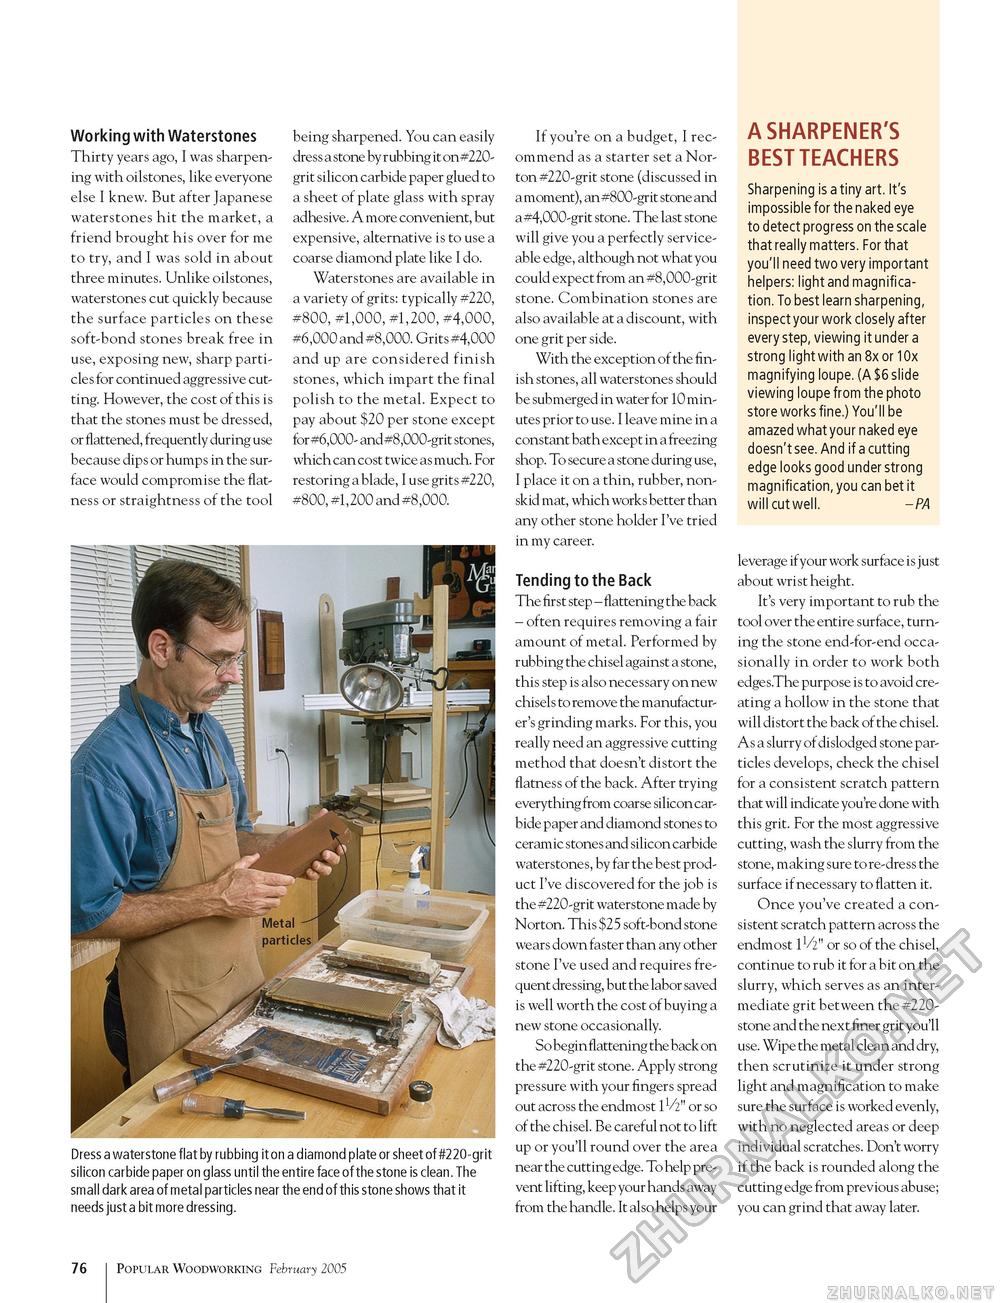
Working with Waterstones Thirty years ago, I was sharpening with oilstones, like everyone else I knew. But after Japanese waterstones hit the market, a friend brought his over for me to try, and I was sold in about three minutes. Unlike oilstones, waterstones cut quickly because the surface particles on these soft-bond stones break free in use, exposing new, sharp particles for continued aggressive cutting. However, the cost of this is that the stones must be dressed, or flattened, frequently during use because dips or humps in the surface would compromise the flatness or straightness of the tool being sharpened. You can easily dress a stone by rubbing it on#220-grit silicon carbide paper glued to a sheet of plate glass with spray adhesive. A more convenient, but expensive, alternative is to use a coarse diamond plate like I do. Waterstones are available in a variety of grits: typically #220, #800, #1,000, #1,200, #4,000, #6,000 and #8,000. Grits #4,000 and up are considered finish stones, which impart the final polish to the metal. Expect to pay about $20 per stone except for #6,000- and #8,000-grit stones, which can cost twice as much. For restoring a blade, I use grits #220, #800, #1,200 and #8,000. If you're on a budget, I recommend as a starter set a Norton #220-grit stone (discussed in a moment), an #800-grit stone and a #4,000-grit stone. The last stone will give you a perfectly serviceable edge, although not what you could expect from an #8,000-grit stone. Combination stones are also available at a discount, with one grit per side. With the exception of the finish stones, all waterstones should be submerged in water for 10 minutes prior to use. I leave mine in a constant bath except in a freezing shop. To secure a stone during use, I place it on a thin, rubber, non-skid mat, which works better than any other stone holder I've tried in my career. Tending to the Back The first step - flattening the back - often requires removing a fair amount of metal. Performed by rubbing the chisel against a stone, this step is also necessary on new chisels to remove the manufacturer's grinding marks. For this, you really need an aggressive cutting method that doesn't distort the flatness of the back. After trying everything from coarse silicon carbide paper and diamond stones to ceramic stones and silicon carbide waterstones, by far the best product I've discovered for the job is the #220-grit waterstone made by Norton. This $25 soft-bond stone wears down faster than any other stone I've used and requires frequent dressing, but the labor saved is well worth the cost of buying a new stone occasionally. So begin flattening the back on the #220-grit stone. Apply strong pressure with your fingers spread out across the endmost 11/2" or so of the chisel. Be careful not to lift up or you'll round over the area near the cutting edge. To help prevent lifting, keep your hands away from the handle. It also helps your A SHARPENER'S BEST TEACHERS Sharpening is a tiny art. It's impossible for the naked eye to detect progress on the scale that really matters. For that you'll need two very important helpers: light and magnification. To best learn sharpening, inspect your work closely after every step, viewing it under a strong light with an 8x or 10x magnifying loupe. (A $6 slide viewing loupe from the photo store works fine.) You'll be amazed what your naked eye doesn't see. And if a cutting edge looks good under strong magnification, you can bet it will cut well. - PA leverage if your work surface is just about wrist height. It's very important to rub the tool over the entire surface, turning the stone end-for-end occasionally in order to work both edges.The purpose is to avoid creating a hollow in the stone that will distort the back of the chisel. As a slurry of dislodged stone particles develops, check the chisel for a consistent scratch pattern that will indicate you're done with this grit. For the most aggressive cutting, wash the slurry from the stone, making sure to re-dress the surface if necessary to flatten it. Once you've created a consistent scratch pattern across the endmost 11/2" or so of the chisel, continue to rub it for a bit on the slurry, which serves as an intermediate grit between the #220-stone and the next finer grit you'll use. Wipe the metal clean and dry, then scrutinize it under strong light and magnification to make sure the surface is worked evenly, with no neglected areas or deep individual scratches. Don't worry if the back is rounded along the cutting edge from previous abuse; you can grind that away later. Dress a waterstone flat by rubbing it on a diamond plate or sheet of #220-grit silicon carbide paper on glass until the entire face of the stone is clean. The small dark area of metal particles near the end of this stone shows that it needs just a bit more dressing. 76 Popular Woodworking February 2005 |


