Popular Woodworking 2005-06 № 148, страница 31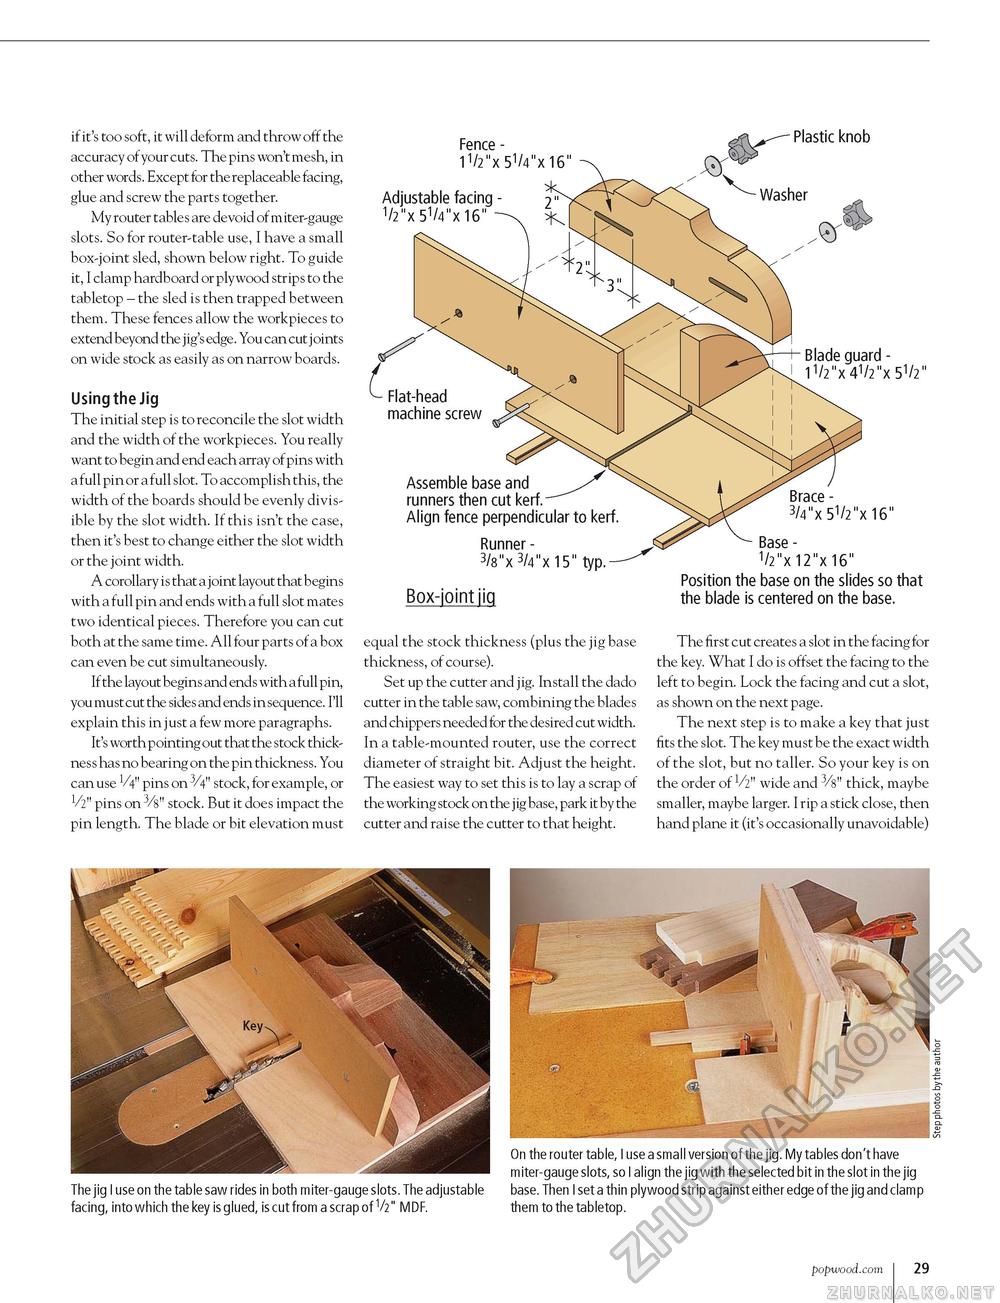
Fence - 11/2"x51/4"x16" Adjustable facing - 7" 1/2"x51/4"x16" ^ Plastic knob ( ^ Flat-head machine screw Assemble base and runners then cut kerf. Align fence perpendicular to kerf. Runner - 3/8"x3/4"x15" typ Blade guard - 11/2"x41/2"x51/2" Brace - 3/4"x51/2"x16" Base - 1/2"x12"x16" if it's too soft, it will deform and throw off the accuracy of your cuts. The pins won't mesh, in other words. Except for the replaceable facing, glue and screw the parts together. My router table s are devoid of m iter-gauge slots. So for router-table use, I have a small box-joint sled, shown below right. To guide it, I clamp hardboard or plywood strips to the tabletop - the sled is then trapped between them. These fences allow the workpieces to extend beyond the j ig's edge. You can cut j oints on wide stock as easily as on narrow boards. Using the Jig The initial step is to reconcile the slot width and the width of the workpieces. You really want to begin and end each array of pins with a full pin or a full slot. To accomplish this, the width of the boards should be evenly divisible by the slot width. If this isn't the case, then it's best to change either the slot width or the joint width. A corollary is that a joint layout that begins with a full pin and ends with a full slot mates two identical pieces. Therefore you can cut both at the same time. All four parts of a box can even be cut simultaneously. If the layout begins and ends with a full pin, you must cut the sides and ends in sequence. I'll explain this in just a few more paragraphs. It's worth pointing out that the stock thickness has no bearing on the pin thickness. You can use 1/4" pins on 3/4" stock, for example, or V2" pins on 3/8" stock. But it does impact the pin length. The blade or bit elevation must Box-joint jig equal the stock thickness (plus the jig base thickness, of course). Set up the cutter and jig. Install the dado cutter in the table saw, combining the blades and chippers needed for the desired cut width. In a table-mounted router, use the correct diameter of straight bit. Adjust the height. The easiest way to set this is to lay a scrap of the working stock on the j ig base, park it by the cutter and raise the cutter to that height. Position the base on the slides so that the blade is centered on the base. The first cut creates a slot in the facing for the key. What I do is offset the facing to the left to begin. Lock the facing and cut a slot, as shown on the next page. The next step is to make a key that just fits the slot. The key must be the exact width of the slot, but no taller. So your key is on the order of V2" wide and 3/8" thick, maybe smaller, maybe larger. I rip a stick close, then hand plane it (it's occasionally unavoidable) ■___- '* The jig I use on the table saw rides in both miter-gauge slots. The adjustable facing, into which the key is glued, is cut from a scrap of V2" MDF. On the router table, I use a small version of the jig. My tables don't have miter-gauge slots, so I align the jig with the selected bit in the slot in the jig base. Then I set a thin plywood strip against either edge of the jig and clamp them to the tabletop. popwood.com 29 |


