Popular Woodworking 2005-06 № 148, страница 37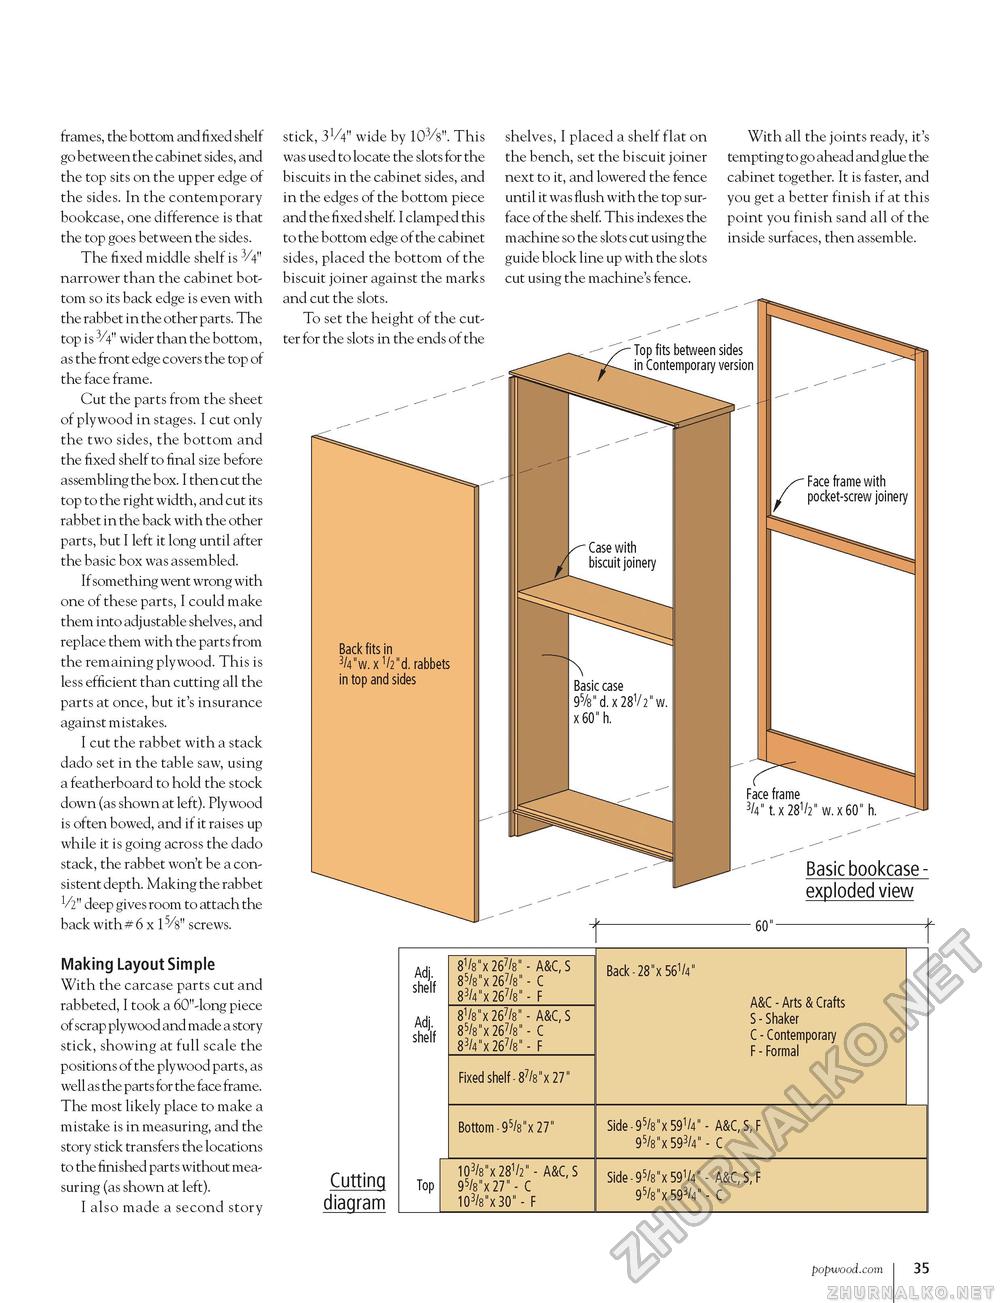
frames, the bottom and fixed shelf go between the cabinet sides, and the top sits on the upper edge of the sides. In the contemporary bookcase, one difference is that the top goes between the sides. The fixed middle shelf is 3/4" narrower than the cabinet bottom so its back edge is even with the rabbet in the other parts. The top is 3/4" wider than the bottom, as the front edge covers the top of the face frame. Cut the parts from the sheet of plywood in stages. I cut only the two sides, the bottom and the fixed shelf to final size before assembling the box. I then cut the top to the right width, and cut its rabbet in the back with the other parts, but I left it long until after the basic box was assembled. If something went wrong with one of these parts, I could make them into adjustable shelves, and replace them with the parts from the remaining plywood. This is less efficient than cutting all the parts at once, but it's insurance against mistakes. I cut the rabbet with a stack dado set in the table saw, using a featherboard to hold the stock down (as shown at left). Plywood is often bowed, and if it raises up while it is going across the dado stack, the rabbet won't be a consistent depth. Making the rabbet V2" deep gives room to attach the back with # 6 x 15/8" screws. Making Layout Simple With the carcase parts cut and rabbeted, I took a 60"-long piece of scrap plywood and made a story stick, showing at full scale the positions of the plywood parts, as well as the parts for the face frame. The most likely place to make a mistake is in measuring, and the story stick transfers the locations to the finished parts without measuring (as shown at left). I also made a second story stick, 31/4" wide by 103/s". This was used to locate the slots for the biscuits in the cabinet sides, and in the edges of the bottom piece and the fixed shelf. I clamped this to the bottom edge of the cabinet sides, placed the bottom of the biscuit joiner against the marks and cut the slots. To set the height of the cutter for the slots in the ends of the Cutting diagram shelves, I placed a shelf flat on the bench, set the biscuit joiner next to it, and lowered the fence until it was flush with the top surface of the shelf. This indexes the machine so the slots cut using the guide block line up with the slots cut using the machine's fence. With all the joints ready, it's tempting to go ahead and glue the cabinet together. It is faster, and you get a better finish if at this point you finish sand all of the inside surfaces, then assemble. Adj. shelf Adj. shelf 81/8"x 267/8" - A&C,S 85/8"x 267/8"- C 83/4"x 267/8"- F 81/8"x 267/8" - A&C, 85/8"x 267/8"- C 83/4"x 267/8"- F Fixed shelf-87/8"x27" Bottom -95/8"x27" Back-28"x561/4M A&C - Arts & Crafts S - Shaker C - Contemporary F - Formal Side-95/8"x591/4M- A&C,S,F 95/8"x 593/4" - C 103/8mx281/2" - A&C, S Top 95/8"x27"-C 103/8"x30" - F Side-95/8"x591/4M- A&C,S,F 95/8"x 593/4" - C popwood.com 35 |


