Popular Woodworking 2005-06 № 148, страница 39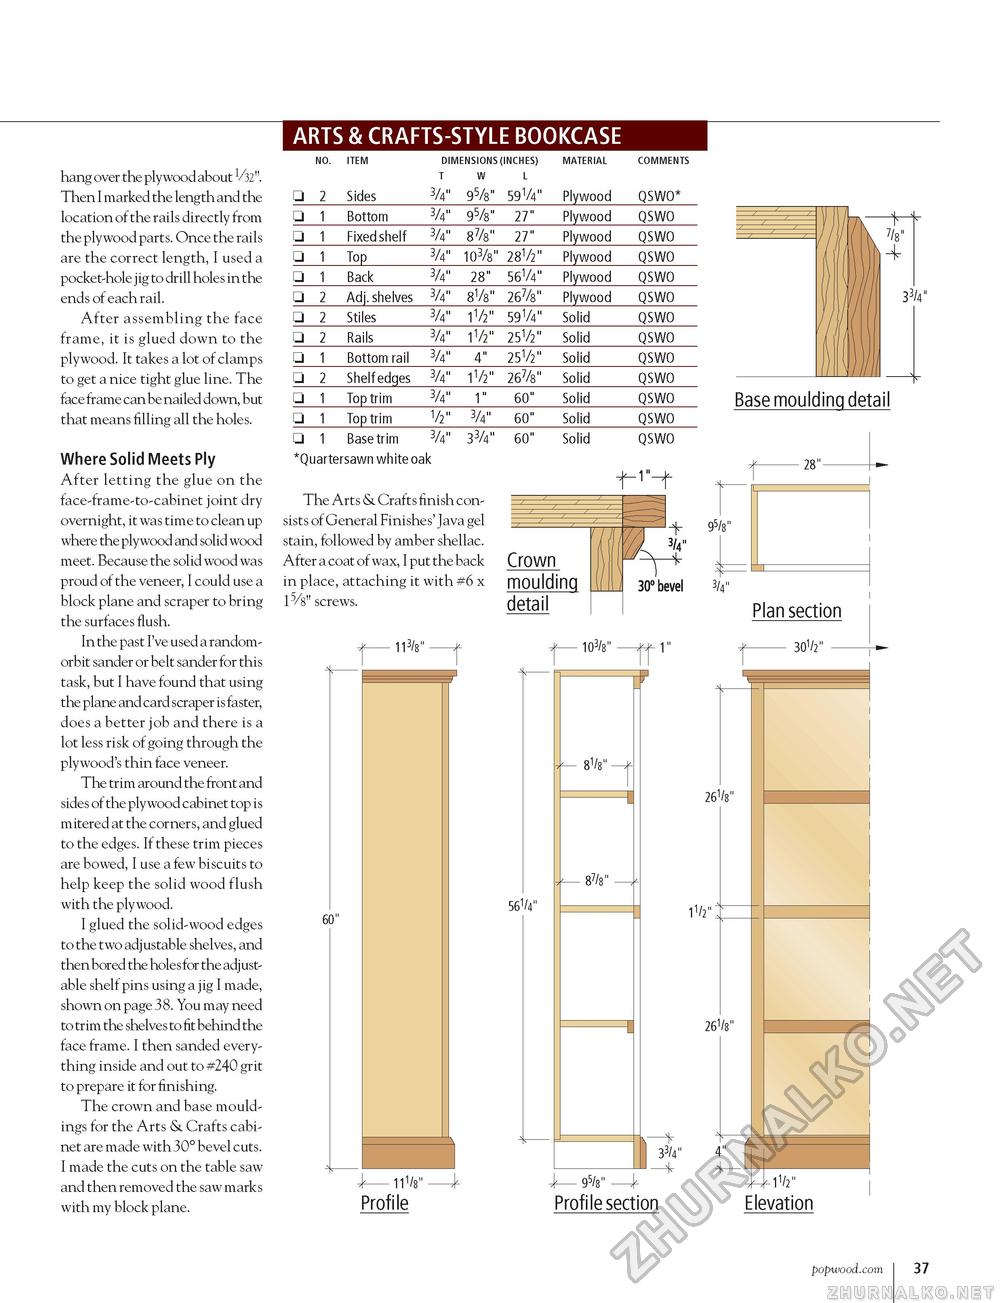
ARTS & CRAFTS-STYLE BOOKCASE hang over the plywood about V32". Then I marked the length and the location of the rails directly from the plywood parts. Once the rails are the correct length, I used a pocket-hole jig to drill holes in the ends of each rail. After assembling the face frame, it is glued down to the plywood. It takes a lot of clamps to get a nice tight glue line. The face frame can be nailed down, but that means filling all the holes. Where Solid Meets Ply After letting the glue on the face-frame-to-cabinet joint dry overnight, it was time to clean up where the plywood and solid wood meet. Because the solid wood was proud of the veneer, I could use a block plane and scraper to bring the surfaces flush. In the past I've used a random-orbit sander or belt sander for this task, but I have found that using the plane and card scraper is faster, does a better job and there is a lot less risk of going through the plywood's thin face veneer. The trim around the front and sides of the plywood cabinet top is mitered at the corners, and glued to the edges. If these trim pieces are bowed, I use a few biscuits to help keep the solid wood flush with the plywood. I glued the solid-wood edges to the two adjustable shelves, and then bored the holes for the adjustable shelf pins using a jig I made, shown on page 3 8. You may need to trim the shelves to fit behind the face frame. I then sanded everything inside and out to #240 grit to prepare it for finishing. The crown and base mouldings for the Arts & Crafts cabinet are made with 30° bevel cuts. I made the cuts on the table saw and then removed the saw marks with my block plane.
□ 1 Base trim 3/4" 33/4" 60" *Quartersawn white oak Base moulding detail □ 1 Base trim 3/4" 33/4" 60" *Quartersawn white oak The Arts & Crafts finish consists of General Finishes' Java gel stain, followed by amber shellac. After a coat of wax, I put the back in place, attaching it with #6 x l5/8" screws. -111/8"-^ Profile 95/s Profile section 1V2" Elevation popwood.com 37 |
||||||||||||||||||||||||||||||||||||||||||||||||||||||||||||||||||||||||||||||||||||||||||||||||||||||||


