Popular Woodworking 2005-06 № 148, страница 41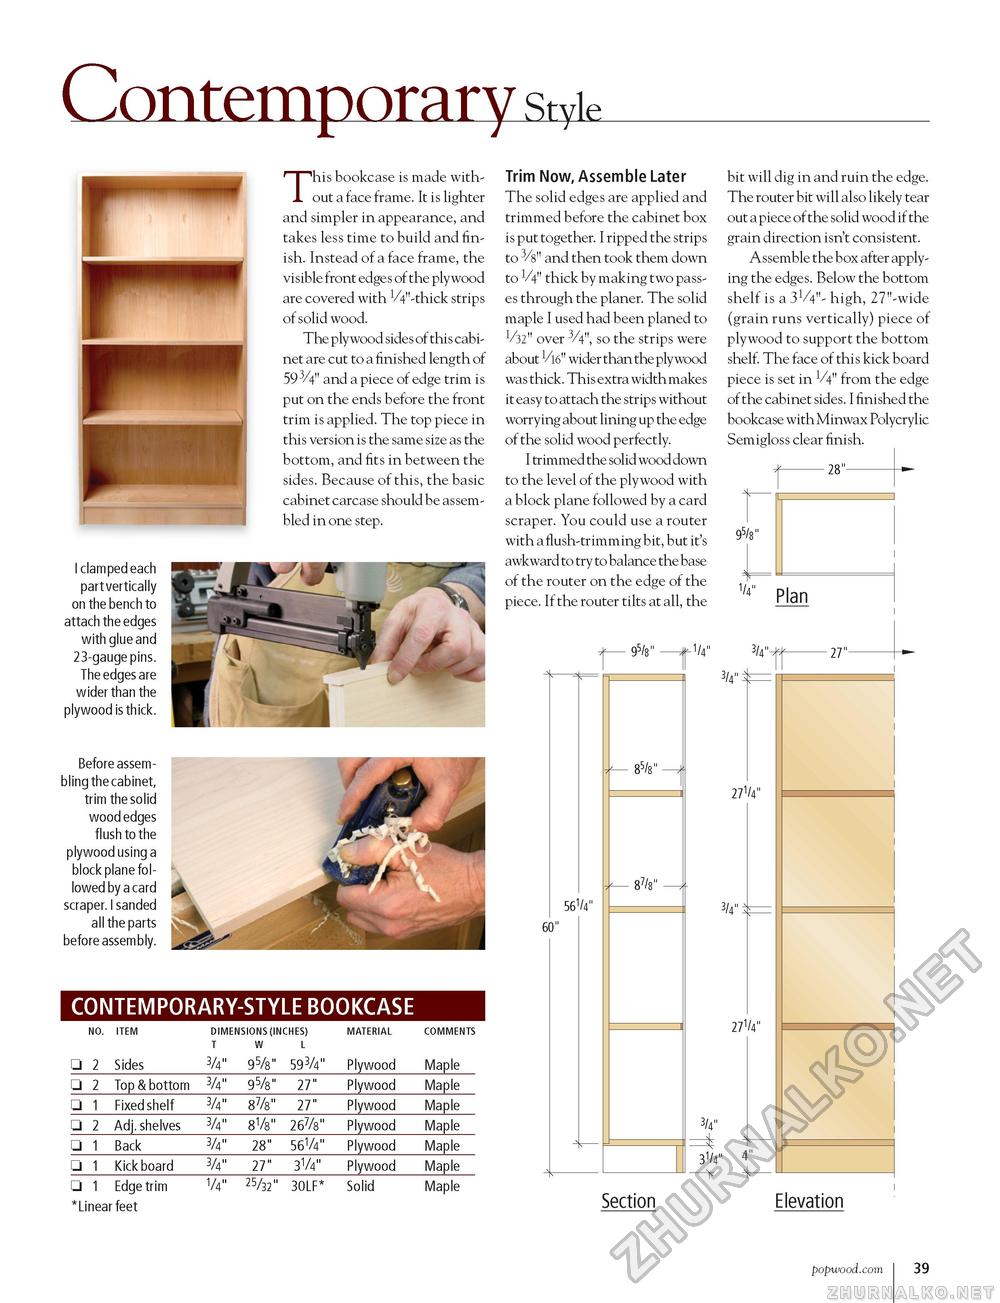
I clamped each part vertically on the bench to attach the edges with glue and 23-gauge pins. The edges are wider than the plywood is thick. Before assembling the cabinet, trim the solid wood edges flush to the plywood using a block plane followed by a card scraper. I sanded all the parts before assembly. This bookcase is made without a face frame. It is lighter and simpler in appearance, and takes less time to build and finish. Instead of a face frame, the visible front edges of the plywood are covered with VV-thick strips of solid wood. The plywood sides of this cabinet are cut to a finished length of 593/4" and a piece of edge trim is put on the ends before the front trim is applied. The top piece in this version is the same size as the bottom, and fits in between the sides. Because of this, the basic cabinet carcase should be assembled in one step. CONTEMPORARY-STYLE BOOKCASE
Trim Now, Assemble Later The solid edges are applied and trimmed before the cabinet box is put together. I ripped the strips to 3/8" and then took them down to 14" thick by making two passes through the planer. The solid maple I used had been planed to 1/32" over 3/4", so the strips were about Vl6" wider than the plywood was thick. This extra width makes it easy to attach the strips without worrying about lining up the edge of the solid wood perfectly. I trimmed the solid wood down to the level of the plywood with a block plane followed by a card scraper. You could use a router with a flush-trimming bit, but it's awkward to try to balance the base of the router on the edge of the piece. If the router tilts at all, the 561/4m 60" bit will dig in and ruin the edge. The router bit will also likely tear out a piece of the solid wood if the grain direction isn't consistent. Assemble the box after applying the edges. Below the bottom shelf is a 31/4"- high, 27"-wide (grain runs vertically) piece of plywood to support the bottom shelf. The face of this kick board piece is set in V4" from the edge of the cabinet sides. I finished the bookcase with Minwax Polycrylic Semigloss clear finish. 28" V4" Plan -V4" 3/4" 3/4"^ 27V4" 3/4" 27V4" 3/4" 3V4" 27" Section Elevation popwood.com 39 |
||||||||||||||||||||||||||||||||||||||||||||||||||||||||||||||||


