Popular Woodworking 2005-06 № 148, страница 70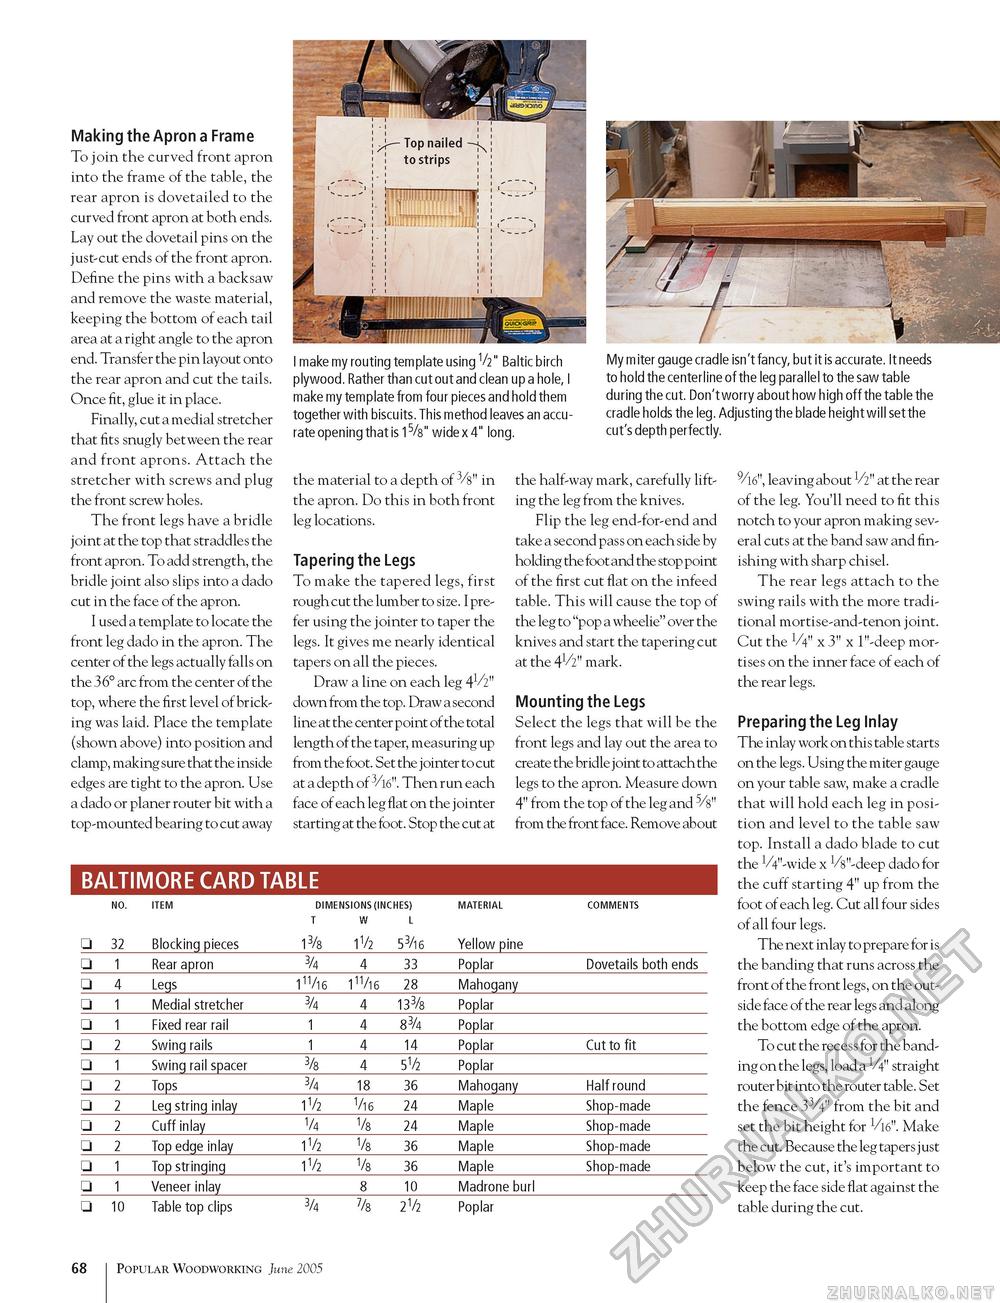
Making the Apron a Frame To join the curved front apron into the frame of the table, the rear apron is dovetailed to the curved front apron at both ends. Lay out the dovetail pins on the just-cut ends of the front apron. Define the pins with a backsaw and remove the waste material, keeping the bottom of each tail area at a right angle to the apron end. Transfer the pin layout onto the rear apron and cut the tails. Once fit, glue it in place. Finally, cut a medial stretcher that fits snugly between the rear and front aprons. Attach the stretcher with screws and plug the front screw holes. The front legs have a bridle joint at the top that straddles the front apron. To add strength, the bridle joint also slips into a dado cut in the face of the apron. I used a template to locate the front leg dado in the apron. The center of the legs actually falls on the 3 6° arc from the center of the top, where the first level of bricking was laid. Place the template (shown above) into position and clamp, making sure that the inside edges are tight to the apron. Use a dado or planer router bit with a top-mounted bearing to cut away I! !p iipm mm mlfflra I make my routing template using 1k" Baltic birch plywood. Rather than cut out and clean up a hole, I make my template from four pieces and hold them together with biscuits. This method leaves an accurate opening that is 15/s" wide x 4" long. My miter gauge cradle isn't fancy, but it is accurate. It needs to hold the centerline of the leg parallel to the saw table during the cut. Don't worry about how high off the table the cradle holds the leg. Adjusting the blade height will set the cut's depth perfectly. the material to a depth of 3/s" in the apron. Do this in both front leg locations. Tapering the Legs To make the tapered legs, first rough cut the lumber to size. I prefer using the jointer to taper the legs. It gives me nearly identical tapers on all the pieces. Draw a line on each leg 41/2" down from the top. Draw a second line at the center point of the total length of the taper, measuring up from the foot. Set the jointer to cut at a depth of 3/16". Then run each face of each leg flat on the jointer starting at the foot. Stop the cut at the half-way mark, carefully lifting the leg from the knives. Flip the leg end-for-end and take a second pass on each side by holding the foot and the stop point of the first cut flat on the infeed table. This will cause the top of the leg to "pop a wheelie" over the knives and start the tapering cut at the 41/2" mark. Mounting the Legs Select the legs that will be the front legs and lay out the area to create the bridle joint to attach the legs to the apron. Measure down 4" from the top of the leg and 5/s" from the front face. Remove about BALTIMORE CARD TABLE
9/16", leaving about V2" at the rear of the leg. You'll need to fit this notch to your apron making several cuts at the band saw and finishing with sharp chisel. The rear legs attach to the swing rails with the more traditional mortise-and-tenon joint. Cut the V4" x 3" x 1"-deep mortises on the inner face of each of the rear legs. Preparing the Leg Inlay The inlay work on this table starts on the legs. Using the miter gauge on your table saw, make a cradle that will hold each leg in position and level to the table saw top. Install a dado blade to cut the VV-wide x VV-deep dado for the cuff starting 4" up from the foot of each leg. Cut all four sides of all four legs. The next inlay to prepare for is the banding that runs across the front of the front legs, on the outside face of the rear legs and along the bottom edge of the apron. To cut the recess for the banding on the legs, load a V4" straight router bit into the router table. Set the fence 33/4" from the bit and set the bit height for Vi6". Make the cut. Because the leg tapers just below the cut, it's important to keep the face side flat against the table during the cut. 68 Popular Woodworking June 2005 |
||||||||||||||||||||||||||||||||||||||||||||||||||||||||||||||||||||||||||||||||||||||||||||||||||||||||||||||||||||||||


