Popular Woodworking 2005-06 № 148, страница 72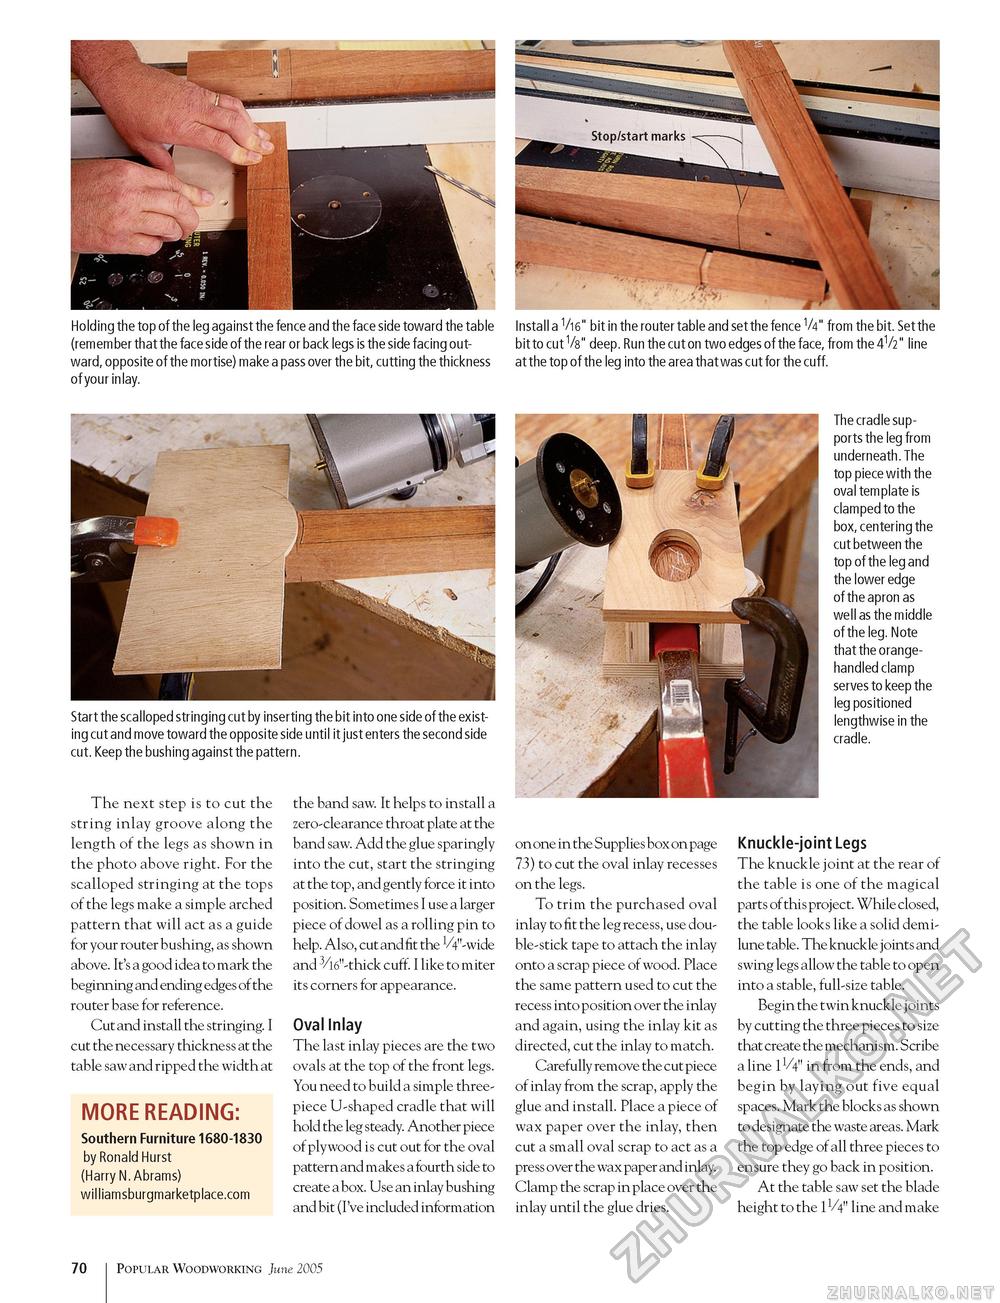
Holding the top of the leg against the fence and the face side toward the table (remember that the face side of the rear or back legs is the side facing outward, opposite of the mortise) make a pass over the bit, cutting the thickness of your inlay. Install a V16" bit in the router table and set the fence V4" from the bit. Set the bit to cut V8" deep. Run the cut on two edges of the face, from the 4V2" line at the top of the leg into the area that was cut for the cuff. Start the scalloped stringing cut by inserting the bit into one side of the existing cut and move toward the opposite side until it just enters the second side cut. Keep the bushing against the pattern. The next step is to cut the string inlay groove along the length of the legs as shown in the photo above right. For the scalloped stringing at the tops of the legs make a simple arched pattern that will act as a guide for your router bushing, as shown above. It's a good idea to mark the beginning and ending edges of the router base for reference. Cut and install the stringing. I cut the necessary thickness at the table saw and ripped the width at MORE READING: Southern Furniture 1680-1830 by Ronald Hurst (Harry N. Abrams) williamsburgmarketplace.com the band saw. It helps to install a zero-clearance throat plate at the band saw. Add the glue sparingly into the cut, start the stringing at the top, and gently force it into position. Sometimes I use a larger piece of dowel as a rolling pin to help. Also, cut and fit the VV'-wide and 3/16"-thick cuff. I like to miter its corners for appearance. Oval Inlay The last inlay pieces are the two ovals at the top of the front legs. You need to build a simple three-piece U-shaped cradle that will hold the leg steady. Another piece of plywood is cut out for the oval pattern and makes a fourth side to create a box. Use an inlay bushing and bit (I've included information The cradle supports the leg from underneath. The top piece with the oval template is clamped to the box, centering the cut between the top of the leg and the lower edge of the apron as well as the middle of the leg. Note that the orange-handled clamp serves to keep the leg positioned lengthwise in the cradle. on one in the Supplies box on page 73) to cut the oval inlay recesses on the legs. To trim the purchased oval inlay to fit the leg recess, use double-stick tape to attach the inlay onto a scrap piece of wood. Place the same pattern used to cut the recess into position over the inlay and again, using the inlay kit as directed, cut the inlay to match. Carefully remove the cut piece of inlay from the scrap, apply the glue and install. Place a piece of wax paper over the inlay, then cut a small oval scrap to act as a press over the wax paper and inlay. Clamp the scrap in place over the inlay until the glue dries. Knuckle-joint Legs The knuckle joint at the rear of the table is one of the magical parts of this project. While closed, the table looks like a solid demilune table. The knuckle joints and swing legs allow the table to open into a stable, full-size table. Begin the twin knuckle joints by cutting the three pieces to size that create the mechanism. Scribe a line 1V4" in from the ends, and begin by laying out five equal spaces. Mark the blocks as shown to designate the waste areas. Mark the top edge of all three pieces to ensure they go back in position. At the table saw set the blade height to the 1V4" line and make 70 Popular Woodworking June 2005 |


